What Type of Paint to Use over Stained Wood for a Smooth Finish
Painting over stained wood sounds easy at first. Grab a brush, open a can of paint, and transform that old dark cabinet or trim into something fresh and modern, right? Not exactly. Stained wood has a reputation for fighting back. The moment you skip prep work, you start seeing ugly yellow stains bleeding through white paint, peeling corners, bubbling finishes, and surfaces that scratch way too easily. That’s why understanding the right paint, primer, and preparation process matters more than most homeowners realize.
Recent painting industry guides and contractor discussions continue to emphasize that shellac-based or oil-based stain-blocking primers remain the most reliable way to prevent tannin bleed-through on stained wood surfaces, especially on oak, cedar, pine, and mahogany.
Before you spend hours repainting cabinets, furniture, doors, or trim, you need a strategy that works long term. Think of stained wood like a slippery ice rink. Paint cannot properly grip a glossy sealed finish unless you create texture and build a barrier layer. That barrier is usually primer, and choosing the wrong one is where most DIY projects go sideways. The good news? Once you understand the process, painting over stained wood becomes surprisingly manageable.
Contents
Why Painting Over Stained Wood Requires Extra Preparation
Painting stained wood is completely different from painting raw drywall or unfinished lumber. Most stained wood surfaces are sealed with polyurethane, lacquer, varnish, wax, or another protective finish. That glossy protective coating is designed to resist moisture and wear, which ironically makes it terrible for paint adhesion. Imagine trying to tape paper to a greasy frying pan. That’s essentially what happens when you paint directly over sealed stain without preparation.
Professional painters repeatedly stress that prep work determines whether paint lasts for years or fails within months. The biggest problem comes from tannins and oils trapped inside the wood. Woods like oak, cedar, pine, mahogany, and redwood naturally release tannins that seep upward through paint layers. Those stains eventually create yellow, orange, or brown blotches that ruin the finish. Many homeowners assume adding more paint will fix the issue, but paint alone cannot block tannins effectively.
Another hidden issue is slickness. Glossy stained wood creates a surface too smooth for standard paint to grip. Even if the paint initially looks fine, it may start peeling around edges, corners, or high-touch areas. That’s why sanding and priming are not optional shortcuts. They create mechanical adhesion and chemical bonding simultaneously. Skipping either one usually creates problems later.
There’s also a psychological trap here. Fresh paint can look amazing on day one, giving people false confidence that the project succeeded. Then summer humidity arrives, cabinets expand slightly, tannins activate, and suddenly discoloration appears everywhere. Proper preparation prevents those future headaches before they begin.
Understanding the Difference Between Raw and Sealed Wood
Raw wood behaves like a sponge. It absorbs primer and paint directly into its fibers, allowing coatings to anchor deeply. Stained wood is different because it usually contains layers of finish sitting on top of the grain. That sealed layer blocks moisture and prevents coatings from penetrating naturally.
Most homeowners are not actually painting stain itself. They are painting the clear protective coating above the stain. That detail changes everything. Polyurethane, lacquer, shellac, wax, and varnish all require slightly different prep methods because they react differently to sanding and primers. Some coatings become gummy under sandpaper, while others become dusty and smooth easily.
A quick water-bead test often reveals whether the wood is sealed. If water beads on the surface instead of soaking in, the wood has a protective finish that requires scuff sanding and bonding primer before painting. Another common clue is shine. Highly reflective surfaces nearly always need aggressive prep for long-lasting paint adhesion.
Understanding the existing finish also helps you choose the correct primer. Water-based primers may struggle over oily finishes or waxy coatings. Shellac and oil-based primers generally perform better because they create a stronger sealing barrier. That’s especially important for antique furniture, stained trim, and older cabinetry where finishes may be decades old.
Oil-Based vs Water-Based Paint for Stained Wood
One of the biggest questions homeowners ask is whether oil-based or water-based paint works better over stained wood. The answer depends on the project, durability requirements, ventilation, and your patience level. Both options can work beautifully when paired with proper prep and primer.
| Feature | Oil-Based Paint | Water-Based Paint |
|---|---|---|
| Drying Time | Slow | Fast |
| Odor | Strong | Low |
| Durability | Excellent | Very Good |
| Cleanup | Mineral spirits | Soap and water |
| Yellowing Over Time | Possible | Minimal |
| Flexibility | Lower | Higher |
| Environmental Impact | Higher VOCs | Lower VOCs |
Oil-based paint remains popular for trim, doors, and cabinets because it cures into a hard shell-like surface. That hardness makes it resistant to scratches and heavy wear. The downside is the smell, longer drying times, and cleanup hassle. Oil paint can also yellow slightly over time, especially in darker rooms.
Water-based acrylic paint has improved dramatically in recent years. Modern enamel-style acrylic paints offer excellent durability while drying faster and producing less odor. Many professionals now prefer high-quality water-based enamel for cabinets and furniture because it levels nicely and stays color stable longer.
The real secret is this: the primer matters more than the topcoat when painting stained wood. A shellac or oil-based stain-blocking primer paired with premium acrylic paint often produces the best balance between durability and convenience. Even Reddit painting communities frequently recommend shellac or oil primers beneath water-based paint for severe tannin problems.
The Best Primers for Painting Over Stained Wood
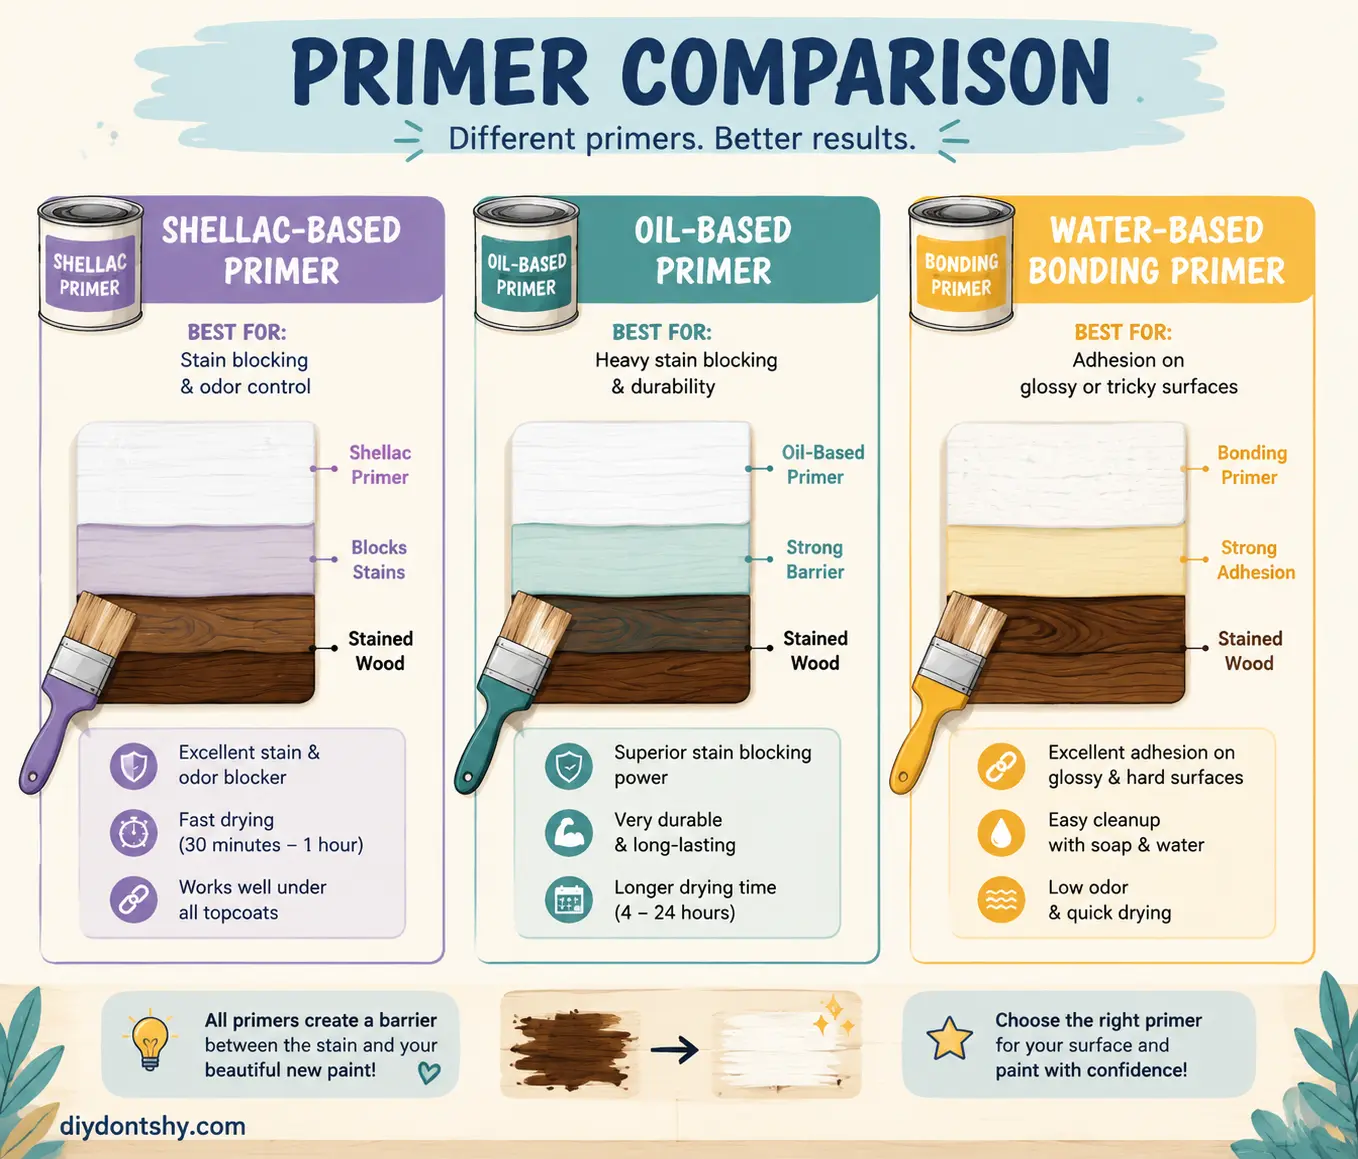
Primer is the hero of this entire process. Without the right primer, even expensive paint can fail quickly. Stain-blocking primers serve two critical functions: they help paint bond to slick surfaces and prevent tannins or dark stains from bleeding through the finish coat.
Shellac-based primers are widely considered the gold standard for stained wood projects. Products like BIN shellac primer consistently appear in contractor recommendations because they seal almost everything. Shellac dries incredibly fast, sticks aggressively, and blocks even severe stains from knots, smoke damage, water damage, or dark wood species.
Oil-based primers are another excellent option, especially for heavy tannin woods and exterior applications. They penetrate deeper into wood fibers and provide strong stain resistance. The downside is slower drying time and stronger fumes. Still, many professionals trust oil-based primers for problem surfaces because of their reliability.
Water-based bonding primers are easier to use and clean up, but they are less reliable against strong tannin bleed. They work best on lightly stained wood or surfaces with minimal discoloration risk. Some newer hybrid bonding primers perform surprisingly well, but shellac and oil remain safer choices for difficult projects.
Here’s a quick comparison:
| Primer Type | Best For | Main Advantage | Main Drawback |
|---|---|---|---|
| Shellac-Based | Severe tannins & stains | Best stain blocking | Strong odor |
| Oil-Based | Heavy-duty adhesion | Excellent penetration | Slow drying |
| Water-Based | Mild staining | Easy cleanup | Weaker tannin blocking |
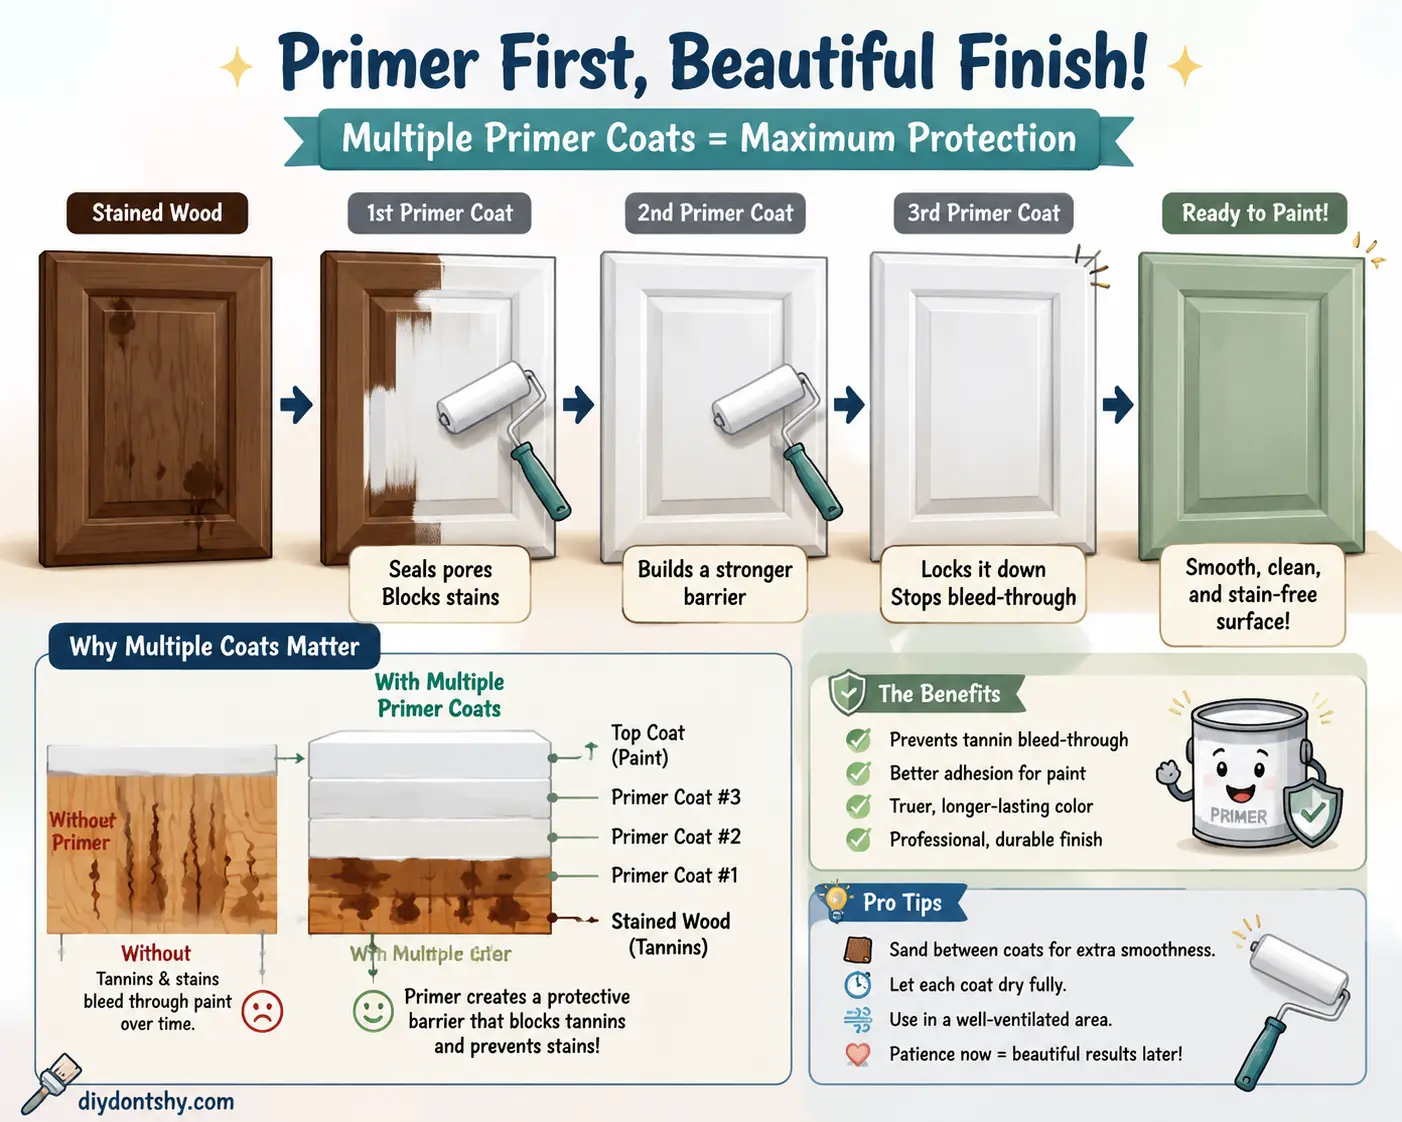
One overlooked trick is thin coats. Multiple thin primer coats outperform one heavy coat nearly every time. Thick coats dry unevenly and may crack later. Thin coats create a smoother, stronger barrier.
Surface Sanding Tips for Better Paint Adhesion
Sanding is where paint adhesion truly begins. Many people assume sanding means stripping wood completely bare, but that’s rarely necessary. In most cases, the goal is simply to remove gloss and create microscopic scratches that help primer grip the surface.
Professionals commonly recommend starting with 120-grit sandpaper to cut through shine and smooth imperfections. Follow with 150- or 180-grit sandpaper for a smoother finish. The surface should feel dull and slightly textured afterward, not glossy.
Corners and edges deserve special attention because paint tends to fail there first. Think about how often cabinet handles, trim corners, and table edges get touched. Those areas need strong adhesion to survive everyday use. A quick scuff sand in those high-contact spots dramatically improves durability.
Dust removal matters just as much as sanding itself. Leftover sanding dust acts like tiny marbles trapped under paint. Vacuum thoroughly and wipe surfaces with a tack cloth before priming. Even invisible dust particles can ruin a smooth finish.
One major sanding mistake is over-sanding veneer furniture. Thin veneers can sand through surprisingly fast, exposing ugly substrate material beneath. Use light pressure and focus on dulling the finish rather than aggressively removing stain. Another common mistake is skipping deglosser on intricate moldings where sandpaper cannot reach effectively.
Sanding may feel tedious, but it’s really the handshake between the old surface and the new finish. Without that handshake, the relationship falls apart quickly.
How to Prevent Bleed-Through and Peeling Paint
Bleed-through is one of the most frustrating problems in wood painting projects. You spend hours creating a beautiful white finish, only to watch yellow streaks emerge days later like ghosts from beneath the surface. Those stains come from tannins, resins, oils, or dyes trapped inside the wood and stain layers.
Oak, cedar, pine, redwood, and mahogany are notorious for tannin bleed. Dark stains create even greater risk because pigments can migrate upward through weak primer layers. Moisture and heat often accelerate the process, which explains why bleed-through sometimes appears weeks after painting.
Peeling usually comes from poor adhesion rather than poor paint quality. Common causes include:
- Skipping sanding
- Painting over wax or grease
- Using weak primer
- Applying thick coats
- Rushing drying times
- Painting glossy surfaces directly
Professional painters consistently recommend shellac or oil-based primers when tannin bleed appears repeatedly. Reddit painting communities often describe situations where multiple water-based primer coats failed, but shellac stopped the issue immediately.
Another smart strategy is spot-priming trouble areas before priming the entire surface. Knots, dark grain streaks, and repaired sections often need extra sealing power. That extra attention prevents stains from returning later.
Humidity control also matters more than people realize. Painting in overly humid conditions traps moisture inside coatings, slowing cure times and increasing the risk of peeling. Good airflow and patience create dramatically stronger finishes.
When a Second Primer Coat Makes a Big Difference
Some projects absolutely require two primer coats. High-tannin woods, dark stains, antique furniture, and old cabinetry often need additional sealing power because one coat simply cannot lock everything down completely.
Professional guides increasingly recommend two thin coats rather than one heavy coat, especially when painting stained oak cabinets or knotty pine trim. Thin coats cure more evenly and create a stronger barrier against bleed-through. Think of it like wearing two light rain jackets instead of one flimsy poncho.
Dark red, cherry, walnut, and mahogany stains are especially stubborn. Their pigments tend to migrate aggressively through paint systems. A second coat dramatically reduces the risk of discoloration later. The same logic applies to smoke-damaged or water-damaged wood where contaminants are deeply embedded.
There’s also a psychological advantage to double priming. It reveals flaws early. After the first coat dries, imperfections become easier to spot. You can fill dents, sand rough areas, and correct texture issues before committing to expensive finish paint.
Second coats matter most when:
- Painting white over dark stain
- Covering knotty wood
- Repainting old cabinets
- Working with oak or cedar
- Covering water stains
- Painting exterior stained wood
The extra time feels annoying initially, but it often saves days of frustration later. Repainting failed cabinets is far worse than adding another primer coat upfront.
Best Paint Finishes for Wood Surfaces
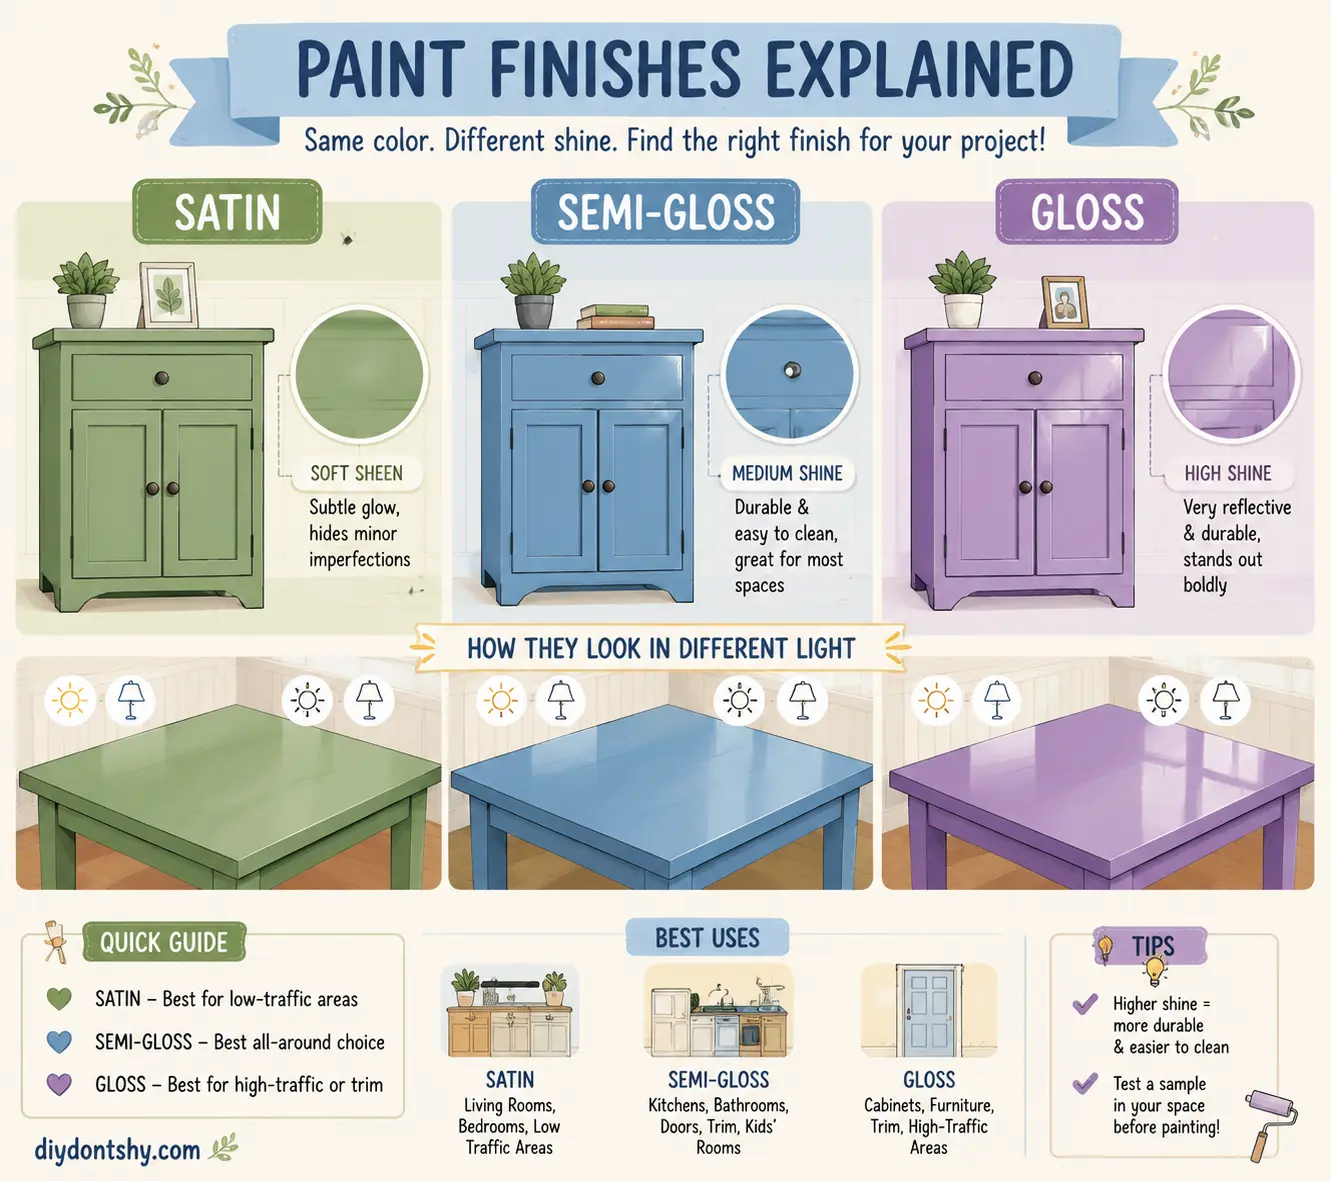
Choosing the right sheen matters almost as much as choosing the right paint itself. Different finishes affect durability, appearance, maintenance, and how visible imperfections become after painting.
| Finish Type | Appearance | Durability | Best Uses |
|---|---|---|---|
| Matte | Flat, soft look | Lower | Decorative furniture |
| Eggshell | Slight sheen | Moderate | Low-traffic wood |
| Satin | Smooth glow | Very good | Furniture & trim |
| Semi-Gloss | Reflective | Excellent | Cabinets & doors |
| Gloss | High shine | Maximum | Specialty accents |
Satin and semi-gloss are usually the sweet spot for stained wood projects. Satin offers a softer appearance while still cleaning easily. Semi-gloss provides extra durability and moisture resistance, making it ideal for kitchens, bathrooms, and trim.
Gloss finishes highlight every imperfection. That can look stunning on perfectly smooth cabinetry, but it can also exaggerate sanding scratches and wood grain inconsistencies. Matte finishes hide flaws better but tend to scuff more easily.
Cabinets generally perform best with satin or semi-gloss enamel paint because they endure constant touching, cleaning, and moisture exposure. Furniture depends more on style preference. Rustic farmhouse furniture often looks great with satin finishes, while modern contemporary pieces sometimes benefit from higher gloss levels.
Lighting also changes how sheen appears. Bright sunlight exaggerates glossiness, while dim rooms soften reflective finishes. Always test samples before painting an entire project.
Long-Term Maintenance After Painting Stained Wood
A properly painted stained wood surface can last for many years, but maintenance still matters. Paint is not invincible. Daily wear, humidity, sunlight, and cleaning chemicals slowly break finishes down over time.
Gentle cleaning is the biggest key to longevity. Harsh scrubbers and abrasive cleaners gradually scratch paint surfaces, especially on cabinets and furniture. Mild soap and soft microfiber cloths work best for routine maintenance. Think of painted wood like a car finish. Aggressive cleaning eventually dulls the surface.
Humidity control also protects painted wood significantly. Excess moisture causes wood expansion and contraction, which stresses paint layers over time. Kitchens and bathrooms especially benefit from proper ventilation.
Touch-ups should happen quickly whenever chips appear. Small paint failures tend to spread because exposed edges allow moisture underneath surrounding paint. Keeping a small container of leftover paint for repairs is always smart.
Sunlight creates another long-term challenge. Direct UV exposure gradually fades colors and weakens paint films. High-quality acrylic paints resist fading better than many older oil-based formulas.
The encouraging part is this: when stained wood is cleaned, sanded, primed, and painted correctly, the finish can remain beautiful for years without major issues. Most catastrophic failures trace back to rushed preparation rather than paint quality itself.
Conclusion
Painting over stained wood successfully is really about understanding chemistry and surface preparation. Stained wood is not naturally paint-friendly because sealers, tannins, oils, and glossy finishes all interfere with adhesion. That’s why sanding, stain-blocking primer, and proper paint selection make such a dramatic difference.
Shellac-based and oil-based primers remain the most reliable defense against bleed-through, especially on oak, cedar, pine, and dark-stained surfaces. Water-based acrylic paints paired with strong primers now offer an excellent balance between durability, convenience, and long-term appearance. The secret isn’t just choosing good paint; it’s building the right foundation beneath it.
When homeowners rush prep work, stained wood almost always wins the battle eventually. But when surfaces are cleaned, sanded, sealed, and painted carefully, old stained cabinets, trim, doors, and furniture can look completely transformed for many years.
FAQs
1. Can you paint directly over stained wood without sanding?
Technically yes, but it is risky. Paint struggles to bond properly to glossy sealed wood. Light sanding or deglossing dramatically improves adhesion and reduces peeling risk.
2. What is the best primer for stained wood?
Shellac-based primers are widely considered the best for blocking tannins and stains. Oil-based primers are also excellent for difficult surfaces and exterior projects.
3. Will water-based paint work over oil-based primer?
Yes. Once oil-based primer fully cures, water-based paint can adhere very well over it. Many professionals use this combination successfully.
4. Why does stain bleed through white paint?
Wood tannins and dark stain pigments migrate upward through weak primer and paint layers. High-tannin woods like oak and cedar are especially prone to bleed-through.
5. How long should primer dry before painting?
Drying time depends on the primer type. Shellac primers often dry within an hour, while oil-based primers may need several hours or overnight curing for best results.

Ahmed Elhor is an Egyptian SEO specialist, pharmacist, and copywriter based in Canada. He combines strong research skills with search focused writing to create clear, helpful content that answers real questions and ranks effectively in search engines.
With a passion for practical DIY ideas, homemade solutions, and creative projects, Ahmed focuses on producing easy to follow guides that are simple, affordable, and useful for everyday life. His work blends creativity with structure, helping readers turn basic materials into meaningful results.