How to Add a Border to a Crochet Blanket with Clean Finished Edges
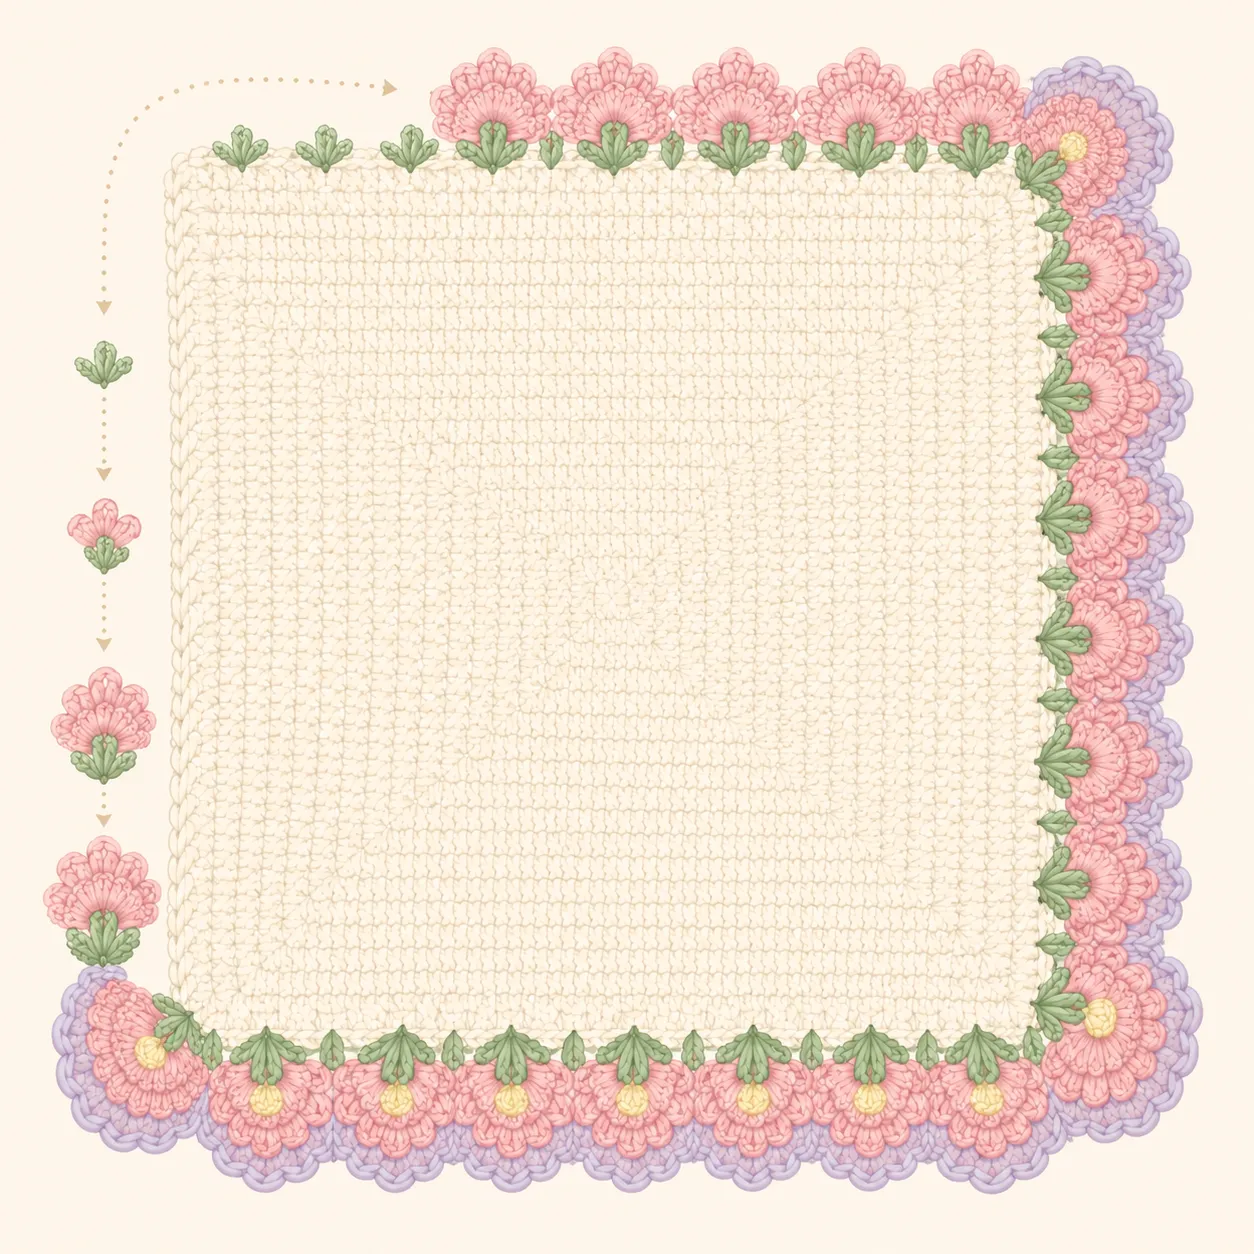
Crochet blankets have a funny way of looking “almost finished” right up until the moment the border goes on. You can spend weeks stitching rows, changing colors, weaving in ends, and shaping corners, yet the blanket still feels incomplete. Then suddenly, one neat border transforms the whole project from homemade to polished. It’s like putting the perfect frame around a painting. The artwork was already beautiful, but now everything feels intentional.
Borders are far more than decorative trim. A well-made crochet border straightens uneven edges, stabilizes the fabric, adds weight to lightweight blankets, and ties the entire design together visually. Recent crochet trends show a growing love for bold borders, vintage lace edging, floral-inspired trims, and color-blocked finishes that make blankets stand out in modern interiors. Crochet designers in 2026 are especially leaning toward textured yet practical edges that balance beauty and durability.
If you’ve ever added a border that curled inward, rippled like potato chips, or refused to lie flat no matter how much blocking you tried, you’re definitely not alone. Border problems happen to beginners and experienced crocheters alike. The secret isn’t luck. It comes down to choosing the right stitch pattern, preparing the edges correctly, managing stitch counts carefully, and understanding how color and tension affect the final shape.
Before grabbing your hook and diving into decorative stitches, it helps to understand how borders actually work and why some succeed while others fail miserably.
Contents
Why Crochet Borders Matter
A crochet border isn’t just decoration stitched around the outside edge. Think of it like the trim around a room or the frame around artwork. It gives structure, defines boundaries, and creates visual balance. Without a border, even beautifully crocheted blankets can look unfinished or uneven. A carefully chosen edging pulls every detail together and makes the entire project feel cohesive.
Borders also solve practical problems that many crocheters run into. Uneven edges are probably the most common issue. Maybe your tension loosened halfway through the project, or perhaps your turning chains created bumps along the sides. A border smooths those imperfections so the blanket looks neat from every angle. Crochet experts consistently mention that borders help stabilize edges while improving durability, especially for blankets that will be washed frequently or used daily.
Another major advantage is weight distribution. Lightweight blankets sometimes curl or stretch oddly at the edges. Adding several rounds of border stitches creates balance and helps the blanket drape better. This is especially useful for baby blankets, granny square afghans, and lightweight throws.
Modern crochet trends also show that borders are becoming a design centerpiece instead of an afterthought. Floral edging, lace-inspired trims, textured picot rows, and color-blocked frames are increasingly popular because they give even simple blankets a custom, designer-quality appearance.
The best part? Borders can completely change the personality of a blanket. A plain striped afghan suddenly looks vintage with a shell stitch edging. A modern geometric blanket becomes sleek and contemporary with a minimalist single crochet frame. It’s amazing how a few extra rounds can completely reshape the mood of a project.
Choosing a Border Style That Matches the Blanket Design
One of the biggest mistakes crocheters make is choosing a border pattern they love without considering whether it complements the blanket itself. It’s a bit like pairing hiking boots with a formal suit. Both can be excellent on their own, but together they feel out of place. A border should enhance the blanket instead of competing with it.
The blanket’s texture is usually the best place to begin. Highly textured designs featuring bobbles, cables, puff stitches, or intricate motifs often look best with a simple edging that lets the main pattern remain the focal point. If the blanket already has plenty of visual interest, an elaborate border can make the finished project feel too busy.
Simple blankets, however, provide the perfect opportunity for decorative borders. Moss stitch blankets, solid granny square afghans, and basic striped throws can be elevated with shell stitches, scallops, lace edging, or floral-inspired trims that add elegance without overwhelming the design.
Color deserves just as much attention as stitch choice. Neutral blankets often benefit from a contrasting border that creates a crisp frame, while colorful blankets usually look best with a solid shade already found within the project. Many experienced crocheters recommend selecting either the darkest color or a subtle accent shade to create balance and tie the palette together.
The goal is harmony. The border should look like a natural extension of the blanket rather than an afterthought added at the very end.
Preparing Uneven Edges Before Crocheting Around Them
If there’s one secret that separates smooth professional borders from frustrating uneven disasters, it’s edge preparation. Most border problems actually begin before the decorative stitching even starts. Uneven edges create tension inconsistencies, distorted corners, and those dreaded ruffled waves that nobody wants.
Crochet blankets rarely come off the hook perfectly square. Some sides stretch more than others. Turning chains can create gaps. Certain stitch patterns naturally lean or shrink. That’s completely normal. The key is preparing the perimeter before beginning the actual border design.
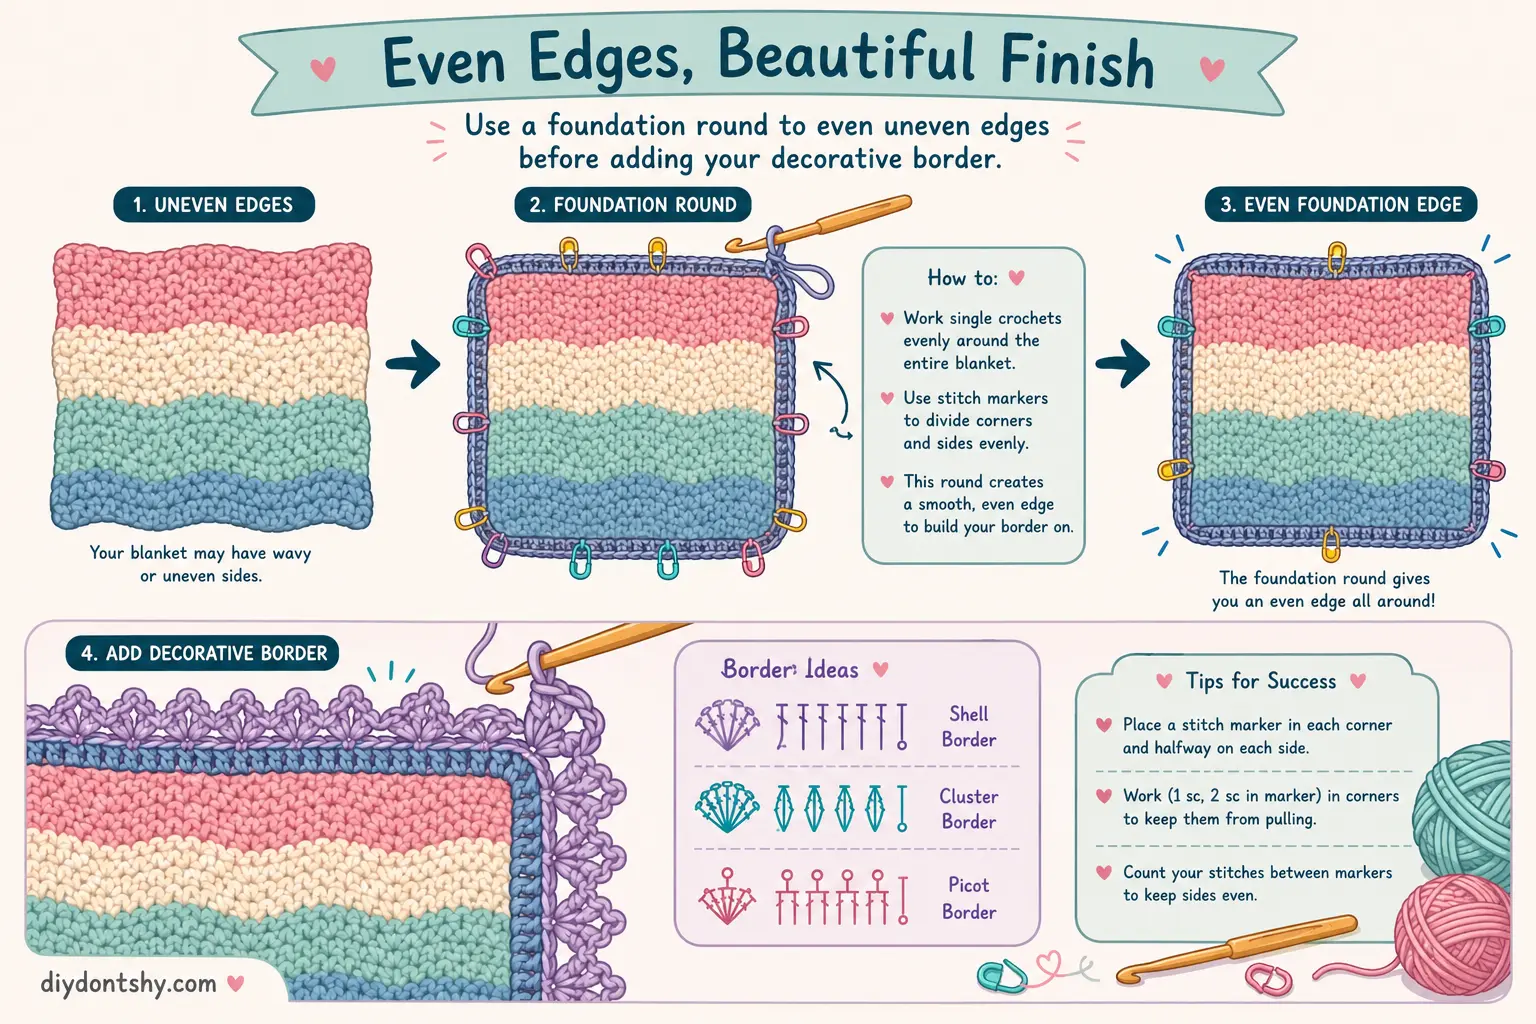
The easiest method is adding a foundation round of single crochet stitches all the way around the blanket. Think of this round as the “reset button.” It evens out rough edges and creates a clean surface for decorative stitches later. Crochet finishing guides consistently recommend this preparation step because it helps standardize stitch placement around uneven row edges.
Spacing matters enormously here. Many beginners place stitches randomly along the sides, which creates bunching in some areas and stretching in others. A good rule is:
- One stitch per stitch across the top and bottom
- Two to three stitches per row along taller side edges
- Adjust slightly depending on stitch height
You also need to pay close attention to corners. Corners require increases so the border can turn smoothly without curling inward. Most blankets need three stitches in each corner space during the setup round.
This preparation phase feels tedious sometimes, especially after finishing a giant blanket, but skipping it almost always leads to frustration later. Imagine trying to build a perfectly level fence on uneven ground. The foundation determines everything that comes afterward.
Some experienced crocheters even block the blanket before adding the border. Blocking relaxes fibers and reveals where tension problems exist. This makes it easier to identify edges that need adjustment before permanent border stitches lock everything into place.
How to Keep Borders from Pulling or Waving
Few crochet problems are more frustrating than finishing a border only to discover it puckers inward or ripples outward. Fortunately, these issues are usually caused by stitch count or tension, making them easy to correct once you know what to watch for.
Wavy borders typically mean too many stitches were added, leaving excess fabric that forms ripples. Borders that pull or curl inward usually have too few stitches, causing the edge to tighten. Finding the right balance is the key to a flat, even finish.
One of the most common mistakes is adding too many stitches along the blanket’s side edges. Because side placement isn’t as obvious as the top or bottom, it’s easy to work into every gap instead of spacing stitches evenly.
If the border feels tight, your stitch height may be the problem. Switching to a hook half a size larger or relaxing your tension often solves the issue immediately. Slip stitches, in particular, should be worked loosely because they naturally tighten the edge.
As you work, lay the blanket flat after every completed round. If the border begins to ripple, remove a few stitches before continuing. If it starts pulling inward, add a few evenly spaced stitches along the affected edge. Making small corrections early is much easier than unraveling several completed rounds.
Crochet communities repeatedly emphasize one important idea: borders should feel relaxed. If you’re forcing the stitches or struggling to keep the blanket flat, adjust your stitch count or tension before moving on.
Simple Stitch Patterns That Frame a Blanket Beautifully
Not every blanket needs an elaborate lace border or dramatic floral edging. Sometimes the simplest stitch patterns create the most elegant finish. In fact, modern crochet trends increasingly favor understated borders that enhance the blanket without stealing attention from the main design.
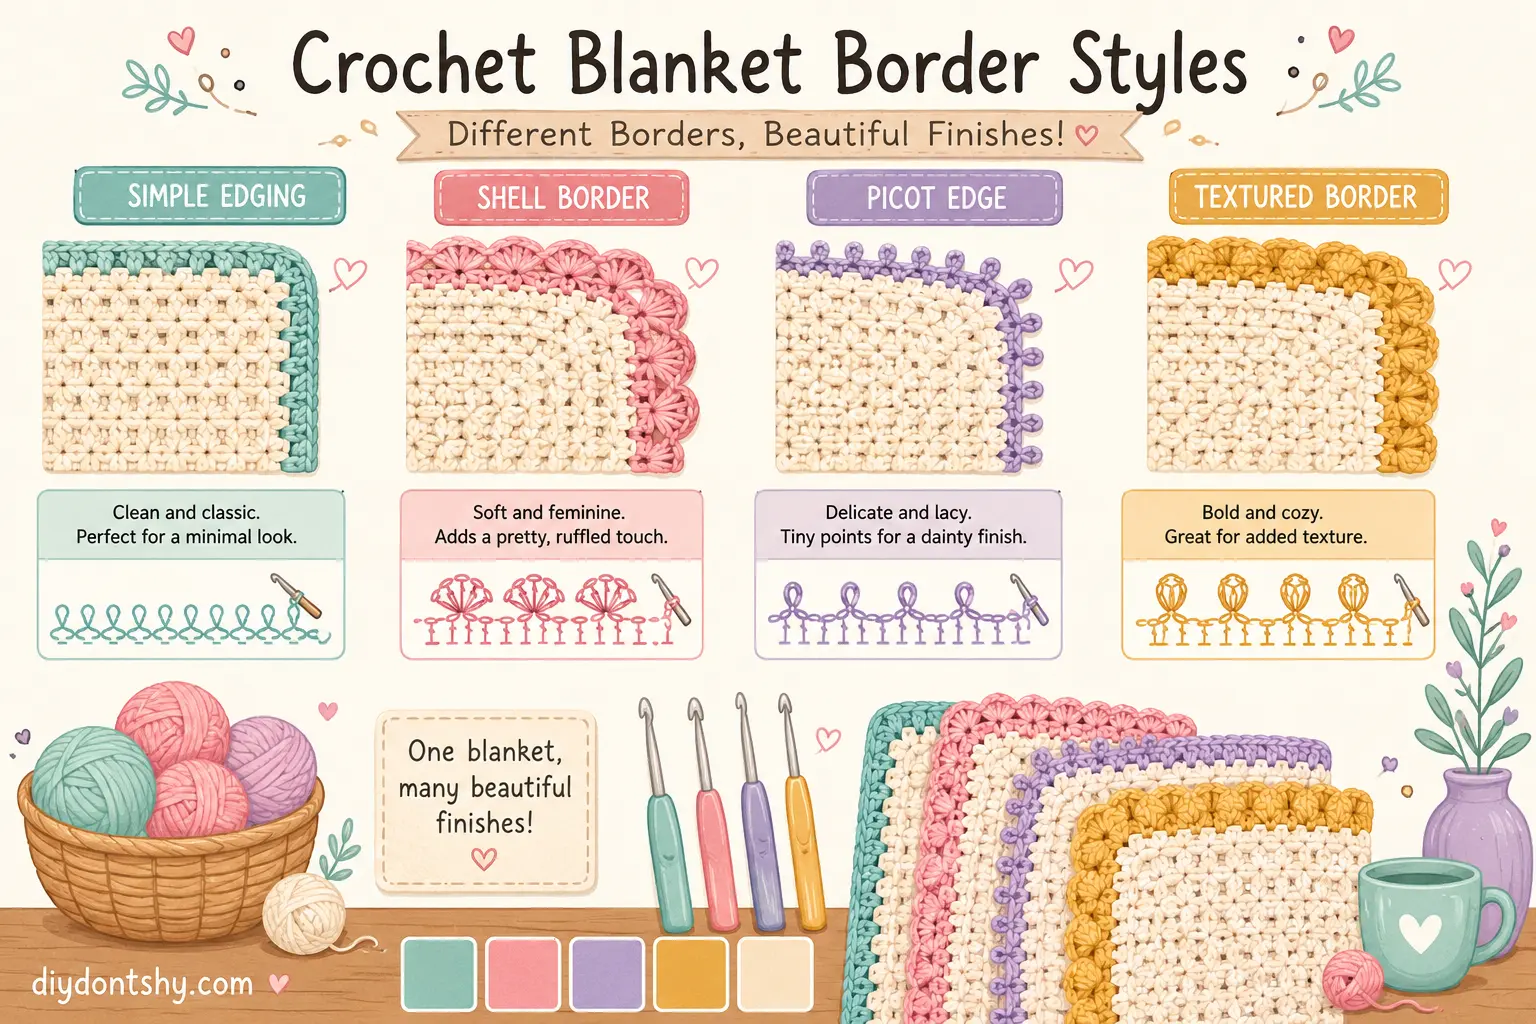
The humble single crochet border remains one of the most versatile choices. It’s clean, structured, beginner-friendly, and complements almost every blanket style. Working several rounds creates a bold framed effect that feels both modern and polished.
Shell stitch borders continue to be a favorite for baby blankets and vintage-inspired projects because they add softness and graceful curves. Picot edging creates delicate decorative points that add subtle detail without overwhelming the design, while crab stitch (reverse single crochet) produces a rope-like texture that’s ideal for contemporary blankets.
Moss stitch, also known as linen stitch, has also become increasingly popular thanks to its woven appearance and balanced texture. It pairs especially well with modern home décor styles.
The best border isn’t always the most elaborate. Choosing a stitch pattern that complements the blanket’s texture, colors, and overall style will always produce the most polished result.
Using Color Changes to Make the Border Stand Out
Color choice can completely transform a crochet border even before the first stitch pattern comes into play. Two identical borders stitched in different colors can create totally different moods. One might feel modern and bold while the other feels soft and traditional.
Contrasting borders are especially effective when you want the edge to frame the blanket dramatically. Dark borders around bright blankets create strong definition, almost like outlining a drawing with ink. Crochet discussions often recommend choosing the darkest color already present in the blanket because it grounds the overall design visually.
Neutral borders work differently. Cream, beige, gray, and soft white tones create a calming effect that softens busy color palettes. They help unify highly colorful blankets without adding additional visual competition. Many crocheters prefer neutral borders for multicolored granny square projects because they create balance and cohesion.
Gradient borders are another growing trend in 2026 crochet design. Soft color transitions add depth and sophistication while maintaining harmony throughout the blanket. Trend forecasts show increasing interest in earth tones, botanical greens, terracotta shades, and playful saturated accent colors in crochet projects.
One clever strategy is using the border to highlight a less noticeable color already hidden inside the blanket. This pulls subtle shades forward and makes the entire palette feel more intentional.
Color placement also affects perceived size. Dark borders visually “contain” blankets and make them appear more structured. Light borders create openness and softness. Bold contrasting borders feel energetic, while monochromatic borders create elegance and simplicity.
If you’re uncertain which color to choose, try laying skeins directly on the blanket before committing. Sometimes the right choice becomes obvious immediately. Other times the color you expected to love completely disappears against the stitches.
That’s the magic of crochet borders. Tiny decisions create huge visual impact.
Adding Corners That Lay Smooth and Flat
Corners are where beautiful borders either succeed magnificently or collapse into chaos. Even a perfectly stitched border can look awkward if the corners bunch, twist, or curl upward. Fortunately, corner problems are usually very predictable once you understand why they happen.
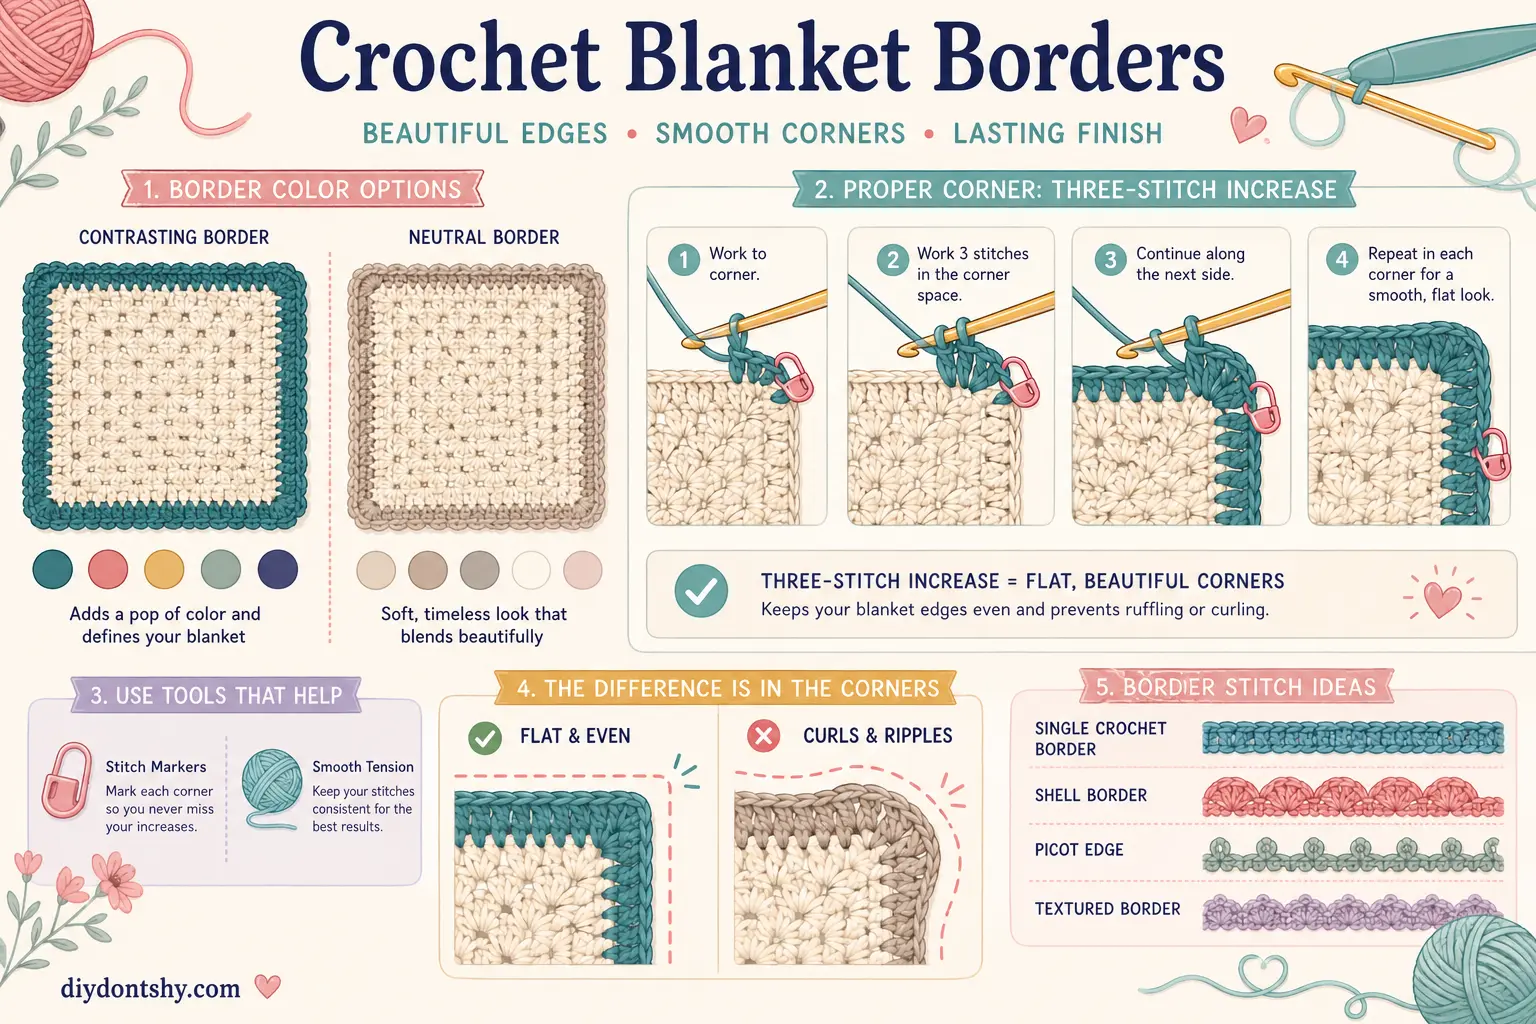
Most crochet corners need increases so the fabric can turn naturally around the angle. Without increases, the stitches pull tightly and create puckering. Too many increases, however, create floppy oversized corners that stick outward awkwardly.
The most common formula is placing three stitches into each corner space. This creates enough flexibility for the border to pivot smoothly while maintaining shape. Taller stitch patterns like double crochet sometimes require additional spacing chains between corner stitches.
What makes corners tricky is that every border stitch behaves differently. Dense stitches like single crochet naturally stay compact, while taller stitches spread outward more aggressively. Decorative shell patterns may need customized corner arrangements so the shells align symmetrically around the blanket.
One helpful trick is using stitch markers to identify all four corners before beginning the border. This prevents accidental missed increases, especially on large blankets where it’s easy to lose track of placement.
Bulky corners often happen when multiple rounds stack increases directly on top of each other. Slightly staggering increase placement between rounds can reduce this buildup and create smoother shaping.
Blocking also makes a huge difference. Many corners that look awkward during stitching relax beautifully after wet blocking or steam blocking. Fibers soften, tension redistributes, and the border settles into its intended shape.
Crochet communities repeatedly emphasize patience during corner work because rushing almost always leads to uneven results.
Corners are like the hinges on a door. When they function smoothly, everything else works naturally.
Finishing Touches That Give a Polished Look
The border may technically finish the blanket, but the final polishing details are what elevate the project from “handmade” to “professionally crafted.” These small finishing steps often make the biggest visual difference.
Blocking is one of the most overlooked finishing techniques in crochet. Many crocheters skip it because they’re excited to use the blanket immediately, but blocking dramatically improves stitch definition, edge alignment, and overall drape. Even slightly uneven borders often relax into clean smooth lines after proper blocking.
Weaving in ends securely matters more than people realize too. Loose ends can slowly work themselves free over time, especially on blankets that get frequent washing and handling. Instead of simply trimming yarn close to the surface, weave the tail through multiple stitch directions to anchor it firmly.
Decorative finishing details are also becoming increasingly popular in modern crochet trends. Fringe borders, tassels, floral edging, and textured trims are appearing more frequently in contemporary blanket designs because they add movement and personality. Modern fringe borders especially have seen renewed popularity in home décor crochet projects.
Sometimes the smallest final round creates the most satisfying finish. A slip stitch edging, crab stitch round, or delicate picot trim can sharpen the overall appearance dramatically.
Care labels are another thoughtful finishing touch if the blanket will be gifted. Including yarn fiber information and washing instructions helps preserve the blanket long-term.
One beautiful thing about crochet borders is that they reflect the maker’s personality. Some crocheters love dramatic statement edges with flowers and lace. Others prefer minimal structured frames that quietly support the design.
Neither approach is wrong.
The perfect border is simply the one that makes the blanket feel complete.
Conclusion
Adding a border to a crochet blanket is one of those finishing techniques that seems simple until you actually start doing it. Then suddenly you’re dealing with uneven edges, wavy corners, stitch counts, tension problems, and color decisions that somehow feel surprisingly important. But once you understand how borders function, the process becomes far less intimidating.
A successful crochet border starts long before the decorative stitches appear. Choosing a border style that matches the blanket design creates visual harmony. Preparing uneven edges establishes a clean foundation. Managing stitch counts prevents pulling and rippling. Thoughtful color choices frame the blanket beautifully. Smooth corners and polished finishing details bring everything together into a finished piece that looks intentional and professional.
The wonderful thing about crochet borders is that they allow endless creativity without requiring an entirely new project. One blanket can look modern, vintage, playful, elegant, minimalist, or dramatic simply by changing the edging style.
And honestly, that final border round is one of the most satisfying moments in crochet. After all the hours spent stitching row after row, the border is the moment the blanket finally becomes whole.
FAQs
What is the easiest crochet border for beginners?
A single crochet border is usually the easiest option for beginners because it creates a clean edge without complicated stitch patterns. It also helps straighten uneven sides and works with almost every type of blanket.
Why does my crochet border ripple?
Rippling usually happens because too many stitches were added around the edges. Reducing the stitch count slightly or spacing stitches more evenly along the sides often fixes the issue.
How many stitches should I put in crochet blanket corners?
Most blanket borders need three stitches in each corner during the setup round. Some decorative borders may require additional chains or customized corner spacing depending on the stitch pattern.
Should I use the same yarn for the border?
Using the same yarn ensures matching texture and weight, but contrasting yarn colors can make the border stand out beautifully. Many crocheters use a coordinating accent color for visual interest.
Do all crochet blankets need borders?
Not necessarily. Some modern minimalist blankets look great without borders. Still, borders help stabilize edges, improve durability, and create a more polished finished appearance.

Kareem Sallam is an Egyptian special writer based in Australia, with a strong interest in practical ideas and creative content that focuses on everyday solutions. He writes clear, engaging articles designed to be easy to follow and useful for a wide range of readers.
His work centers on DIY projects, handmade ideas, simple crafts, and home based creativity. Kareem aims to deliver content that is practical, inspiring, and accessible, helping readers turn simple materials into smart and enjoyable projects.