Creative Ways to Paint Pine Cones with Acrylic Paint

Pine cones have quietly become one of the most loved natural craft materials in modern DIY decor. From rustic farmhouse centerpieces to metallic holiday ornaments, these little woodland treasures can transform into stunning decorative pieces with just a few brushes and the right acrylic paint techniques. Recent crafting reports from major craft retailers show a strong rise in hands-on, nature-inspired DIY projects, especially tactile and botanical crafts that reconnect people with handmade creativity.
What makes painted pine cones so special? They sit right at the crossroads of nature and art. A pine cone already has incredible texture, layers, shadows, and symmetry. Acrylic paint simply enhances what is already there. The trick is learning how to paint them without losing their natural beauty. If too much paint is applied, the scales clog together and the entire cone can look heavy and artificial. When painted correctly, though, pine cones look elegant, detailed, and surprisingly high-end.
This guide walks through everything you need to know, from cleaning and drying pine cones to advanced dry-brushing techniques, metallic finishes, glitter accents, seasonal color combinations, and smart storage methods. Whether you want cozy winter decor, colorful autumn centerpieces, or modern minimalist ornaments, you will find practical techniques that actually work.
Contents
Why Painted Pine Cones Are Trending in DIY Decor
Crafting trends in 2026 are heavily focused on tactile, analog hobbies that help people disconnect from screens and reconnect with hands-on creativity. According to recent crafting trend reports, searches for traditional crafting activities and natural DIY projects have surged dramatically over the last year. That explains why painted pine cones are suddenly appearing everywhere from Pinterest boards to upscale holiday catalogs.
There is something deeply satisfying about turning a simple forest find into decorative art. Pine cones are free, biodegradable, naturally textured, and incredibly versatile. Unlike plastic craft materials, every cone is unique. Some are tall and elegant, others are short and layered like little flowers. When acrylic paint is added thoughtfully, the cone keeps its organic charm while gaining personality and style.
Acrylic paint has become the preferred choice for pine cone crafts because it dries quickly, offers strong color payoff, and allows excellent layering techniques. Community crafters consistently rank acrylics as the easiest and most reliable paint option for pine cone decorating projects. You can dilute it for soft watercolor-style washes or apply it thickly for dramatic, bold textures.
Another reason painted pine cones are so popular is flexibility. They fit almost every decor style imaginable. Rustic cabins, Scandinavian minimalism, farmhouse aesthetics, modern metallic interiors, and cozy holiday displays can all incorporate pine cones naturally. Think of them as the chameleons of seasonal decor. One color palette can make them feel earthy and woodland-inspired, while another can make them look luxurious and glamorous.
People also love the sustainability aspect. Modern crafting trends increasingly favor reusable, eco-friendly materials instead of disposable decor. Pine cones perfectly match that philosophy because they can be repainted, refreshed, or repurposed year after year.
Choosing the Right Pine Cones for Painting
Not all pine cones behave the same way once paint touches them. Some absorb moisture quickly and close up tightly, while others remain beautifully open and textured. Choosing the right cones before you start painting saves time and frustration later.
Open pine cones are usually the easiest to work with because the scales create visible depth and allow paint to settle naturally into crevices. Closed cones may look compact and neat at first, but they often hide dirt, sap, and moisture inside. When exposed to paint or humidity, they can tighten further and lose their decorative shape. That is why many experienced crafters intentionally dry pine cones in the oven before painting them.
The size of the pine cone matters too. Smaller cones work wonderfully for ornaments, gift toppers, and bowl fillers. Medium cones are perfect for wreaths and table arrangements. Larger cones create dramatic focal points in centerpieces and holiday displays. Some crafters even trim large cones into flower-like shapes using pruning shears to create realistic floral arrangements.
Here is a quick comparison table for popular pine cone styles:
| Pine Cone Type | Best Use | Painting Difficulty |
|---|---|---|
| Small Round Cones | Ornaments and garlands | Easy |
| Long Open Cones | Centerpieces and displays | Medium |
| Thick Layered Cones | Floral-style crafts | Medium |
| Closed Compact Cones | Minimalist decor | Hard |
Fresh pine cones collected outdoors often contain hidden insects, sticky resin, or trapped moisture. Even if they look clean, skipping the preparation stage can ruin the final result. Mold growth, bad odors, and paint adhesion problems are surprisingly common when cones are painted immediately after collecting them.
Texture also plays a huge role in the final appearance. Highly layered cones respond beautifully to dry brushing and metallic highlighting because the raised edges naturally catch paint. Flatter cones create a softer, smoother finish and work better for minimalist or Scandinavian-style decor.
If possible, collect more pine cones than you think you need. Some may crack, close, or absorb paint unevenly during experimentation. Extra cones give you freedom to test color combinations and techniques without worrying about ruining your best pieces.
Cleaning and Drying Pine Cones Before Painting
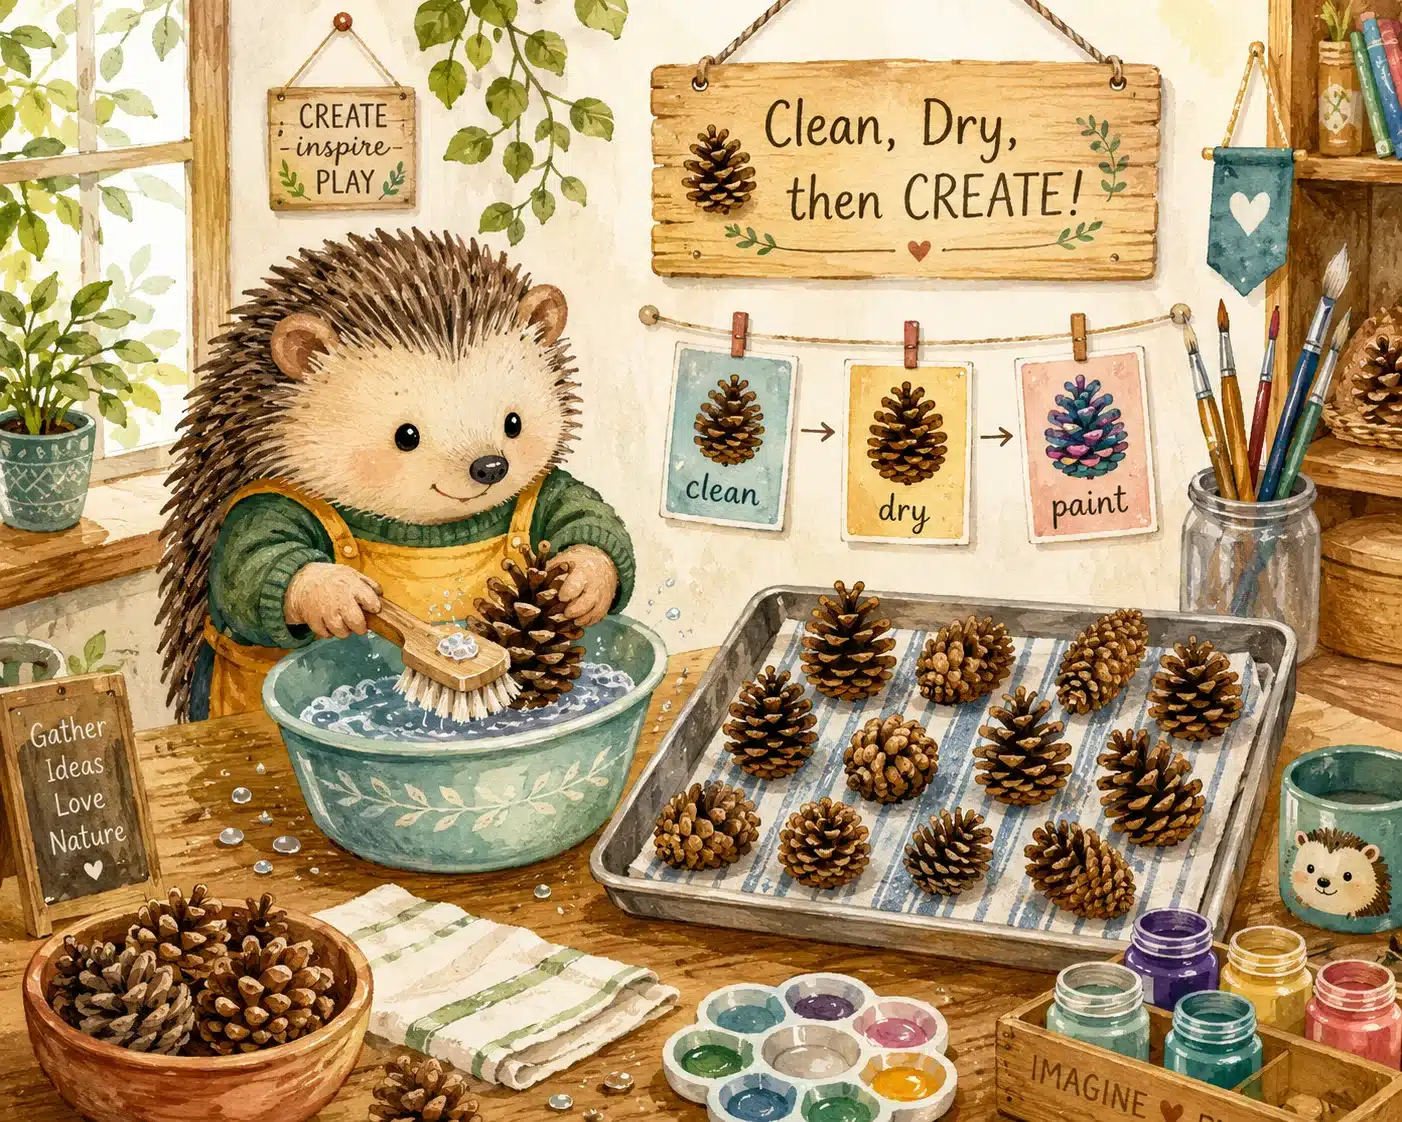
Cleaning pine cones may sound boring, but this step is honestly where great results begin. Imagine painting over hidden dirt, sap, or trapped moisture. The paint may peel later, discolor, or dry unevenly. Worse, insects hiding inside the cone can emerge after your project is displayed indoors. Nobody wants their centerpiece suddenly crawling across the dining table.
The first step is soaking the pine cones in warm water mixed with a small amount of vinegar. This helps loosen dirt and remove tiny insects hiding between the scales. Let the cones soak for about 20 to 30 minutes. During this stage, you will notice many pine cones temporarily close up. Do not panic. That is completely normal.
After soaking, rinse them thoroughly and place them on towels to drain excess water. At this point, many crafters use oven drying to fully open the cones again while removing remaining moisture. According to experienced DIY crafters, oven drying also helps melt excess resin and improves the cone’s final appearance.
Here is a simple drying method many crafters use:
- Preheat the oven to about 200°F (93°C).
- Line a baking tray with foil or parchment paper.
- Spread pine cones evenly without overcrowding.
- Bake for 30 to 60 minutes while checking frequently.
As the cones dry, they gradually reopen like blooming flowers. Watching this transformation feels oddly magical. It is like the pine cone wakes back up after a rainy forest storm.
One important tip: never leave pine cones unattended in the oven. Natural materials can overheat if forgotten. Keep ventilation good because heated sap can create a noticeable smell.
Completely dry pine cones are much easier to paint because acrylic paint grips the surface evenly. Moisture trapped inside the scales can cause paint bubbling or uneven drying later. Fully dried cones also resist mold growth, which is especially important if you plan to store them for future seasonal displays.
Essential Supplies for Painting Pine Cones
The good news about pine cone crafting is that you do not need expensive supplies. Most beautiful painted pine cone projects come from simple tools combined with smart techniques. Acrylic craft paint remains the most popular option because it is affordable, beginner-friendly, and available in endless colors.
Matte acrylic paint usually works best when you want a natural woodland look. Satin or gloss acrylics create more dramatic decorative effects, especially during holiday crafting. Metallic acrylics are particularly popular for winter decor because they reflect light beautifully across the pine cone scales.
Brush choice matters more than many beginners realize. Large flat brushes help with base coats, while small detail brushes reach into deep crevices. Dry-brushing techniques often work best with stiff, worn-out brushes because they naturally catch the raised texture without flooding the surface.
Here are some especially useful supplies:
| Supply | Purpose |
|---|---|
| Acrylic Craft Paint | Main coloring material |
| Small Detail Brushes | Precision painting |
| Flat Brushes | Base coating |
| Foam Brushes | Soft blending |
| Fine Glitter | Subtle sparkle |
| Spray Sealer | Long-term protection |
| Hot Glue Gun | Display assembly |
Many advanced crafters also use watered-down acrylic washes to create layered color effects. This technique allows the natural brown tones of the pine cone to remain partially visible underneath the paint. Instead of covering the cone completely, the color gently settles into the texture like a stain on wood.
A stay-wet palette can also help if you plan to paint many cones at once. Recent acrylic paint innovations even include re-wettable formulas that remain workable longer than traditional acrylics. That is useful for blending metallic shades or creating ombre effects.
Protecting your workspace is equally important because pine cones can roll unexpectedly while painting. Many crafters place them in egg cartons or secure them with toothpicks while drying. Little tricks like this make the entire process far less messy.
Preparing Pine Cones for Long-Lasting Results
One of the biggest frustrations people face when painting pine cones is watching them suddenly close during the process. This usually happens because pine cones naturally respond to moisture. Since acrylic paint contains water, heavy paint application can trigger the scales to tighten.
The secret is controlling moisture carefully. Thin paint layers work much better than thick coats. Instead of drowning the pine cone in paint, lightly build color over multiple applications. This preserves the shape while still creating vibrant coverage.
Some crafters spray a light clear sealer before painting to reduce moisture absorption. Others prefer applying a diluted glue solution first. Both methods create a barrier that stabilizes the pine cone slightly before acrylic paint touches it.
Temperature and humidity also affect pine cones dramatically. If your workspace is cold or damp, cones are more likely to close. Painting in a warm, dry environment helps them stay fully open. Think of pine cones almost like tiny wooden flowers reacting to weather conditions.
Drying between layers is essential too. Rushing causes moisture buildup, which can soften details and distort the scales. Patience produces sharper texture and cleaner color transitions.
Another smart preparation technique involves using minimal primer. Heavy primers often clog the natural texture that makes pine cones visually interesting in the first place. A light misting primer or diluted acrylic base coat usually works better than thick coverage.
Long-lasting painted pine cones also benefit from protective finishing sprays. Matte sealers maintain a rustic natural appearance, while gloss sealers create a polished decorative look. Satin finishes sit nicely between the two, offering gentle sheen without looking overly artificial.
Acrylic Paint Techniques That Highlight Natural Texture
Painting pine cones is very different from painting flat wood or canvas. Pine cones already contain built-in dimension, shadows, and raised surfaces. The goal is not to hide those details but to emphasize them.
One of the best beginner techniques is layered thin coats. Instead of applying heavy opaque paint immediately, use diluted acrylic paint almost like watercolor. This allows deeper crevices to remain darker while raised edges gradually brighten with each layer.
Acrylic washes are especially effective for earthy and rustic designs. Mix acrylic paint with a small amount of water and brush it lightly across the surface. Excess paint naturally settles into grooves, creating depth without losing texture. Browns, soft greens, muted whites, and dusty blues work beautifully with this technique.
Another highly effective method involves partial painting. Rather than coating the entire cone, paint only the tips of the scales. This creates a frosted or dipped effect that feels elegant and modern. Many winter decorations use white-tipped pine cones because they resemble freshly fallen snow.
Gradient blending also works surprisingly well on pine cones. For example, deep burgundy fading into gold creates dramatic holiday decor, while sage green blending into cream gives a softer botanical feel. Since pine cone scales naturally overlap, they almost behave like layered flower petals during blending.
Metallic highlighting can instantly elevate the appearance of a pine cone. Gold, copper, silver, and champagne tones catch light beautifully on textured surfaces. Recent color trend reports show smoky greens, earthy neutrals, and warm metallic combinations becoming especially popular in contemporary decor.
The trick is restraint. Pine cones look most beautiful when their natural structure still remains visible beneath the paint.
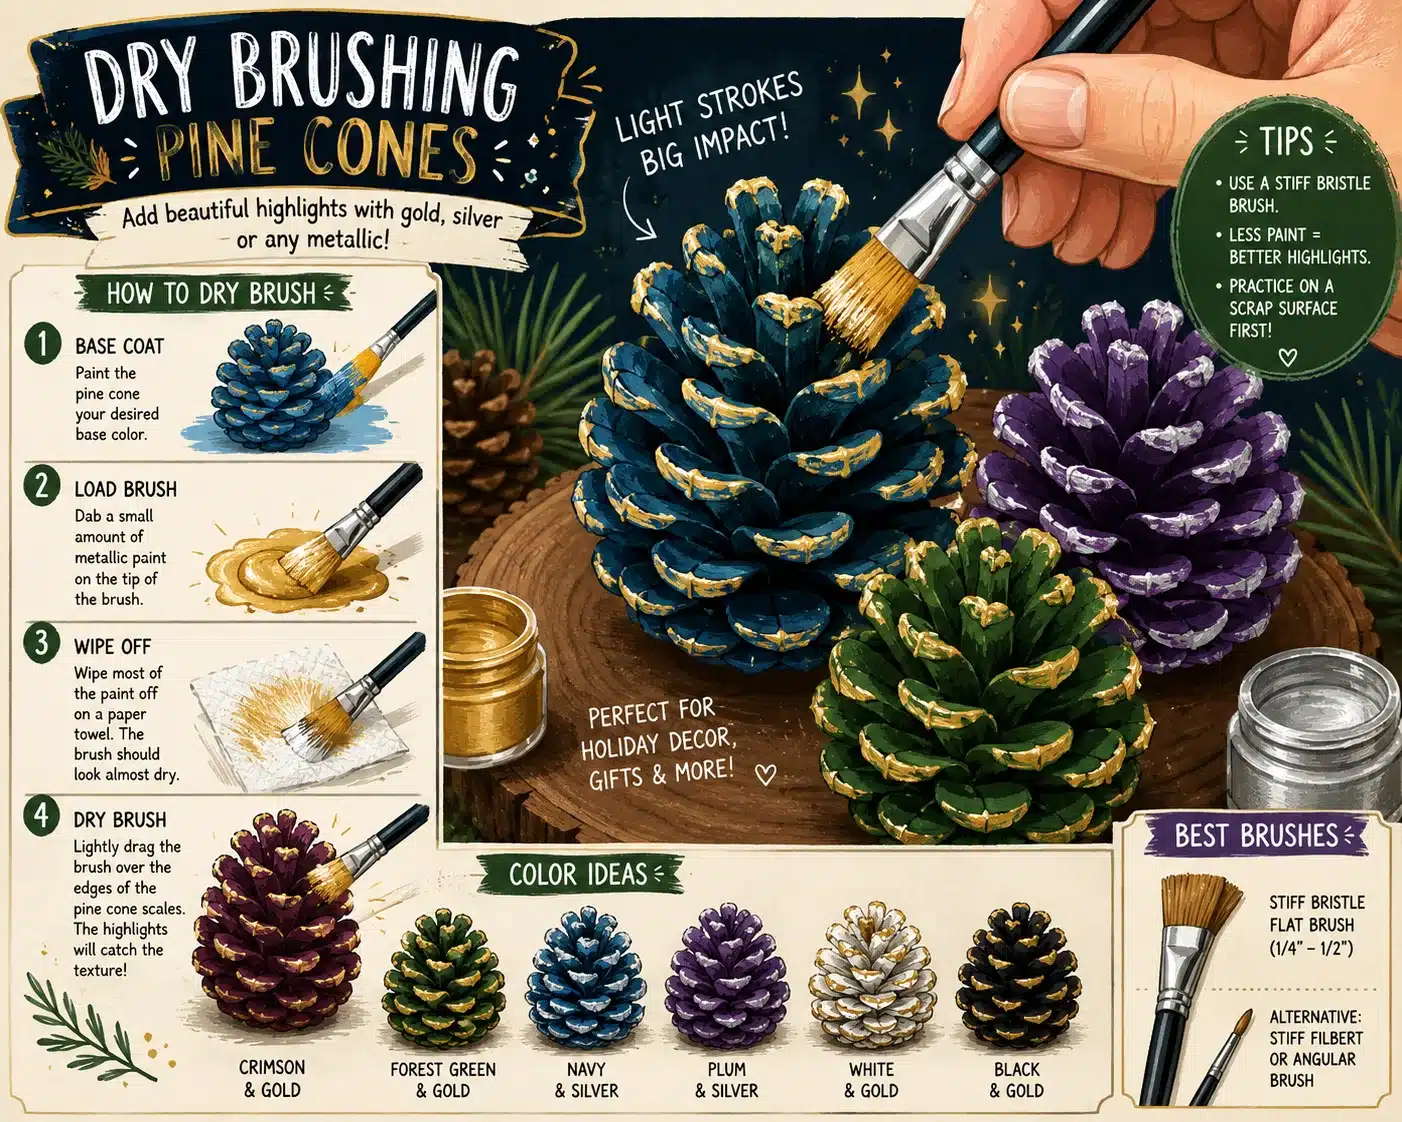
Using Dry Brushing for a More Detailed Look
Dry brushing is probably the single most effective technique for making painted pine cones look professionally crafted. It sounds fancy, but it is actually incredibly simple.
The process involves dipping a brush into paint and then wiping almost all the paint off before lightly dragging the brush across the pine cone surface. Because very little paint remains on the brush, only the raised edges catch color. The deep grooves stay darker, instantly creating contrast and detail.
Think about sunlight hitting tree bark in the forest. The raised ridges appear brighter while the deeper cracks remain shadowed. Dry brushing mimics that exact natural effect.
White dry brushing creates a snowy winter appearance. Gold and bronze dry brushing feel luxurious and festive. Soft pastel dry brushing gives pine cones a delicate spring aesthetic. Black dry brushing over metallic bases can even create dramatic antique finishes.
The best brushes for this method are often old, stiff brushes that would normally be considered worn out. Their rough texture helps skim the raised surfaces naturally.
Dry brushing works especially well after applying a darker base coat first. For example:
| Base Color | Dry Brush Color | Result |
|---|---|---|
| Dark Brown | Gold | Rustic luxury |
| Forest Green | White | Winter woodland |
| Burgundy | Copper | Cozy autumn look |
| Black | Silver | Modern metallic style |
Many experienced crafters layer multiple dry-brushed colors gradually. A little bronze followed by subtle gold highlights can make ordinary pine cones look almost sculptural.
This technique also prevents paint buildup. Since the brush stays relatively dry, the cone maintains sharp texture and stays open more easily.
Metallic and Seasonal Color Ideas That Stand Out
Color completely changes the personality of painted pine cones. The same cone can feel rustic, glamorous, playful, or elegant depending on the palette you choose.
Metallic finishes remain among the most popular choices because they naturally emphasize texture. Gold catches warm light beautifully, silver feels icy and sophisticated, and copper creates rich autumn warmth. Champagne metallics have become especially trendy because they combine softness with luxury.
Holiday-themed palettes are always popular:
- White and silver for snowy winter decor
- Red and gold for traditional Christmas displays
- Copper and burgundy for autumn centerpieces
- Sage green and cream for botanical minimalism
- Navy and bronze for modern rustic interiors
Nature-inspired crafting trends are increasingly leaning toward earthy, muted tones instead of loud primary colors. Dusty greens, warm terracotta, smoky blues, and soft beige combinations create a calming, organic appearance.
Some crafters even experiment with color-shifting or iridescent acrylics that subtly change depending on lighting angle. Recent acrylic paint innovations have made these specialty finishes more accessible for everyday DIY projects.
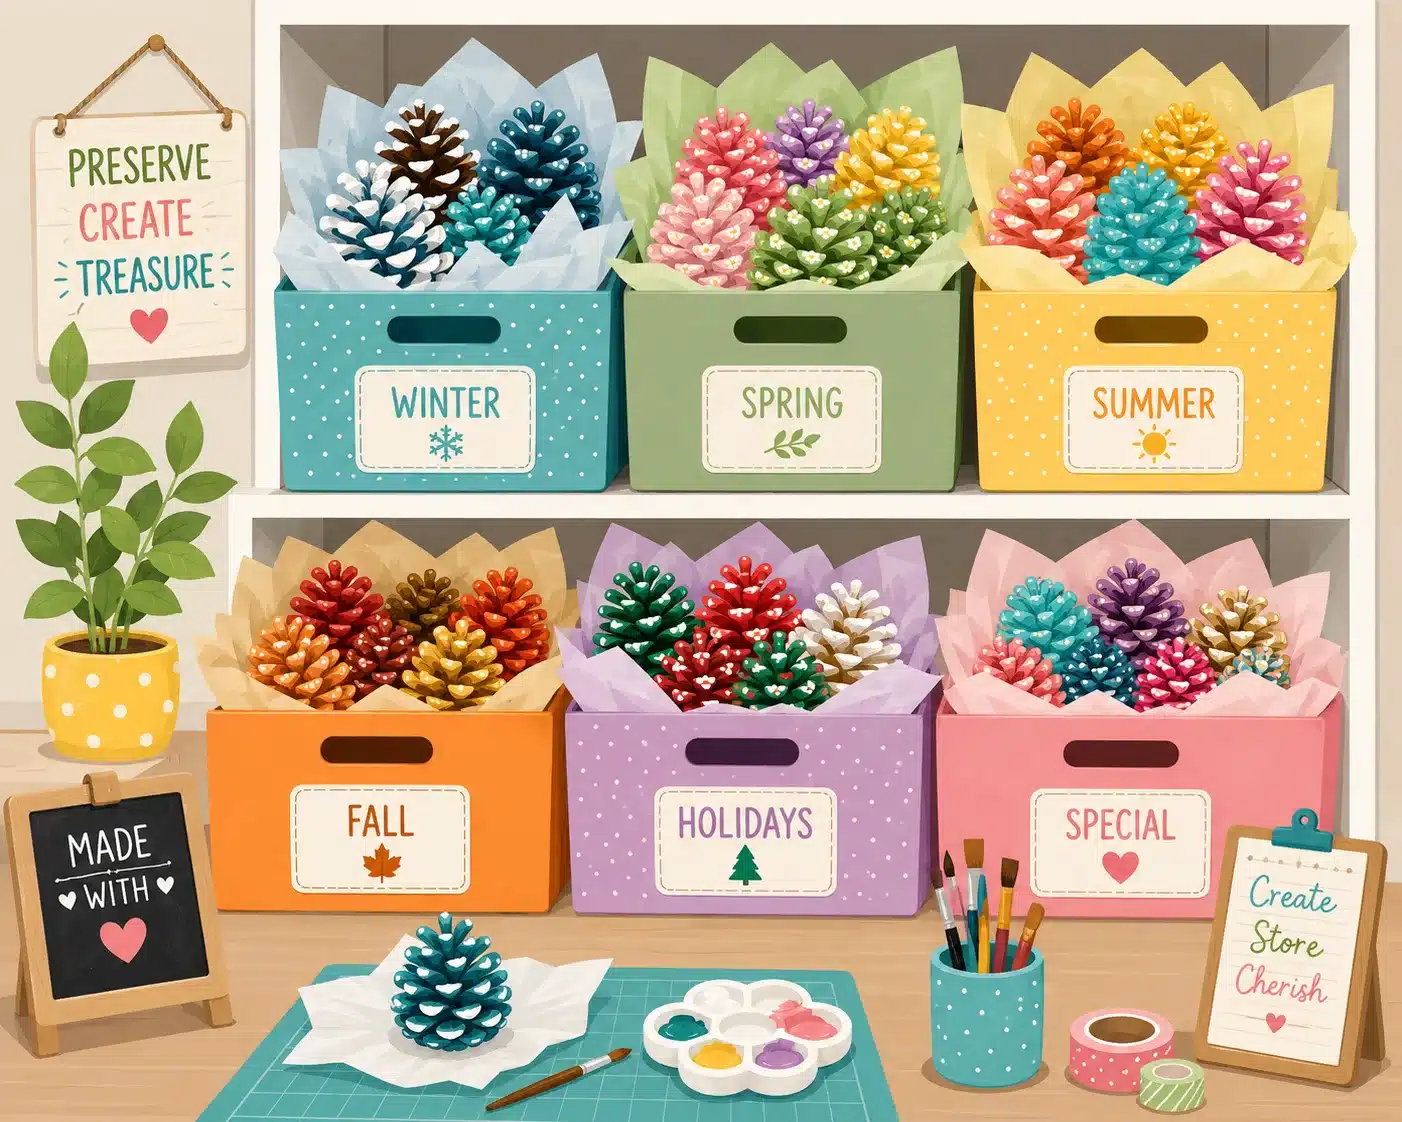
Seasonal decorating becomes incredibly easy once you start collecting painted pine cones in different palettes. You can rotate them throughout the year just like throw pillows or table runners.
Adding Glitter or Sealers Without Hiding the Shape
Glitter can either make pine cones look magical or completely ruin them. The difference usually comes down to scale and restraint.
Fine glitter tends to work much better than chunky glitter because it enhances texture instead of burying it. A light dusting across the edges catches light beautifully while still preserving the cone’s natural structure.
One smart method involves brushing clear glue only onto the tips of the scales and sprinkling glitter lightly afterward. This creates sparkle exactly where light naturally hits.
Spray adhesives can also work, but heavy application often fills crevices and reduces detail. Think of glitter like seasoning in cooking. Too little disappears, but too much overwhelms everything.
Sealers are equally important because acrylic paint can chip over time, especially on textured surfaces. Here are the most common finishing options:
| Sealer Type | Finish | Best Use |
|---|---|---|
| Matte Spray | Natural look | Rustic decor |
| Satin Spray | Soft sheen | Everyday displays |
| Gloss Spray | Shiny finish | Holiday ornaments |
Always apply sealers in thin coats. Thick sealer layers can make pine cones look plastic-like and stiff. Several light sprays produce much better results.
Some crafters combine matte sealers with selective gloss accents. For example, a mostly matte pine cone with glossy metallic tips creates gorgeous contrast.
Creative Ways to Display Painted Pine Cones at Home
Once your pine cones are painted, the real fun begins. These little decorations are surprisingly versatile.
Bowls filled with painted pine cones instantly create cozy seasonal decor. Metallic cones in glass bowls feel elegant and upscale, while earthy painted cones in wooden trays create warm rustic charm.
Wreaths are another classic option. Many crafters trim pine cones into flower-like shapes and arrange them into floral wreath designs. The result often looks so realistic that people mistake the cones for actual flowers.
Painted pine cones also work beautifully as:
 Christmas tree ornaments
- Table centerpieces
- Garland accents
- Gift toppers
- Mantel decorations
- Candle ring fillers
- Vase arrangements
Some Reddit crafters recently shared pine cone floral arrangements that looked astonishingly realistic, proving just how versatile painted cones can become in home decor.
If you enjoy entertaining, painted pine cones also make excellent seasonal place settings. Small personalized cones beside plates can double as decor and party favors.
Outdoor displays are possible too, but weather-resistant sealers become essential if moisture exposure is expected.
Storage Tips That Keep Painted Pine Cones Looking Fresh
Proper storage matters if you want your painted pine cones to last for years instead of one season. Since pine cones are natural materials, they remain somewhat reactive to humidity and temperature changes even after painting.
The biggest enemy is moisture. Damp environments can cause cones to close, soften, or develop mold. Always store them in dry containers with airflow. Cardboard boxes often work better than airtight plastic bins because they reduce trapped humidity.
Tissue paper or kraft paper layers help protect painted surfaces from scratching. Metallic finishes especially benefit from careful wrapping because friction can dull shine over time.
Avoid stacking heavy objects on top of stored pine cones. Their scales can bend or flatten permanently under pressure.
If you notice dust buildup after storage, use a soft dry brush instead of water for cleaning. Moisture exposure can reactivate the cone’s natural movement and potentially affect the paint finish.
Refreshing older painted pine cones is also surprisingly easy. A quick dry brushing touch-up or fresh sealer coat can make them look brand new again.
Many experienced crafters build seasonal pine cone collections over time. Once you realize how versatile they are, it becomes hard to stop experimenting with new colors and finishes.
Conclusion
Painting pine cones with acrylic paint is one of those crafts that feels both relaxing and deeply rewarding. A simple object collected from the ground transforms into something artistic, personal, and surprisingly elegant. The beauty lies in preserving the natural texture while enhancing it with thoughtful paint techniques.
From cleaning and drying to dry brushing, metallic finishes, and protective sealing, every step contributes to the final result. Thin paint layers, careful moisture control, and strategic highlighting help pine cones maintain their beautiful organic structure instead of becoming clogged or overly artificial.
The growing popularity of tactile, nature-inspired crafting makes painted pine cones more relevant than ever. They fit beautifully into rustic decor, modern seasonal styling, minimalist interiors, and cozy holiday displays alike. Better yet, they are affordable, sustainable, and endlessly customizable.
Once you start experimenting with painted pine cones, you will probably never look at a forest walk the same way again.
FAQs
1. What type of acrylic paint works best for pine cones?
Standard acrylic craft paint works best because it dries quickly, layers well, and preserves texture when applied in thin coats. Matte and satin finishes are especially popular for natural-looking results.
2. Why do pine cones close while painting?
Pine cones naturally react to moisture. Since acrylic paint contains water, thick paint application can cause the scales to close. Using thin layers and fully drying cones beforehand helps prevent this.
3. Can painted pine cones be used outdoors?
Yes, but they should be sealed with a weather-resistant spray sealer. Outdoor moisture and humidity can affect both the paint and the pine cone structure over time.
4. How do you add glitter without ruining the texture?
Use fine glitter sparingly and apply it mainly to the tips of the scales with light glue. Chunky glitter tends to hide detail and make pine cones look bulky.
5. How long do painted pine cones last?
With proper sealing and dry storage, painted pine cones can last for many years. Keeping them away from humidity and direct moisture helps preserve both shape and color.

Kareem Sallam is an Egyptian special writer based in Australia, with a strong interest in practical ideas and creative content that focuses on everyday solutions. He writes clear, engaging articles designed to be easy to follow and useful for a wide range of readers.
His work centers on DIY projects, handmade ideas, simple crafts, and home based creativity. Kareem aims to deliver content that is practical, inspiring, and accessible, helping readers turn simple materials into smart and enjoyable projects.