5 Gallons of Paint Will Cover How Many Square Feet in Different Spaces
Painting a room sounds simple until you stand in the paint aisle wondering one thing: how far will 5 gallons of paint actually go? Most people assume the answer is straightforward, but paint coverage works a lot like fuel mileage in a car. The number printed on the can represents ideal conditions, not the real-world chaos of textured walls, dark colors, uneven surfaces, and second coats that suddenly become necessary halfway through the job.
In most situations, 5 gallons of paint cover between 1,750 and 2,000 square feet with one coat on smooth surfaces. That estimate changes dramatically depending on the wall texture, the paint quality, the color transition, and whether primer is involved. Rough surfaces can reduce coverage by as much as 30%, while porous materials like brick or fresh drywall absorb paint like a sponge.
A lot of homeowners underestimate how much paint they need because they only measure floor space instead of wall area. Others forget that dark red walls hiding beneath white paint may require two or even three coats. Suddenly, that “enough paint” calculation turns into an expensive second trip to the store. This guide breaks everything down clearly so you know exactly how much area 5 gallons can realistically cover and how to avoid costly mistakes before the first roller even touches the wall.
Understanding Average Paint Coverage
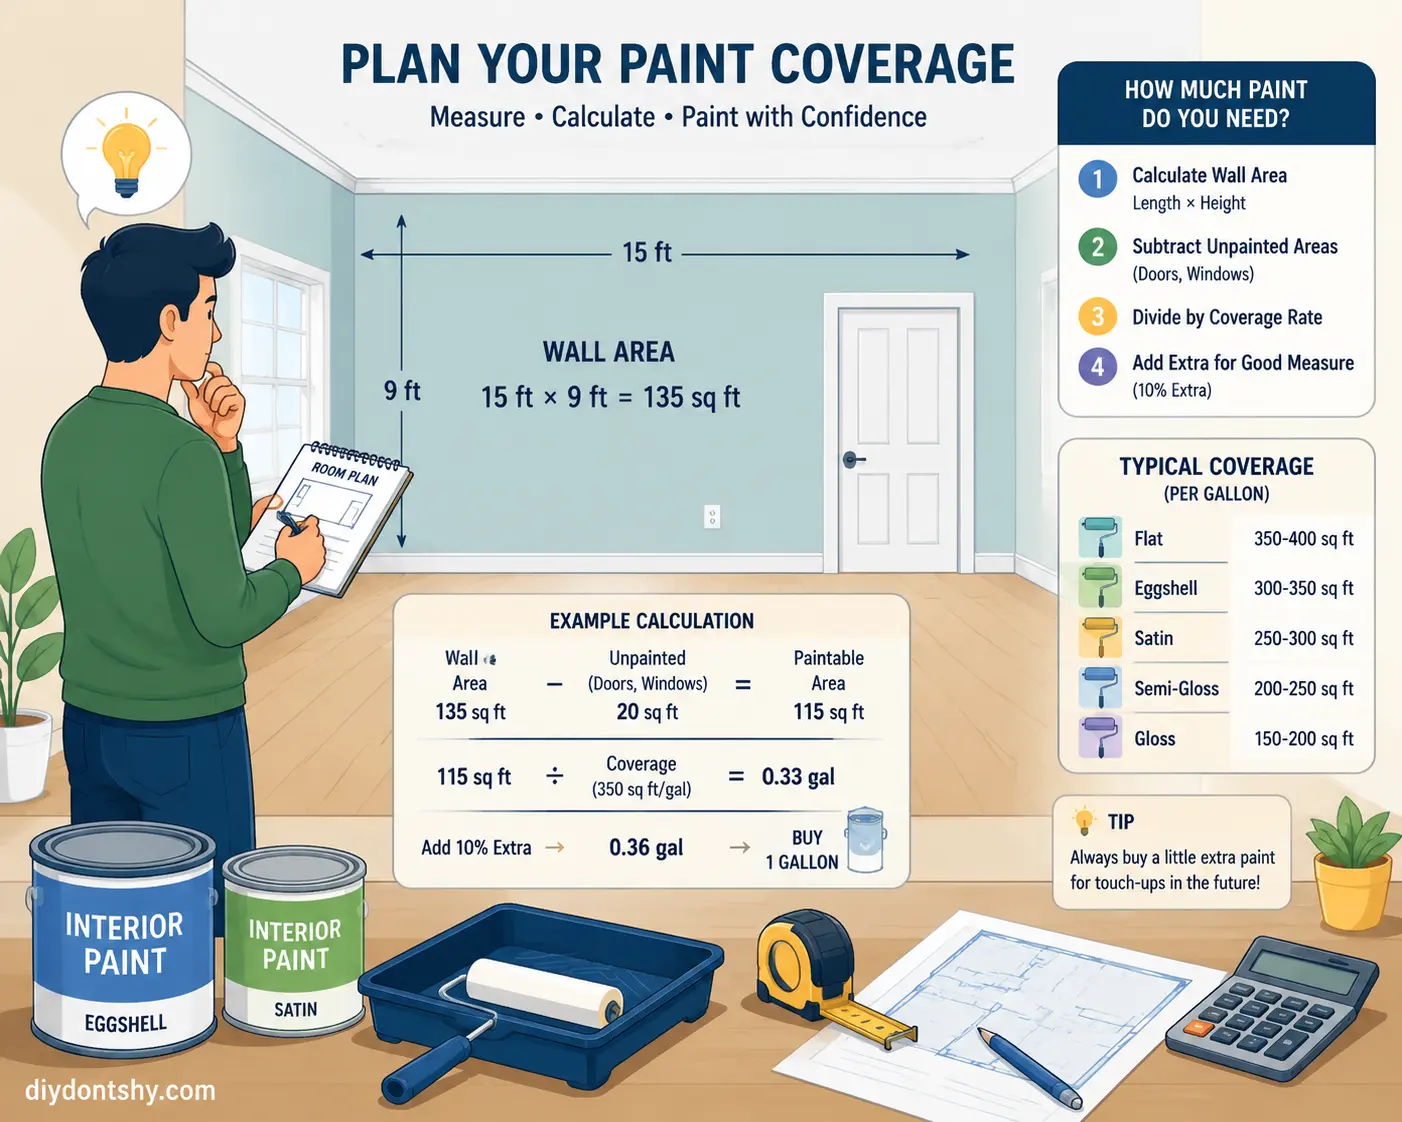
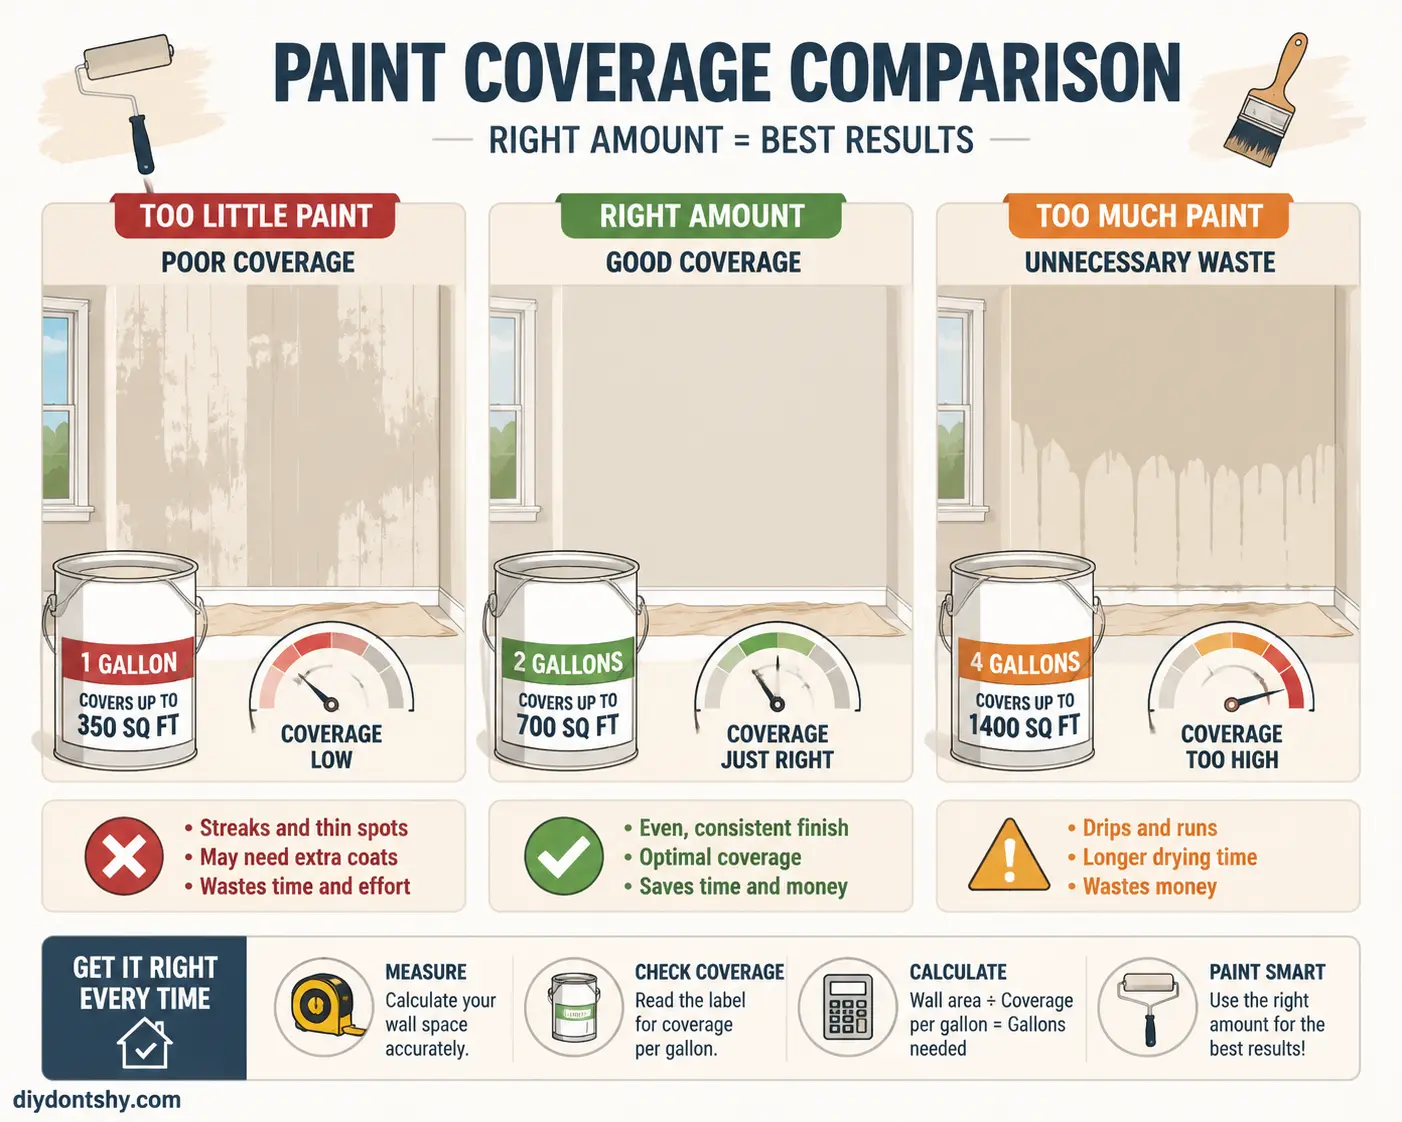
Most paint manufacturers advertise coverage rates between 350 and 400 square feet per gallon for interior paint on smooth, primed walls. Multiply that by five gallons and you get approximately 1,750 to 2,000 square feet of coverage for a single coat. That sounds pretty generous until reality walks into the room carrying textured drywall, patched holes, and a deep burgundy wall that you’re trying to turn bright white.
Think of manufacturer estimates like the fuel economy sticker on a brand-new car. Sure, you might get those numbers under perfect conditions, but most people drive through traffic, rough roads, and bad weather. Paint behaves the same way. Coverage estimates are tested in ideal laboratory-style environments using smooth surfaces and controlled application methods. Your home probably doesn’t resemble a paint laboratory.
Professional painters usually plan more conservatively. Instead of assuming 400 square feet per gallon, many contractors estimate closer to 300–350 square feet per gallon to avoid shortages. That extra margin matters because running out of paint mid-project can create visible color inconsistencies if the second batch comes from a different mix. Even slight variations in tint can become noticeable under sunlight or interior lighting.
Another factor people overlook is application thickness. Applying paint too thinly may stretch coverage, but it often creates streaks and uneven color. Applying it too heavily wastes material and increases drying time. Finding that sweet spot takes practice, which is why beginners sometimes use significantly more paint than expected. A first-time DIY painter rolling aggressively across walls can burn through gallons surprisingly fast.
Paint type also matters. Flat finishes usually cover more area because they absorb and diffuse light differently. Semi-gloss and gloss paints tend to require thicker application for a uniform appearance. Premium paints often contain more solids and better pigments, which improves hiding power and reduces the need for additional coats.
How Surface Texture Affects Paint Coverage
Surface texture changes paint coverage more dramatically than most homeowners realize. A perfectly smooth wall acts like clean paper, allowing paint to spread evenly and efficiently. A textured wall behaves more like a sponge or a mountain range full of tiny valleys that soak up paint from every angle. That additional surface area can reduce paint coverage by 15% to 30% or more.
Light textures such as orange peel drywall may still allow decent coverage rates around 300–350 square feet per gallon. Heavy knockdown textures, popcorn ceilings, stucco, brick, or rough masonry can slash coverage to 200–250 square feet per gallon. Suddenly, those five gallons that seemed endless now barely cover one large room with two coats.
Here’s a simple comparison table showing average real-world paint coverage:
| Surface Type | Average Coverage Per Gallon | Estimated Coverage for 5 Gallons |
|---|---|---|
| Smooth primed drywall | 350–400 sq ft | 1,750–2,000 sq ft |
| Light texture walls | 300–350 sq ft | 1,500–1,750 sq ft |
| Heavy textured surfaces | 200–250 sq ft | 1,000–1,250 sq ft |
| Bare drywall | 250–300 sq ft | 1,250–1,500 sq ft |
| Brick or stucco | 100–200 sq ft | 500–1,000 sq ft |
Porous materials make the problem even worse because they literally absorb paint beneath the surface. New drywall, unfinished wood, raw concrete, and unpainted brick drink up paint rapidly during the first coat. Without primer, you may need multiple finish coats just to achieve consistent color and sheen.
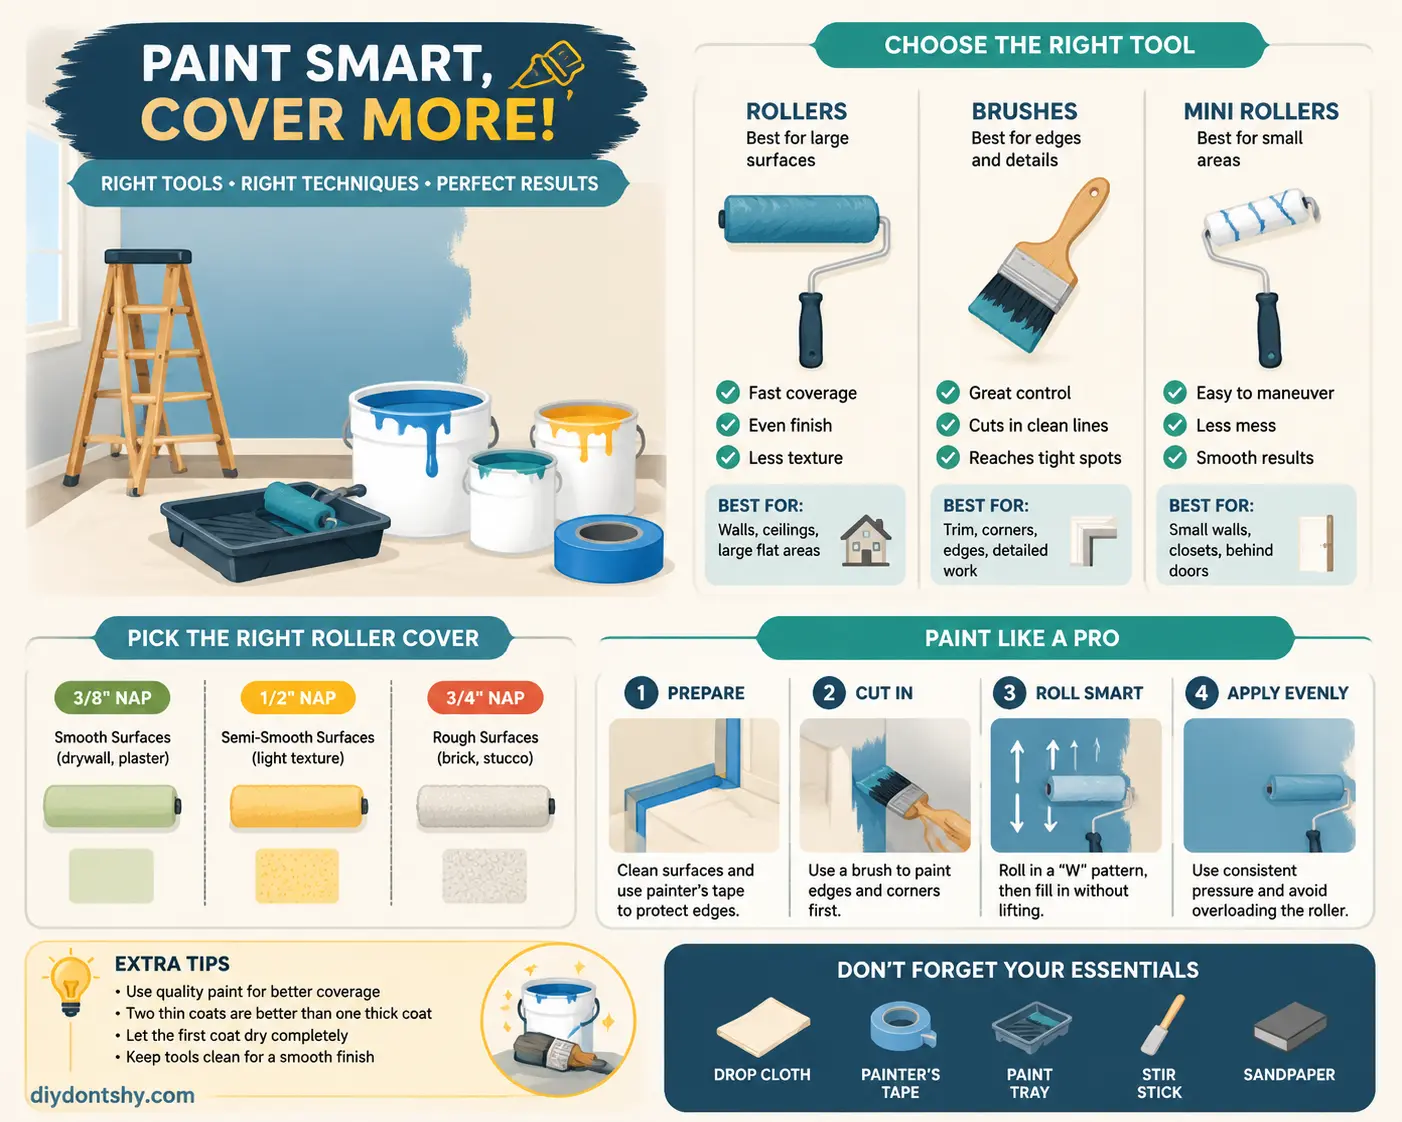
The roller you choose also influences performance on textured surfaces. A thicker roller nap carries more paint into crevices but also increases paint usage overall. Smooth walls typically use a ⅜-inch nap roller, while textured surfaces may require a ¾-inch nap or thicker.
Exterior painting magnifies these challenges. Weathered siding, stucco, and brick are exposed to years of sun, moisture, and temperature swings that create tiny cracks and porosity. Exterior surfaces almost always consume more paint than interior walls.
Why Primer Changes Everything
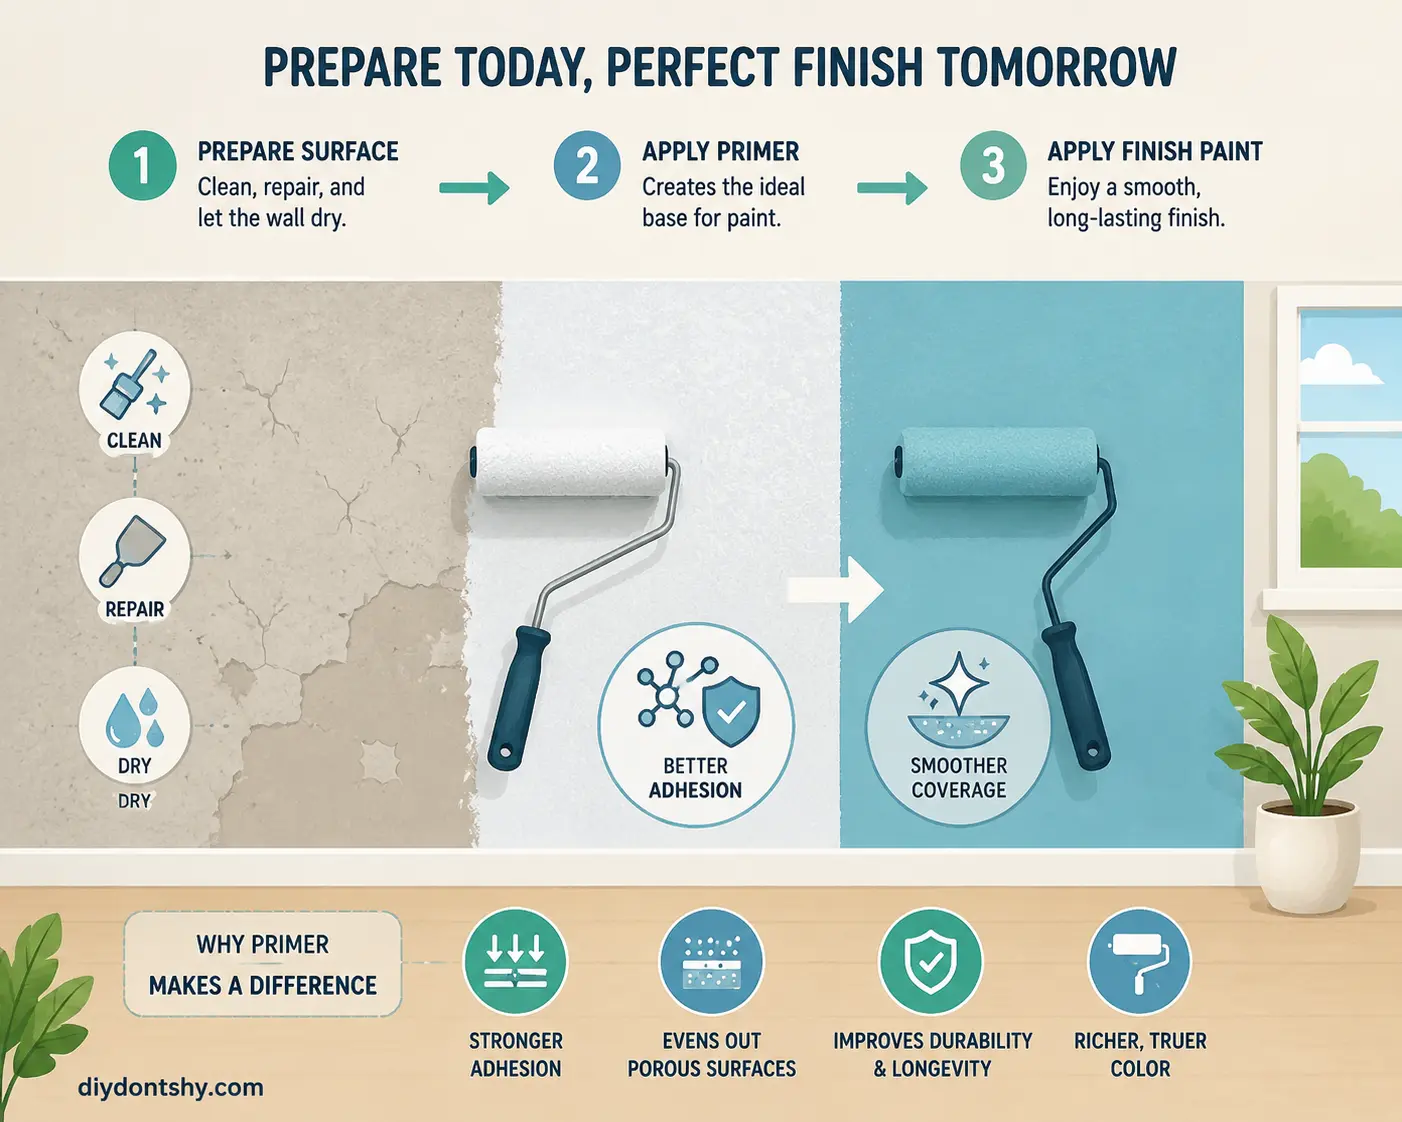
Primer is the unsung hero of a successful paint project. Many DIY painters skip it because it feels like an unnecessary extra step, but primer can dramatically improve coverage while actually reducing total paint consumption. That sounds backwards at first, but it makes perfect sense once you understand how surfaces absorb paint.
Fresh drywall is incredibly thirsty. Without primer, finish paint soaks unevenly into the surface, causing blotchy areas and forcing additional coats. Primer seals the drywall first, creating a more uniform base so the actual paint spreads evenly. On new drywall, using primer can improve finish paint coverage by hundreds of square feet across an entire home.
Color changes create another major reason for priming. Imagine painting over a dark navy blue wall with pale beige paint. Without primer, the dark color bleeds through repeatedly, even after two coats. Painters often describe this like trying to hide a black marker using a yellow highlighter. The old color keeps peeking through underneath.
Tinted primers solve that problem beautifully. Instead of fighting against the previous color with expensive finish paint, primer creates a neutral foundation. Many professional painters tint primer close to the final paint color, reducing the number of finish coats needed.
Primer also improves adhesion on glossy or difficult surfaces. Kitchens, bathrooms, trim, and previously oil-painted walls may reject fresh paint unless properly primed first. Peeling paint later is far more expensive than taking the extra preparation step upfront.
Some modern paints advertise “paint and primer in one.” These products can work reasonably well for repainting already painted surfaces in similar colors. They are less effective for severe color transitions, stains, raw drywall, or porous surfaces. In those situations, dedicated primer still performs much better.
Another overlooked benefit of primer is consistency. Walls with repaired patches often absorb paint differently than surrounding areas. Primer evens out those variations so the final coat looks seamless instead of patchy. Without it, repaired spots may flash under lighting conditions, especially with satin or semi-gloss finishes.
Calculating Square Footage Correctly Before Painting
A surprising number of people calculate paint needs incorrectly because they measure floor space instead of wall surface area. Paint doesn’t care how large your floor is. It only cares about the total area you’re coating. That mistake alone can throw off estimates by hundreds of square feet.
To measure interior walls properly, calculate the perimeter of the room and multiply it by wall height. For example, a 12-by-15-foot room has a perimeter of 54 feet. Multiply that by an 8-foot wall height and you get 432 square feet of wall space.
Using that formula:
- Length = 15 feet
- Width = 12 feet
- Height = 8 feet
The total wall area equals:
- (2 × 15 + 2 × 12) × 8
- 54 × 8
- 432 square feet
Most professionals subtract doors and windows afterward, but many DIY painters simply leave them included as a safety buffer. A standard door equals roughly 20 square feet, while average windows may range between 10 and 15 square feet each.
Ceilings complicate things further because many people forget to include them entirely. A 12-by-15-foot ceiling adds another 180 square feet of paintable area immediately. Suddenly, that “small room” becomes a much larger project.
Exterior measurements work differently because homes contain gables, trim, siding variations, and architectural details. Many painters break exteriors into rectangular sections and calculate each separately. Accuracy matters because exterior paint projects become expensive quickly, especially with premium paints.
Another critical factor is coat count. If your wall area equals 1,000 square feet and you need two coats, your effective coverage requirement becomes 2,000 square feet. Many homeowners forget this completely and only buy enough paint for one coat.
Professional estimators often add 10% extra paint for waste, touch-ups, roller absorption, and future maintenance. That reserve paint becomes extremely useful later when minor scuffs or repairs appear.
When Multiple Coats Become Necessary
People love the idea of one-coat coverage because it sounds fast, cheap, and easy. In reality, multiple coats are often necessary for durability, consistency, and proper appearance. Even premium paints frequently perform best with two coats, especially under challenging conditions.
Color transitions represent one of the biggest reasons additional coats become unavoidable. Dark reds, deep blues, vibrant greens, and intense yellows are notoriously difficult colors to cover. Some pigments simply don’t hide underlying shades well. Going from dark to light usually demands primer plus two finish coats for professional-looking results.
Stains and damaged walls create another challenge. Smoke stains, water marks, grease, and repaired drywall patches can bleed through ordinary paint. Stain-blocking primer followed by multiple finish coats often becomes necessary to completely hide the issue.
Low-quality paint can also sabotage coverage expectations. Cheap paints contain fewer solids and weaker pigments, meaning they spread thinner and hide less effectively. Ironically, bargain paint sometimes costs more overall because it requires extra coats. Higher-end paints may cost more per gallon but reduce labor and total usage significantly.
Application method changes coverage too. Sprayers waste more paint through overspray and airborne particles compared to rolling or brushing. Some experts estimate sprayers may consume up to three times more paint under certain conditions.
Lighting exposes coverage problems many people miss during application. A wall might look fine during daytime but reveal streaks and thin spots under evening lamps. That’s why professionals inspect painted surfaces under multiple lighting conditions before declaring the job finished.
Humidity and temperature influence drying behavior as well. Paint applied in poor conditions may not level properly, creating uneven appearance or requiring additional touch-ups. Exterior projects especially depend heavily on weather timing.
One subtle issue is sheen consistency. Even if color coverage appears adequate, insufficient paint thickness may create uneven gloss reflection. Satin and semi-gloss finishes make these flaws more obvious because they reflect light differently across the wall surface.
Common Mistakes That Lead to Underestimating Paint Needs
One of the biggest paint mistakes is trusting the label blindly without accounting for real-world conditions. The can might promise 400 square feet per gallon, but your heavily textured living room walls may only deliver 250 square feet. That gap becomes enormous when multiplied across an entire house.
Ignoring texture is probably the most common estimating error. Textured walls have more physical surface area than smooth walls, even though the room dimensions remain the same. Imagine wrapping gift paper around a basketball versus a smooth box. The textured object naturally requires more material.
Another major oversight is forgetting ceilings, trim, closets, hallways, and accent walls. Homeowners often calculate only the primary wall surfaces and then suddenly realize they still need paint for baseboards, crown molding, doors, and ceilings. Those extras add up quickly.
People also underestimate waste. Rollers absorb paint, brushes retain material, trays collect residue, and small spills happen during nearly every project. Paint left inside the can for touch-ups later should also be considered part of the required amount.
Poor surface preparation creates hidden paint consumption too. Dusty, greasy, or damaged walls prevent smooth application and may force additional coats. Skipping sanding or cleaning can sabotage even high-quality paint.
Buying different batches later creates another headache. Even when paint codes match perfectly, slight tint variations between production batches can become noticeable. Professionals often “box” paint together by mixing multiple cans into a larger container for consistent color across the entire project.
Using the wrong roller nap can waste surprising amounts of paint. Thick rollers on smooth walls overload surfaces and reduce efficiency, while thin rollers on textured walls fail to reach crevices properly.
Time pressure also leads to mistakes. People rushing through a project often spread paint too thinly or unevenly. Then they need extra coats later to fix visible roller marks and streaks. Slow, controlled application usually provides better coverage and a cleaner finish.
Tips for Getting More Even Coverage From Each Gallon
Getting maximum coverage from paint isn’t about stretching it thin like butter scraped across toast. It’s about improving efficiency while maintaining a professional finish. The goal is consistent, even application that fully hides the surface underneath.
Start with proper surface preparation. Clean walls thoroughly, repair holes, sand rough patches, and remove dust before painting. Smooth, prepared surfaces allow paint to glide evenly instead of soaking unpredictably into imperfections.
Choosing high-quality tools matters more than many people realize. Cheap rollers shed fibers, distribute paint unevenly, and absorb excess material. Quality rollers release paint more consistently and reduce wasted product.
Use the correct roller nap for the surface:
- Smooth drywall: ⅜-inch nap
- Light texture: ½-inch nap
- Heavy texture: ¾-inch nap or thicker
Maintaining a wet edge is another professional technique that dramatically improves appearance. Instead of stopping randomly in the middle of a wall, painters work continuously across sections to avoid visible lap marks.
Paint should also be stirred thoroughly before and during use. Pigments settle over time, and inconsistent mixing can create uneven color or sheen across walls. Professionals frequently remix paint throughout large projects.
Temperature plays a surprisingly important role. Most paints perform best between 50°F and 85°F. Extreme heat causes paint to dry too quickly, creating streaks and roller marks. High humidity slows drying and may affect adhesion.
Primer remains one of the best ways to maximize coverage efficiency. A properly primed surface allows finish paint to spread evenly and achieve full color faster. Skipping primer may appear cheaper initially but often increases overall paint usage.
Another smart strategy is buying slightly more paint than calculated. Experts commonly recommend an extra 10% buffer. That spare paint becomes invaluable for touch-ups months later when furniture scuffs or wall repairs happen.
Finally, resist the temptation to dilute paint unless the manufacturer specifically recommends it. Watering down paint excessively weakens coverage and durability. Thin paint may appear to stretch farther initially but usually requires additional coats later.
Paint Coverage Comparison Table
| Condition | Coverage Per Gallon | 5 Gallons Coverage |
|---|---|---|
| Smooth primed interior wall | 350–400 sq ft | 1,750–2,000 sq ft |
| Lightly textured wall | 300–350 sq ft | 1,500–1,750 sq ft |
| Heavy textured wall | 200–250 sq ft | 1,000–1,250 sq ft |
| New drywall without primer | 250–300 sq ft | 1,250–1,500 sq ft |
| Brick or stucco exterior | 100–200 sq ft | 500–1,000 sq ft |
| Two-coat application | Coverage cut roughly in half | Varies greatly |
| Spray application | Reduced efficiency | More paint required |
Final Thoughts on 5 Gallons of Paint Coverage
So, how many square feet will 5 gallons of paint cover? Under ideal conditions, you can expect around 1,750 to 2,000 square feet with one coat. Real-world conditions almost always reduce that number. Textured walls, porous materials, drastic color changes, poor preparation, and multiple coats can dramatically increase paint usage.
The smartest approach is conservative planning. Measure carefully, consider surface texture honestly, include ceilings and trim, and assume two coats unless you’re making only a minor color change. Primer may seem like extra work, but it often saves both paint and frustration in the long run.
Painting isn’t just about color. It’s about preparation, technique, and understanding how surfaces behave. A smooth wall and a rough stucco exterior might technically occupy the same square footage, but they consume paint very differently. Treating every project the same is where estimation mistakes happen.
Buying slightly more paint than calculated is almost always better than running short halfway through the job. Leftover paint helps with future touch-ups, while mismatched batches can become a permanent visual annoyance.
At the end of the day, accurate paint estimation is less about mathematical perfection and more about understanding the variables that influence coverage. Once you account for those variables properly, estimating becomes much easier and your finished project looks dramatically better.
FAQs
How many square feet does 5 gallons of paint cover with two coats?
If one coat covers roughly 1,750–2,000 square feet on smooth walls, two coats reduce effective coverage to approximately 875–1,000 square feet because the entire surface must be painted twice.
Does expensive paint really cover better?
Yes, higher-quality paint often contains more solids and better pigments, which improves hiding power and reduces the need for extra coats. Premium paint can sometimes save money overall by lowering total paint usage.
Should I always use primer before painting?
Primer is strongly recommended for new drywall, raw wood, major color changes, stained surfaces, and glossy finishes. It improves adhesion and helps finish paint cover more evenly.
How much paint should I buy extra?
Most professionals recommend purchasing about 10% more paint than your calculations suggest. This accounts for waste, touch-ups, and future repairs.
Why does textured wall paint coverage decrease so much?
Textured surfaces contain more actual surface area because of grooves, peaks, and crevices. Paint fills all those tiny spaces, reducing the total square footage covered per gallon.

Ahmed Elhor is an Egyptian SEO specialist, pharmacist, and copywriter based in Canada. He combines strong research skills with search focused writing to create clear, helpful content that answers real questions and ranks effectively in search engines.
With a passion for practical DIY ideas, homemade solutions, and creative projects, Ahmed focuses on producing easy to follow guides that are simple, affordable, and useful for everyday life. His work blends creativity with structure, helping readers turn basic materials into meaningful results.