How to Seal Air Dry Clay After Painting

Creating something with air dry clay feels a bit magical, doesn’t it? You shape a lump of soft clay with your hands, paint it with personality, and suddenly it becomes a decorative bowl, a miniature sculpture, jewelry, or even a keepsake that means something deeply personal. But here’s the catch many beginners discover the hard way: painted air dry clay is surprisingly vulnerable if you don’t seal it properly.
Without a protective finish, moisture can sneak into the clay, colors may fade, paint can peel, and the surface may become sticky or cracked over time. That’s why sealing is not just an optional final touch; it’s the armor that protects your artwork from everyday wear and environmental damage. Recent crafting guides and artist discussions consistently emphasize that multiple thin coats of acrylic varnish or polyurethane provide the best protection for painted air dry clay pieces.
Before diving into the step-by-step process, let’s map out everything covered in this guide.
Contents
Why Sealing Air Dry Clay Matters
Air dry clay may look solid once it hardens, but beneath the surface it behaves more like a sponge than ceramic pottery. Unlike kiln-fired clay, air dry clay never becomes fully waterproof because it hardens through evaporation rather than intense firing temperatures. That means even beautifully painted pieces can absorb moisture from the air over time. According to recent crafting resources, unsealed air dry clay is especially vulnerable to softening, cracking, fading, and mold growth when exposed to humidity.
Think of sealing like putting a raincoat on your project. The clay underneath stays safer because the sealer forms a barrier between the environment and the surface. Without that barrier, paint layers can chip easily, especially around edges and corners that are handled frequently. Many beginners blame the paint when colors start peeling, but the real culprit is often the lack of a durable finish coat protecting the artwork.
Another important reason to seal painted clay is color preservation. Acrylic paint tends to look richer and more vibrant once sealed properly. Matte finishes soften the appearance while glossy finishes make colors pop dramatically. Either way, a good sealer locks pigments into place so sunlight, dust, and moisture don’t gradually dull the design. Some modern acrylic sealers even contain UV-resistant ingredients that help slow fading over time.
Durability also changes completely after sealing. A decorative clay tray sitting on a shelf might survive unsealed for a while, but jewelry, coasters, ornaments, and figurines need real protection. If you’ve ever spent hours painting tiny details only to watch them scratch off after a week, you already know why this finishing step matters so much.
The Porous Nature of Air Dry Clay
One thing many people misunderstand is that dry does not mean waterproof. Air dry clay can feel rock hard while still remaining highly porous underneath. Tiny invisible pockets inside the clay continue absorbing humidity from the environment long after the project appears finished. That’s why professional crafters repeatedly recommend sealing every exposed area, including bottoms, edges, and hidden grooves.
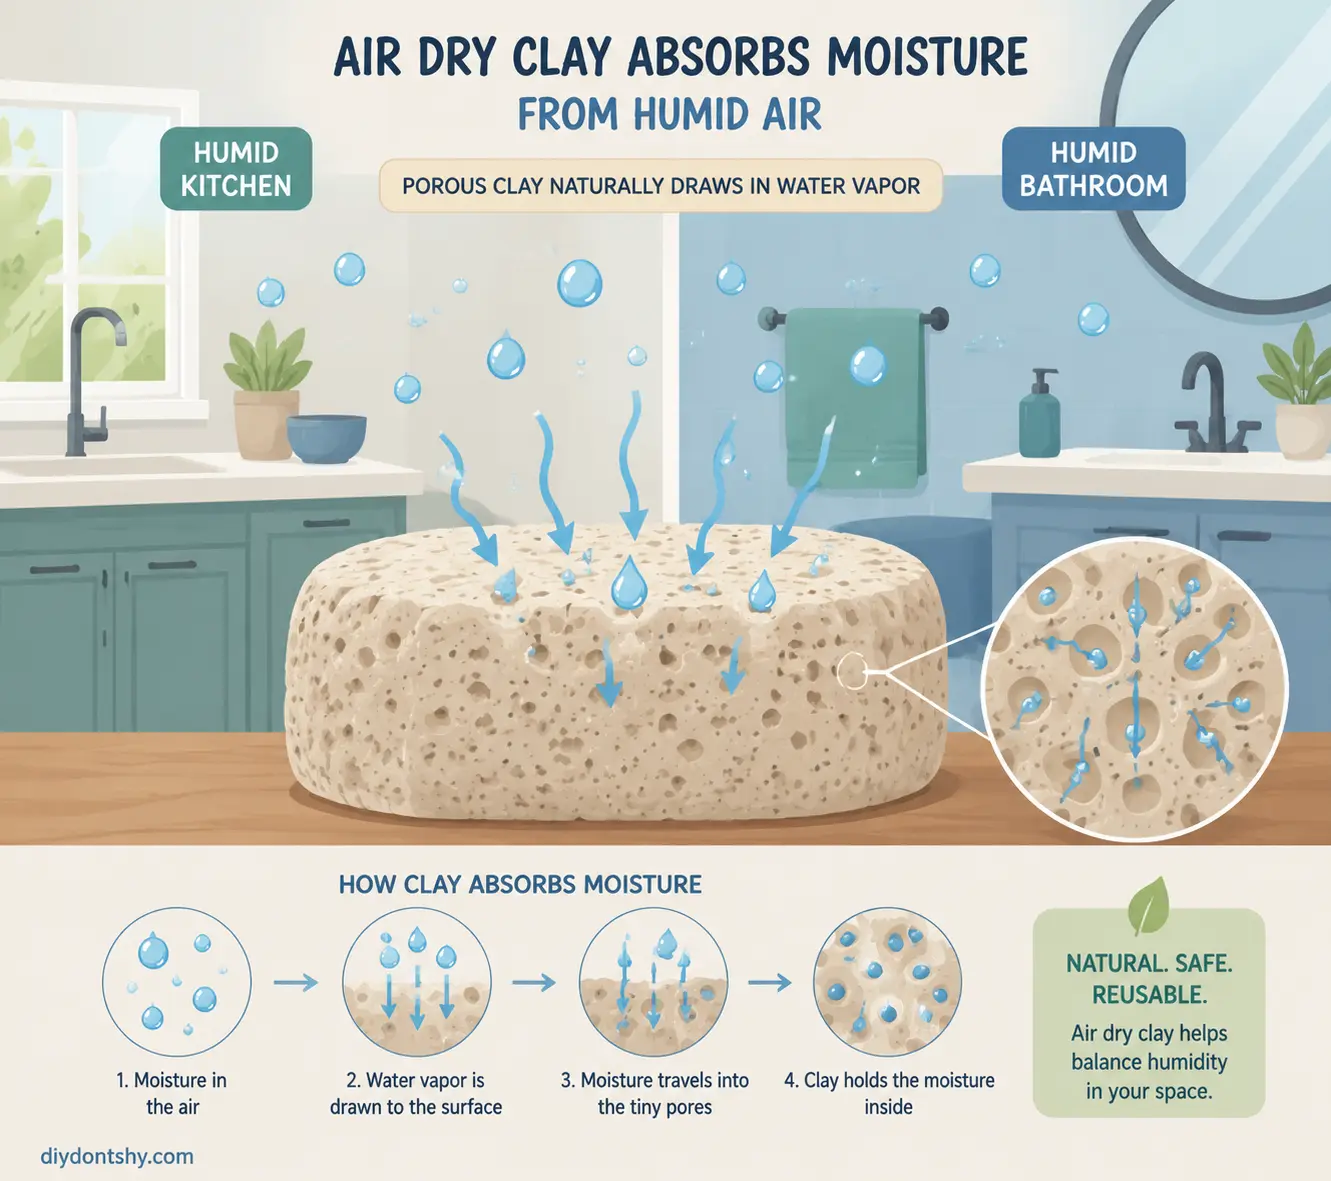
Humidity becomes especially problematic in bathrooms, kitchens, or countries with damp climates. Imagine leaving a paper towel outside during a humid day; it gradually pulls moisture from the air. Air dry clay behaves in a similar way. Over time, that moisture can weaken the structure, cause swelling, or create hairline cracks that spread slowly through the piece.
Paint alone doesn’t always solve this issue. While acrylic paint provides some surface coverage, many paints still allow microscopic moisture penetration. That’s why clear finishing coats are considered essential rather than decorative. The sealer acts like the final locked door after all the painting work is done.
Some artists even seal clay before painting to reduce uneven paint absorption. Recent guides suggest this can help produce smoother, more vibrant color application, particularly for lighter paint shades. Still, sealing after painting remains the most important stage because it protects the final artwork itself.
What Happens If You Skip the Sealer
Skipping the sealer might save twenty minutes today, but it often costs weeks of frustration later. Unsealed painted clay commonly develops peeling paint, faded colors, sticky surfaces, or brittleness. Reddit crafting communities are filled with stories from artists who watched their projects deteriorate because they underestimated how delicate air dry clay can be.
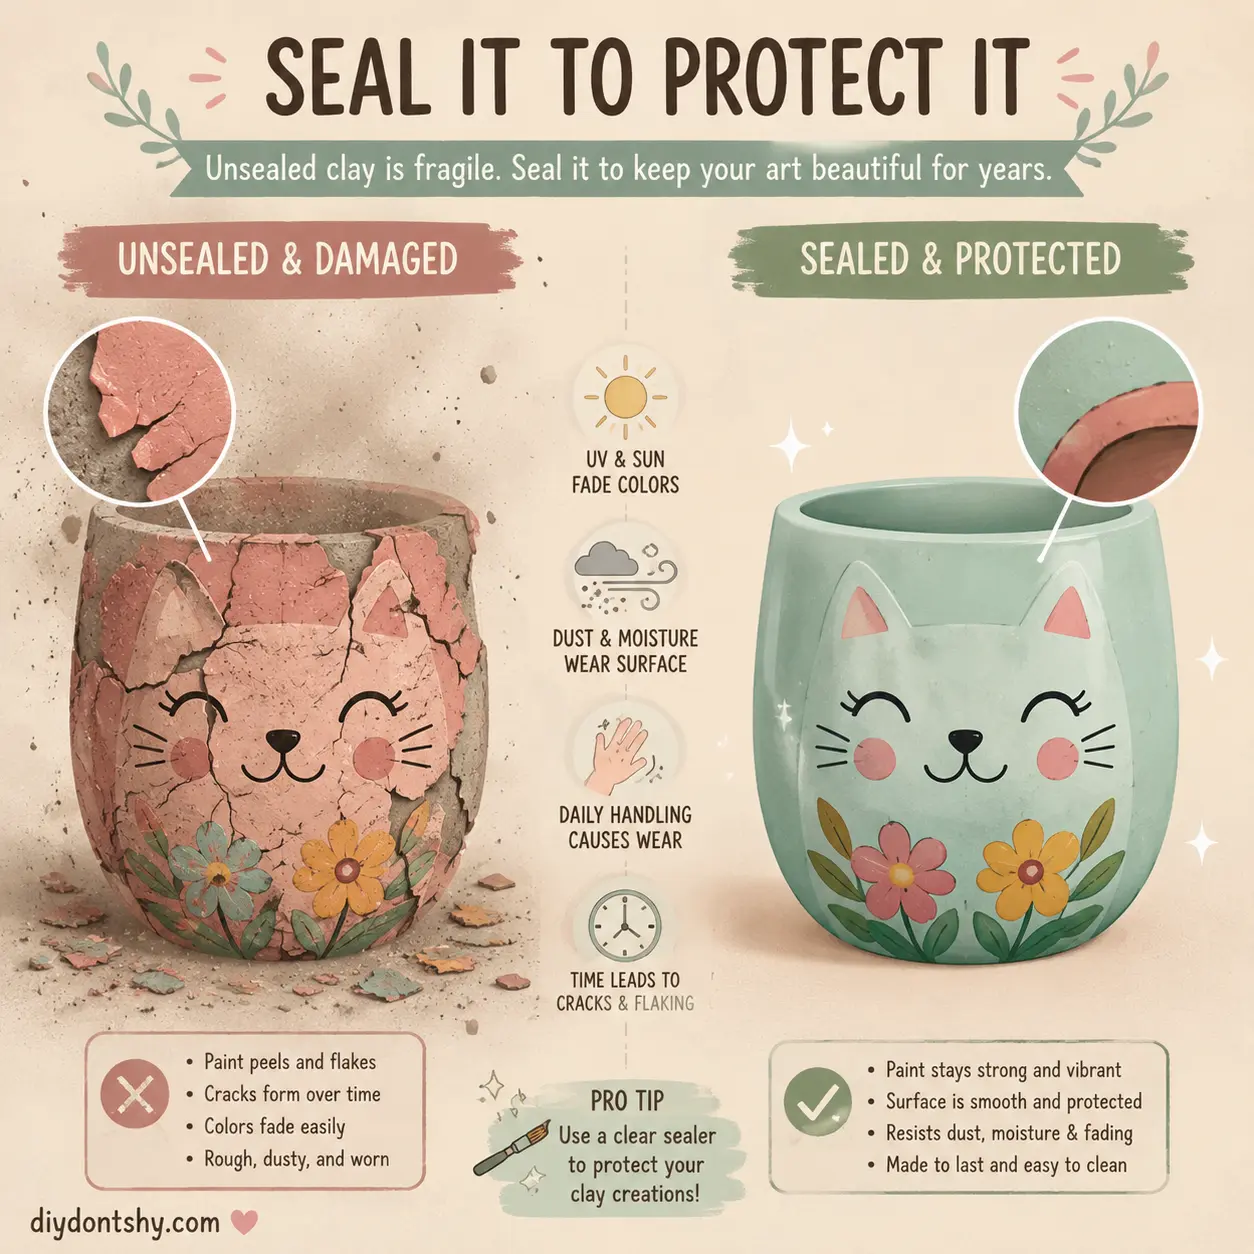
One of the biggest issues is paint flaking. Air dry clay expands and contracts slightly with humidity changes. Without a flexible protective coat, painted layers can separate from the surface like dried mud peeling from pavement. This becomes especially noticeable on corners or frequently touched areas.
Dust is another hidden enemy. Because unsealed clay remains slightly porous, it traps dirt more easily than sealed surfaces. Cleaning then becomes difficult because wiping with moisture may damage the paint itself. A proper sealer makes the surface smoother and easier to maintain.
Then there’s the dreaded sticky finish problem. Some cheap craft sealers remain tacky for months if applied too heavily or used in humid environments. Users discussing this online frequently recommend acrylic spray varnishes or polyurethane alternatives instead of overly thick glue-based finishes for long-term durability.
Skipping protection is a little like buying a phone and refusing to use a case. Sure, it may survive for a while; but one accident, one humid day, or one careless scratch can undo hours of creative effort.
Best Types of Sealers for Painted Clay
Choosing the right sealer can feel overwhelming because craft stores are packed with glossy bottles promising miracle protection. The truth is simpler: most successful air dry clay artists rely on just a few dependable options. The best choice depends on your project type, desired finish, and how much wear the item will experience.
Here’s a quick comparison of the most popular sealing options:
| Sealer Type | Finish Options | Durability | Best For |
|---|---|---|---|
| Acrylic Varnish | Matte, Satin, Gloss | Medium-High | General crafts |
| Polyurethane | Satin, Gloss | Very High | Frequently handled items |
| Mod Podge | Matte, Gloss | Medium | Decorative indoor pieces |
| Epoxy Resin | Ultra Gloss | Extremely High | Jewelry, coasters |
Recent crafting guides consistently identify acrylic varnish and water-based polyurethane as the safest all-around choices for painted air dry clay.
Acrylic Varnish
Acrylic varnish is probably the most beginner-friendly option available. It dries relatively quickly, comes in multiple finishes, and usually doesn’t yellow over time. Water-based acrylic varnishes are especially popular because they’re easier to clean up and have lower odor compared to solvent-heavy alternatives.
For decorative figurines, ornaments, and lightweight crafts, acrylic varnish offers a strong balance between flexibility and protection. It also works beautifully with acrylic paint because both materials share similar chemical properties. That compatibility reduces the risk of cracking or peeling later.
Polyurethane Sealers
Polyurethane provides tougher protection than standard acrylic varnish. Water-based polyurethane is especially recommended because oil-based versions may yellow over time.
If your project will be touched frequently; like coasters, trays, or jewelry dishes; polyurethane often performs better. It creates a harder shell that resists scratches and moisture more effectively. The tradeoff is that thicker polyurethane layers can sometimes feel slightly plasticky if overapplied.
Mod Podge and Craft Sealers
Mod Podge is popular because it’s inexpensive and widely available. It works reasonably well for decorative items that won’t face heavy wear or moisture exposure. However, many artists report tacky finishes or reduced durability in humid conditions.
That doesn’t mean Mod Podge is useless; it just works best for lighter indoor projects rather than functional items exposed to water or heat.
Resin Finishes
Epoxy resin sits at the luxury end of clay sealing. It creates a glass-like coating with exceptional water resistance and shine. Resin is ideal for coasters, jewelry, and decorative trays where maximum durability matters.
The downside? Resin requires careful mixing, ventilation, and patience. Bubbles, uneven curing, and drips can frustrate beginners quickly. Still, for artists chasing a professional glossy finish, resin can transform a simple clay piece into something that looks store-bought.
Choosing Between Glossy, Matte, and Satin Finishes
The finish you choose changes the personality of your artwork almost as much as the paint itself. A glossy finish can make colors explode with vibrancy, while matte coatings create a softer, handmade aesthetic. Satin falls somewhere in between, offering subtle elegance without excessive shine.
Glossy sealers reflect more light, which naturally intensifies colors and enhances depth. Bright acrylic paints especially benefit from gloss because the reflective surface gives them a polished appearance. This makes glossy finishes popular for charms, decorative figurines, and vibrant statement pieces.
Matte sealers create the opposite mood. Instead of reflecting light dramatically, they diffuse it softly. That means earthy tones, rustic pottery styles, and natural-looking sculptures often appear more sophisticated with matte protection. Matte also hides fingerprints and minor scratches better than gloss.
Satin finishes are like the diplomatic middle child. They offer slight sheen without the mirror-like effect of full gloss. Many crafters prefer satin because it looks professional while still preserving some handcrafted warmth. If you can’t decide, satin is usually the safest universal choice.
Recent air dry clay guides emphasize that finish selection is mostly aesthetic rather than structural; the protection level depends more on product quality and coat thickness than shine level alone.
Preparing Painted Clay Before Sealing
Preparation makes a huge difference in the final outcome. Applying sealer too early is one of the fastest ways to ruin an otherwise beautiful project. Even if paint feels dry to the touch, moisture trapped underneath can cause cloudiness, bubbling, or peeling later.
Most experts recommend allowing painted air dry clay to sit at least 24 hours before sealing, longer for thicker paint layers or humid environments. Patience matters here more than people expect. Think of it like baking bread; you can’t rush the cooling stage without consequences.
Start by checking the surface carefully under bright light. Dust particles, lint, and pet hair become surprisingly noticeable once trapped beneath clear varnish. Use a soft dry brush or microfiber cloth to remove debris gently.
Sanding can also improve results if the clay surface feels rough. Fine-grit sandpaper smooths imperfections without damaging the paint. Just avoid aggressive sanding after painting unless you intentionally want distressed textures.
Temperature and humidity matter too. Applying sealer in damp conditions increases drying time and may create tacky surfaces. A cool, dry room with decent airflow usually produces the cleanest finish.
Brush-On vs Spray Sealers
The battle between brush-on and spray sealers is almost like choosing between a paintbrush and an airbrush; both work beautifully, but each shines in different situations.
Brush-on sealers offer more control. They’re excellent for detailed sculptures, textured surfaces, and projects with crevices that sprays may miss. You can guide the product exactly where needed and build thicker protective layers gradually. Brush-on polyurethane especially works well for heavily used objects.
The challenge comes from streaks and brush marks. Thick applications often dry unevenly, creating visible lines or cloudy areas. Using soft synthetic brushes and applying ultra-thin coats helps reduce this problem dramatically.
Spray sealers are loved for smooth, even coverage. They’re especially useful for intricate details because the mist reaches areas brushes struggle to access. Spray acrylic varnishes also dry faster and rarely leave streaks when applied correctly.
Many Reddit users specifically recommend clear acrylic spray sealers for avoiding sticky finishes common with some brush-on craft glazes.
Still, spray products require ventilation and careful technique. Holding the can too close may cause drips, while spraying too heavily can create cloudy patches. Light sweeping passes usually produce the best results.
How to Apply Sealer Properly
The secret to professional-looking results isn’t expensive materials; it’s restraint. Beginners almost always apply too much sealer too quickly. Thick coats trap moisture, dry unevenly, and increase the risk of cracking or stickiness.
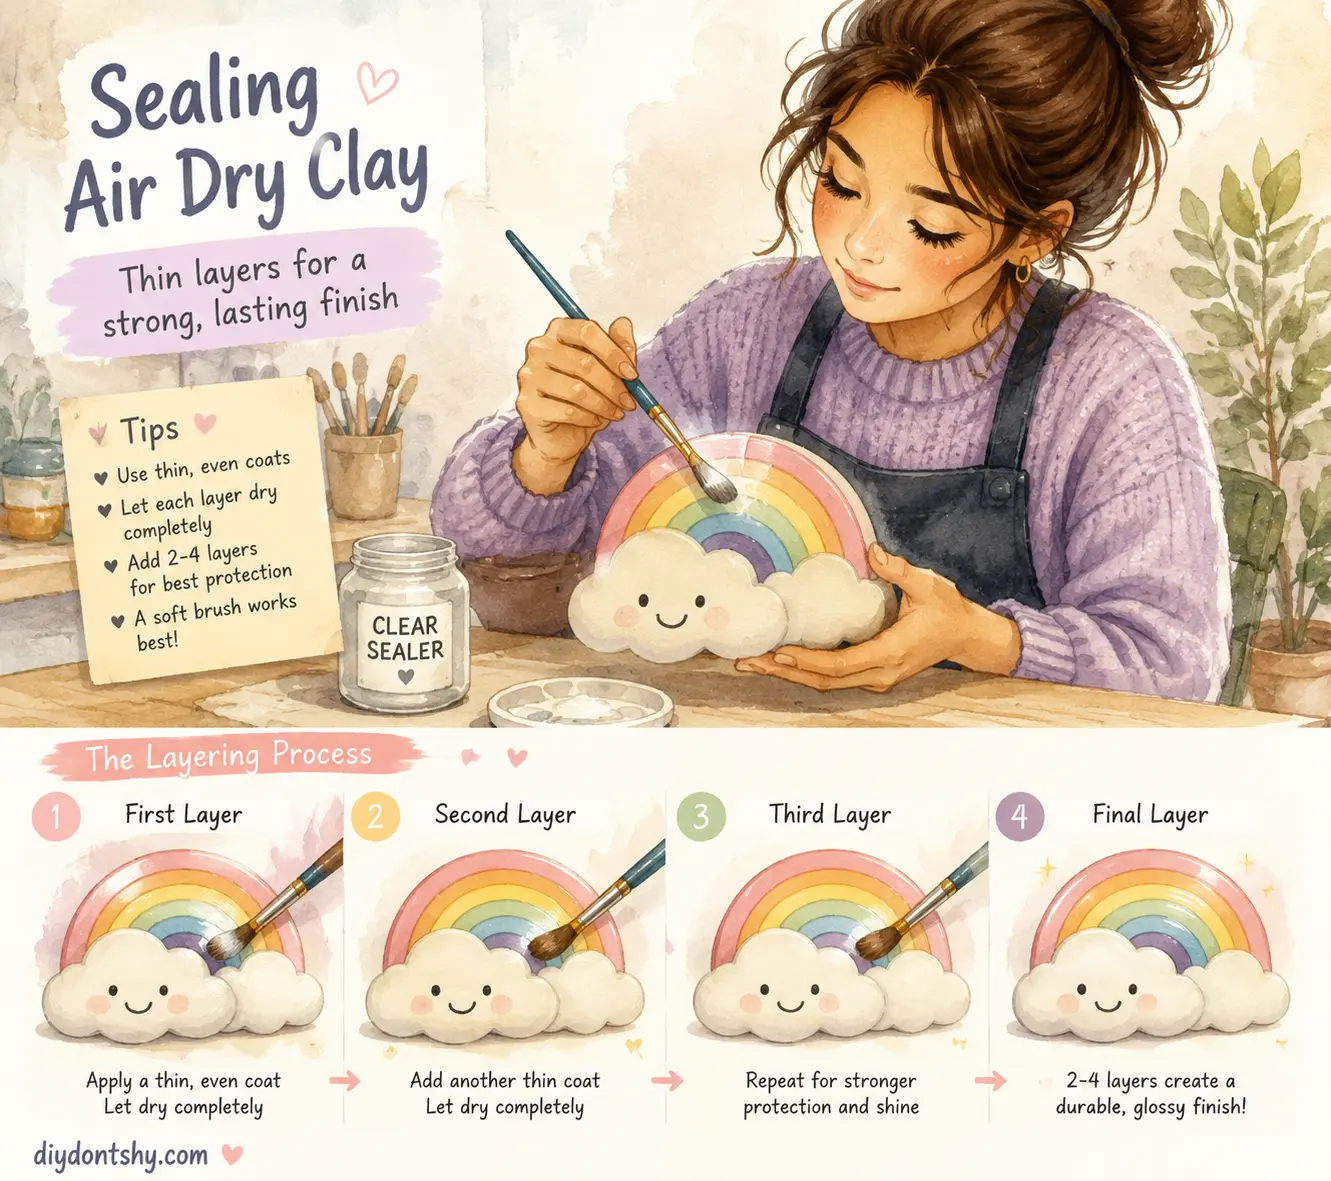
Thin layers are your best friend.
Start with a very light first coat. Don’t worry if it looks slightly uneven initially. The first layer acts more like a foundation than the final finish. Allow it to dry fully according to product instructions before adding additional coats.
Most experts recommend two to three thin coats for standard protection. Functional items or moisture-prone projects may benefit from four or five thin layers instead of one thick coat.
Here’s a simple application process many artists follow:
- Ensure clay and paint are fully dry.
- Clean away dust and debris.
- Apply the first thin sealer coat.
- Let it dry completely.
- Lightly inspect for imperfections.
- Apply additional thin coats gradually.
- Allow full curing before heavy handling.
This layered approach works because each coat bonds more evenly without trapping excess moisture underneath.
Avoiding Common Sealing Problems
Nothing feels worse than ruining a finished clay project during the final step. Thankfully, most sealing disasters come from a few predictable mistakes.
Preventing Streaks and Brush Marks
Brush streaks usually happen because the sealer is too thick or the brush is overloaded. A soft synthetic brush with gentle, even strokes helps tremendously. Avoid repeatedly brushing over partially drying areas because that creates texture inconsistencies.
Spray sealers naturally reduce streak risk, which is why many artists prefer them for smooth decorative finishes.
Avoiding Sticky Surfaces
Sticky finishes frustrate crafters everywhere. According to many community discussions, overly thick Mod Podge layers or humid drying conditions are common causes.
To avoid tackiness:
- Use thin coats only
- Allow full drying between layers
- Avoid humid rooms
- Choose water-based polyurethane or acrylic varnish for stronger curing
If a surface remains sticky after several days, lightly dusting with cornstarch can temporarily reduce tackiness, though resealing with a higher-quality product may ultimately be necessary.
Preventing Cracks and Peeling
Cracks often form when wet layers dry unevenly or when the underlying clay still contains moisture. Always give air dry clay enough curing time before painting or sealing. Recent Reddit discussions show many beginners underestimate drying time, especially for thicker projects.
Peeling can also happen when paint adhesion is weak. Some artists solve this by applying gesso or primer before painting, especially on smoother clay surfaces.
Drying and Curing Tips for Long-Term Durability
Drying and curing are not the same thing, and understanding that difference can save your artwork. Drying means the surface no longer feels wet. Curing means the protective finish has chemically hardened completely.
Many sealers dry within 15 to 30 minutes per coat but require 24 to 48 hours for full curing. During this period, the finish remains vulnerable even if it feels touchable.
Avoid stacking pieces or exposing them to moisture immediately after sealing. Even fingerprints can become permanent impressions in softer finishes during early curing stages.
Air circulation matters too. Good airflow helps solvent evaporation and encourages more even curing. A small fan placed nearby; not directly blasting the project; can help speed the process safely.
Temperature extremes should also be avoided. Excessive heat may soften certain finishes, while cold temperatures slow curing dramatically. Room temperature conditions generally provide the safest environment.
For maximum durability, many artists wait several days before using functional clay pieces like trays or coasters. It feels slow, but curing patience often determines whether a project lasts months or years.
Ways to Preserve Color and Prevent Moisture Damage
Protecting color involves more than just adding a shiny layer. Sunlight, humidity, and handling all gradually affect painted surfaces over time. Choosing UV-resistant sealers helps slow fading, especially for brightly colored projects displayed near windows.
Storage matters too. Even sealed air dry clay should not be soaked in water or left outdoors permanently. Unlike fired ceramic, air dry clay remains somewhat sensitive internally.
Here are a few practical habits that extend longevity dramatically:
| Protection Method | Benefit |
|---|---|
| UV-resistant sealer | Reduces color fading |
| Multiple thin coats | Improves moisture resistance |
| Indoor storage | Prevents humidity damage |
| Soft cleaning cloth | Prevents scratching |
| Full curing time | Strengthens protective finish |
Handling frequency also changes how much protection is needed. Decorative shelf items require less aggressive sealing than jewelry dishes, coasters, or key holders touched daily.
Some advanced artists even combine techniques, using acrylic varnish beneath resin topcoats for extra durability. Others apply periodic maintenance coats every couple of years to refresh older projects.
At the end of the day, preserving painted clay is about respecting its limitations while enhancing its strengths. Air dry clay will never behave exactly like fired ceramic; but with proper sealing, it can remain beautiful far longer than many people expect.
Conclusion
Sealing painted air dry clay is the difference between creating something temporary and crafting something built to last. The clay itself may seem sturdy once dry, but without protection it remains vulnerable to moisture, scratches, fading, and peeling. A carefully chosen sealer transforms fragile artwork into a far more resilient finished piece.
Whether you prefer a glossy varnish that makes colors sparkle, a matte finish that looks earthy and handmade, or a satin coating that balances both worlds, the key lies in patience and thin, even application. Most problems; sticky surfaces, streaks, cracks, and peeling; come from rushing the process or applying coats too heavily.
Brush-on sealers provide precision and durability, while spray sealers offer smoother coverage and convenience. Water-based acrylic varnishes and polyurethane finishes remain among the most recommended options for both beginners and experienced crafters because they combine flexibility, protection, and ease of use.
Your finished clay piece deserves more than just paint. It deserves protection that keeps the colors vibrant, the surface smooth, and the structure strong long after the creative excitement fades.
FAQs
1. Can air dry clay become completely waterproof after sealing?
No, air dry clay cannot become fully waterproof like kiln-fired ceramic. Sealers make it water-resistant, which helps protect against moisture and humidity, but prolonged soaking can still damage the clay.
2. What is the best sealer for air dry clay after painting?
Water-based acrylic varnish and polyurethane are among the most recommended choices because they provide durability without yellowing. Resin offers the strongest protection but requires more skill to apply properly.
3. How many coats of sealer should I use?
Most projects benefit from two to three thin coats. Frequently handled items or moisture-prone pieces may require four to five coats for better protection.
4. Why does my sealed clay feel sticky?
Sticky surfaces usually happen because coats were applied too thickly, humidity interfered with curing, or the sealer itself has lower durability. Many artists report better results with acrylic spray sealers or polyurethane compared to heavy glue-based finishes.
5. Should I use brush-on or spray sealer?
Brush-on sealers work best for detailed coverage and thicker protection, while spray sealers provide smoother, streak-free finishes on intricate projects. The best choice depends on your project size, texture, and desired finish.

Kareem Sallam is an Egyptian special writer based in Australia, with a strong interest in practical ideas and creative content that focuses on everyday solutions. He writes clear, engaging articles designed to be easy to follow and useful for a wide range of readers.
His work centers on DIY projects, handmade ideas, simple crafts, and home based creativity. Kareem aims to deliver content that is practical, inspiring, and accessible, helping readers turn simple materials into smart and enjoyable projects.