How to Use a Paint Mixing Cup for Accurate Paint Ratios
Painting looks simple from the outside. You pour paint into a cup, stir it, and spray it. Easy, right? Not exactly. One tiny mistake in your paint ratio can turn a smooth glossy finish into a peeling, bubbling disaster that looks like it survived a sandstorm. That’s why understanding how to use a paint mixing cup properly matters far more than most beginners realize.
Whether you’re working on automotive paint, furniture refinishing, industrial coatings, or custom DIY projects, accurate paint mixing controls everything from texture and drying speed to adhesion and color consistency. Professional painters don’t guess measurements. They follow ratios precisely because even a slight imbalance can affect curing and durability. Recent industry guides highlight that incorrect ratios commonly lead to poor adhesion, uneven drying, cracking, and premature fading.
Before diving into the actual process, it helps to understand how mixing cups work and why they’ve become essential in modern painting systems.
Contents
Understanding What a Paint Mixing Cup Does
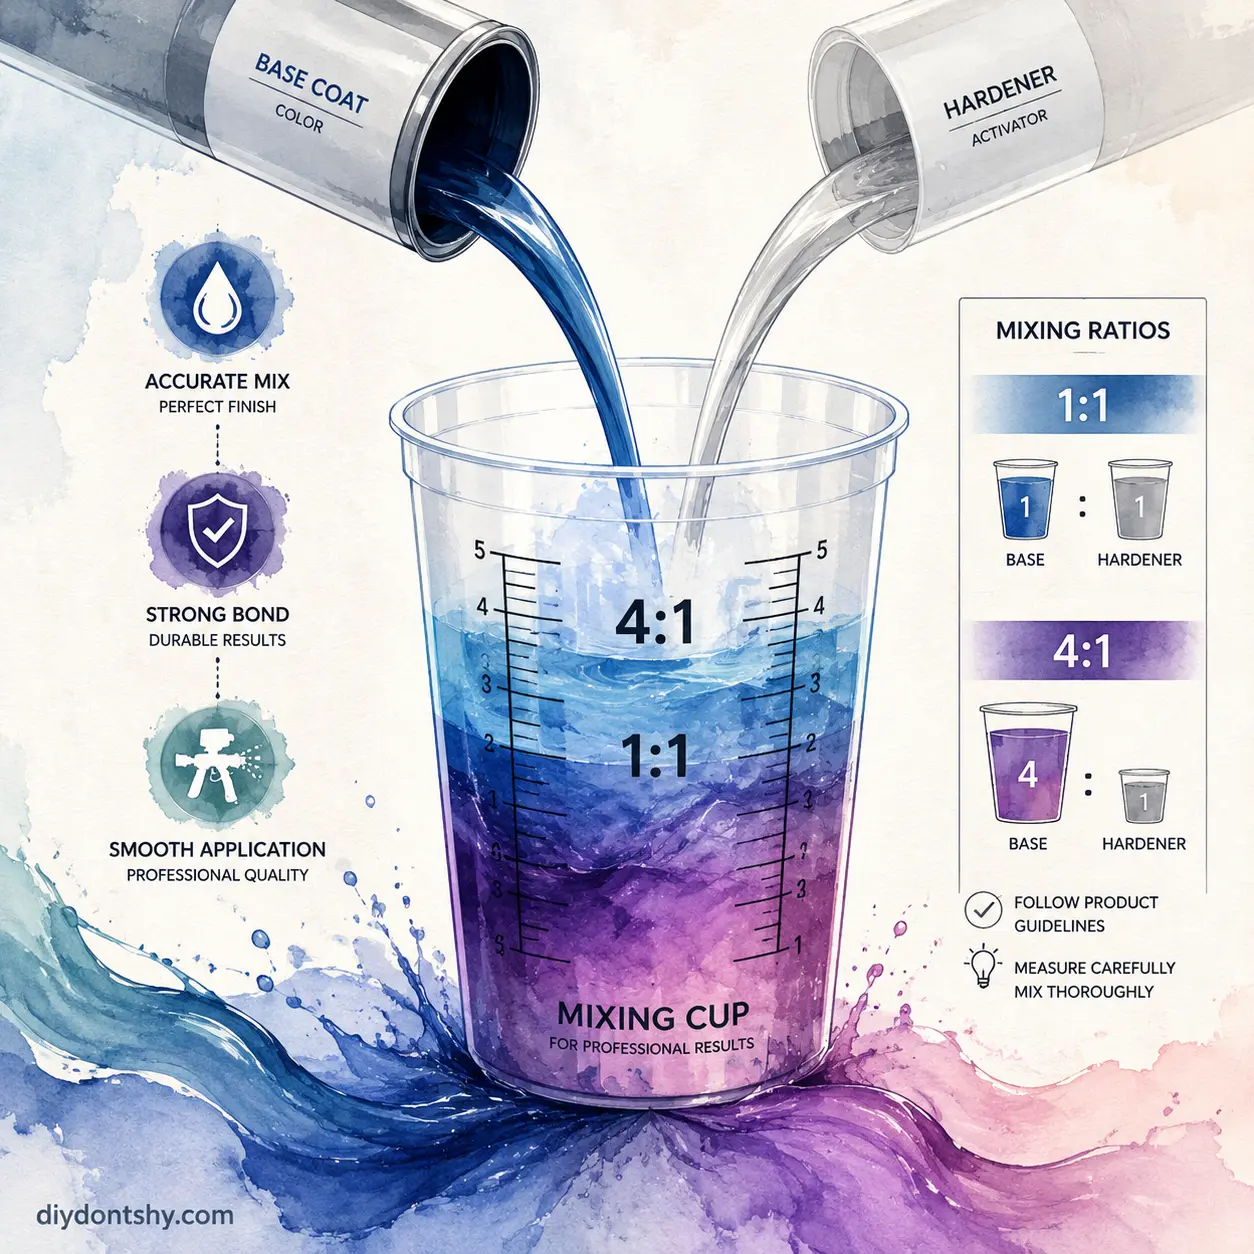
A paint mixing cup is more than just a plastic container. Think of it like a recipe guide printed directly onto your measuring tool. Instead of grabbing separate measuring spoons, scales, or guesswork containers, the cup itself provides ratio markings that help you mix paint components accurately. These cups are especially common in automotive painting, where paint systems often require combinations of paint, hardener, activator, reducer, or thinner in exact proportions. Industry guides consistently emphasize that paint is rarely sprayed straight from the can because additives are necessary for proper flow, curing, and durability.
Most paint cups include ratio systems like 1:1, 2:1, 4:1, or 8:1:1 printed along the sides. These numbers represent “parts,” not ounces or milliliters. That distinction trips up a lot of beginners. A 4:1 ratio simply means four equal parts paint and one equal part hardener. It doesn’t matter whether your “part” is a tablespoon, ounce, or liter. The relationship between the ingredients is what matters.
Professional painters rely heavily on these cups because consistency matters enormously in finishing work. Imagine baking bread and randomly doubling the yeast while keeping everything else the same. The result becomes unpredictable. Paint behaves the same way. Too much hardener can cause brittleness or cracking, while too little reducer may leave the finish thick and textured like orange peel. Using a proper mixing cup eliminates much of that uncertainty and creates repeatable results from project to project.
Why Professionals Rely on Mixing Ratios
Experienced painters treat mixing ratios almost like chemistry formulas because, in many ways, that’s exactly what they are. Modern coatings contain reactive ingredients engineered to work within precise ranges. Automotive refinishing systems, for example, often depend on carefully balanced chemical reactions to harden correctly and bond to surfaces.
Consistency is the biggest reason professionals stick rigidly to recommended ratios. If you spray one coat mixed properly and another mixed too thin, the final surface may dry unevenly or display noticeable color variation. Commercial body shops avoid this by standardizing every measurement. Some even use digital scales alongside mixing cups to eliminate human error completely. Reddit discussions among auto painters regularly point out that even slight inaccuracies can affect catalyzing and long-term durability.
Another important reason is efficiency. Properly mixed paint flows through spray equipment more smoothly, atomizes correctly, and reduces wasted material. A painter who consistently mixes accurately spends less time sanding out defects or repainting damaged areas. Over time, that saves enormous labor costs and frustration.
Common Paint Components Inside the Cup
Most paint systems contain at least two ingredients, though some include three or four. The main component is obviously the paint itself, which carries pigment and binder materials. Then comes the hardener or activator, which chemically reacts with the paint to cure it. Reducers or thinners adjust viscosity so the paint sprays evenly through a gun or spreads smoothly with a brush.
Here’s a quick comparison table showing typical paint components:
| Component | Purpose | Common Problem if Incorrect |
|---|---|---|
| Paint/Base | Provides color and coverage | Weak coverage or color inconsistency |
| Hardener/Activator | Triggers curing process | Cracking or soft finish |
| Reducer/Thinner | Adjusts spray viscosity | Runs, drips, or orange peel |
| Additives | Enhance flexibility or drying | Uneven texture |
Understanding what each ingredient does makes reading paint ratios much easier. Instead of seeing confusing numbers, you begin seeing a balanced system where every ingredient has a job.
Why Accurate Paint Ratios Matter Before You Begin
The difference between a flawless finish and a ruined paint job often comes down to a few milliliters of material. That sounds dramatic, but it’s true. Paint systems are engineered with very narrow tolerance windows, especially in automotive and industrial applications. Recent technical resources emphasize that inaccurate ratios can cause improper curing, weak adhesion, fading, cracking, and inconsistent gloss levels.
Think about making coffee. Too much water makes it weak and bland. Too little water makes it overpowering and bitter. Paint behaves similarly, except the consequences cost far more than a disappointing cup of coffee. If the mixture is too thick, the paint may spray poorly, leaving a textured finish. If it’s too thin, it may sag or run down the surface before drying.
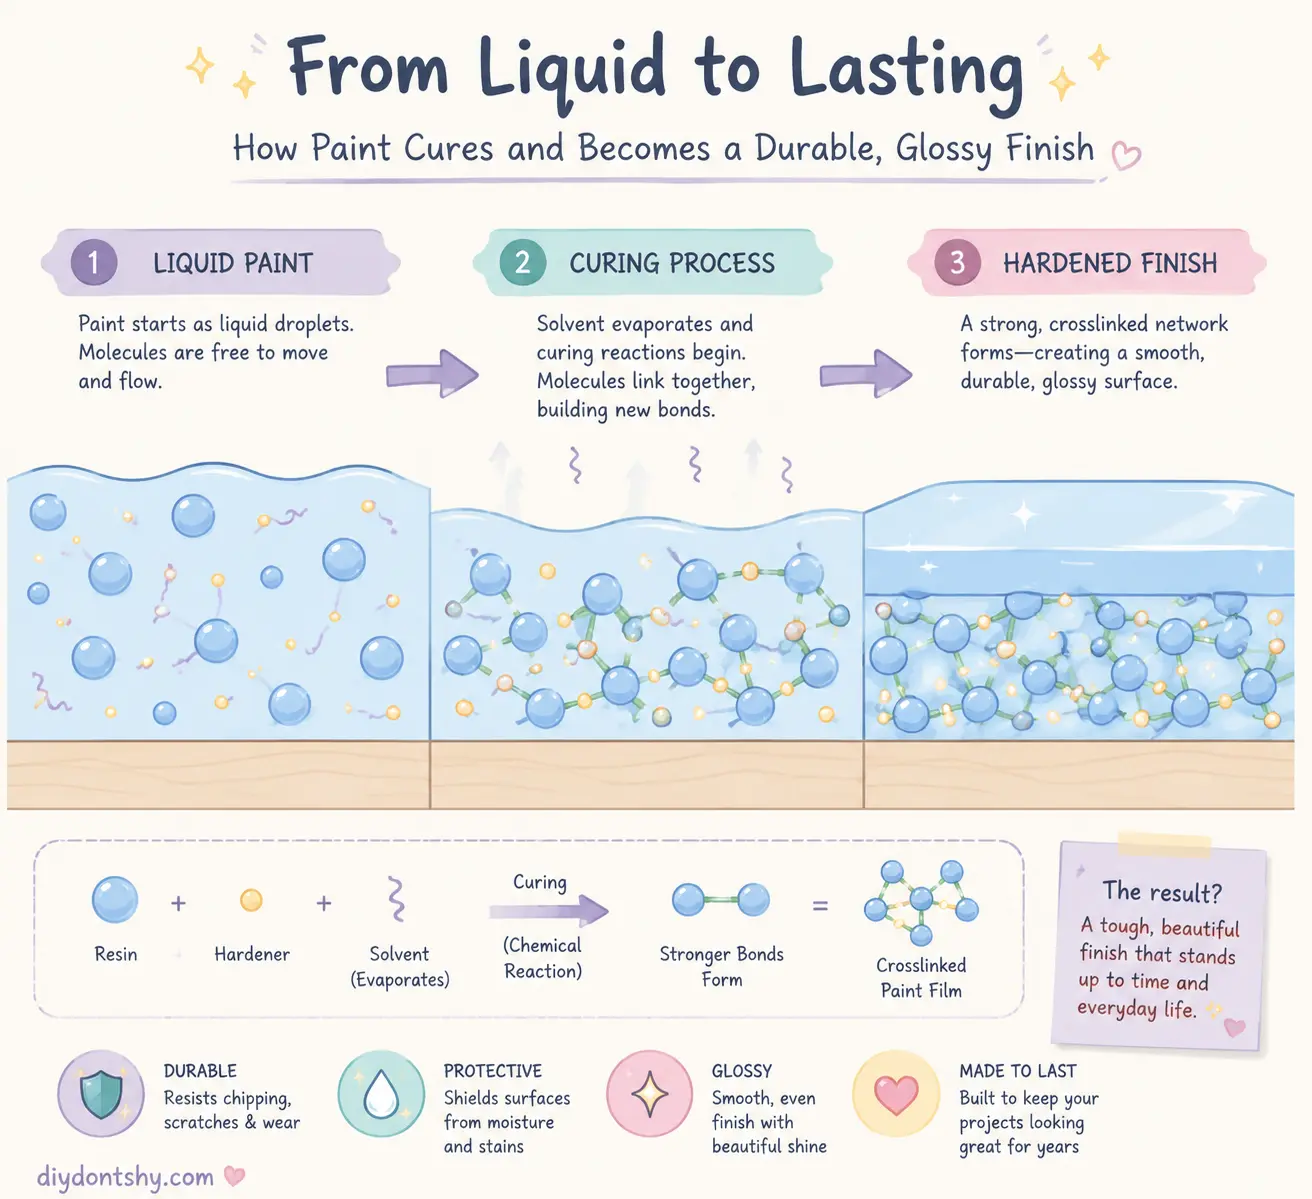
Accurate mixing also affects drying time. Many beginners assume paint simply “air dries,” but modern two-component coatings rely on chemical reactions. The hardener activates molecules inside the paint so they cross-link into a durable surface. Too little hardener means incomplete curing. Too much can speed up the reaction too aggressively, leading to brittleness or cracking later.
Professional painters know that fixing bad paint is significantly harder than mixing it correctly the first time. Sanding, stripping, and repainting consume time, materials, and patience. Spending an extra minute reading ratio marks carefully is much cheaper than repainting an entire panel or project.
How Incorrect Ratios Affect Paint Performance
When ratios are wrong, paint performance suffers almost immediately. One of the most common issues is poor adhesion. Paint that doesn’t bond properly may peel or chip after only a short period of use. Automotive refinishing experts warn that even small deviations can compromise durability and gloss.
Another major issue is texture inconsistency. Paint that’s too thick can create heavy orange peel effects, while overly reduced paint may become watery and uneven. The finish might look acceptable initially but deteriorate rapidly under sunlight, moisture, or temperature changes.
Color inconsistency is another overlooked problem. When paint viscosity changes, pigments may settle differently during spraying, causing subtle shade differences between coats. That’s especially noticeable in metallic paints where flake orientation matters greatly.
The Science Behind Paint Curing
Modern paint systems are essentially controlled chemical reactions. When you add hardener to paint, molecules begin linking together to form a hardened coating. That process depends heavily on balance. If the chemistry becomes unstable, the coating weakens.
Environmental factors also play a role. Some painters reduce thinner amounts in humid conditions to prevent excessive runs, while colder temperatures sometimes require slight hardener adjustments. Community discussions among professional painters frequently mention temperature and humidity as major variables affecting results.
The takeaway is simple: accurate ratios aren’t about perfectionism. They’re about giving the paint the conditions it needs to perform properly.
Reading Measurement Marks Without Confusion
The markings on a paint mixing cup can look intimidating at first glance. There are lines everywhere, numbers stacked vertically, and multiple ratio scales printed side by side. For beginners, it can feel like trying to read a map in another language. The good news is that once you understand the system, it becomes surprisingly simple.
Most cups organize measurements by ratio columns. If your paint requires a 4:1:1 mixture, you’ll locate the corresponding scale labeled 4:1:1 on the cup. You first pour paint to the desired number on the paint column, then add hardener until the next level, followed by reducer to the final level. Industry guides consistently explain that these markings represent proportional “parts,” not absolute measurements.
One common beginner mistake is mixing ingredients within the same column instead of progressing across columns. Reddit users discussing paint cup confusion repeatedly point out that each column represents the next stage in the ratio sequence.
Understanding Ratio Numbers Like 4:1:1
A ratio like 4:1:1 means four parts paint, one part hardener, and one part reducer. If you pour paint to the “4” mark, you then add hardener until the liquid reaches the next designated “1” line. Finally, reducer is added until the final line.
Here’s a simple reference table:
| Ratio | Meaning |
|---|---|
| 1:1 | Equal parts paint and reducer |
| 2:1 | Two parts paint, one part hardener |
| 4:1:1 | Four parts paint, one hardener, one reducer |
| 8:1:1 | Eight parts paint, one hardener, one thinner |
Once you understand that the lines represent progression rather than isolated measurements, the system becomes much easier to follow.
Avoiding Common Measurement Errors
One of the biggest errors painters make is eyeballing measurements instead of reading the markings directly. Paint systems are far less forgiving than many people expect. Even slight inaccuracies can affect viscosity and curing.
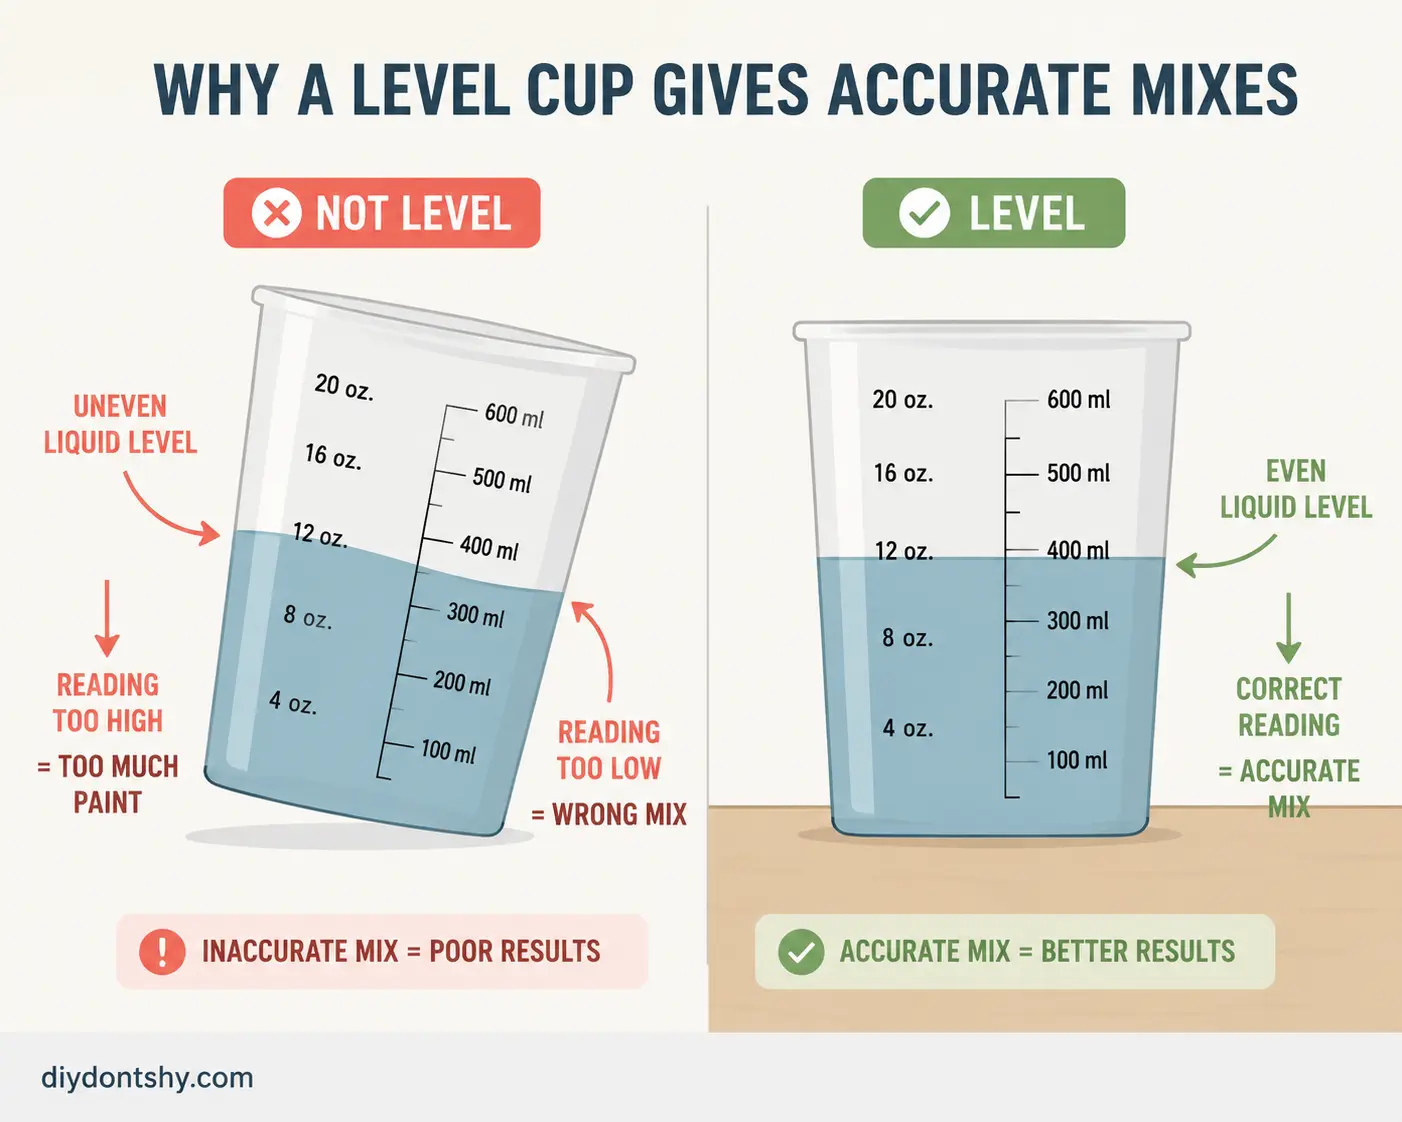
Another mistake is holding the cup at an angle while pouring. That distorts liquid levels and creates inaccurate readings. Many technical guides specifically recommend placing the cup on a flat surface before measuring.
Why Flat Surfaces Matter During Measuring
A tilted cup changes the liquid level visually, which means you might accidentally add too much reducer or hardener. Imagine trying to measure water in a crooked measuring cup while baking a cake. The result becomes unreliable instantly.
Flat surfaces also improve visibility. When the cup is stable, you can read the markings more clearly and pour more precisely. Professional painters often pour slowly near the target line to avoid overshooting the measurement.
Mixing Paint, Hardener, and Reducer the Right Way
The actual mixing process is where theory turns into action. This is the moment when careful measuring pays off. Rushing through it almost always creates problems later, whether that means poor spraying, uneven color, or paint that refuses to cure correctly.
Start by reading the manufacturer’s instructions completely. This step sounds obvious, but many people skip it. Different products use different ratios, and some even reverse the ingredient order. Technical guides warn that certain systems list ratios as Paint:Reducer:Hardener instead of Paint:Hardener:Reducer.
Once you know the required ratio, place your mixing cup on a flat surface and locate the matching scale. Pour the paint first because it usually forms the largest portion of the mixture. Add hardener next, then reducer if needed. After measuring everything accurately, stir thoroughly for several minutes until the consistency becomes completely uniform.
Step-by-Step Paint Mixing Process
Here’s a simplified process professionals commonly follow:
- Read the paint technical data sheet.
- Select the correct ratio scale on the cup.
- Pour paint to the target line.
- Add hardener to the next ratio line.
- Add reducer or thinner if required.
- Stir slowly but thoroughly.
- Allow induction time if specified.
This sequence keeps the chemistry balanced and prevents incomplete mixing.
Choosing the Correct Mixing Sequence
Order matters more than beginners realize. Adding reducer before hardener, for example, can affect how ingredients combine. Many manufacturers specify an exact order because certain chemicals need to blend sequentially for best results.
Painters also need to consider working time. Once hardener activates the paint, the clock starts ticking. Some products remain usable for only 30–60 minutes before thickening.
Preventing Air Bubbles While Stirring Materials Together
Air bubbles are sneaky little troublemakers. They may seem harmless inside the cup, but once sprayed, they can create pinholes, texture defects, or weak spots in the finish. Preventing them starts with how you stir the paint.
A lot of beginners stir aggressively like they’re whisking cake batter. That approach traps air into the mixture. Instead, professionals use slow, deliberate motions that fold the materials together smoothly. Think of it like gently blending cream into coffee rather than shaking a soda bottle.
Paint experts also recommend using clean stir sticks and avoiding rapid circular whipping motions. The goal is consistency, not speed. If bubbles appear, allowing the mixture to rest briefly can help trapped air escape before spraying.
Stirring Techniques That Protect Paint Quality
The best technique is slow scraping and folding. Drag the stir stick along the cup walls and bottom to ensure all materials combine evenly. Pay close attention to thicker pigments that may settle near the base.
Another helpful habit is avoiding overmixing. Once the paint becomes uniform in color and texture, stop stirring. Endless mixing only increases air contamination risk.
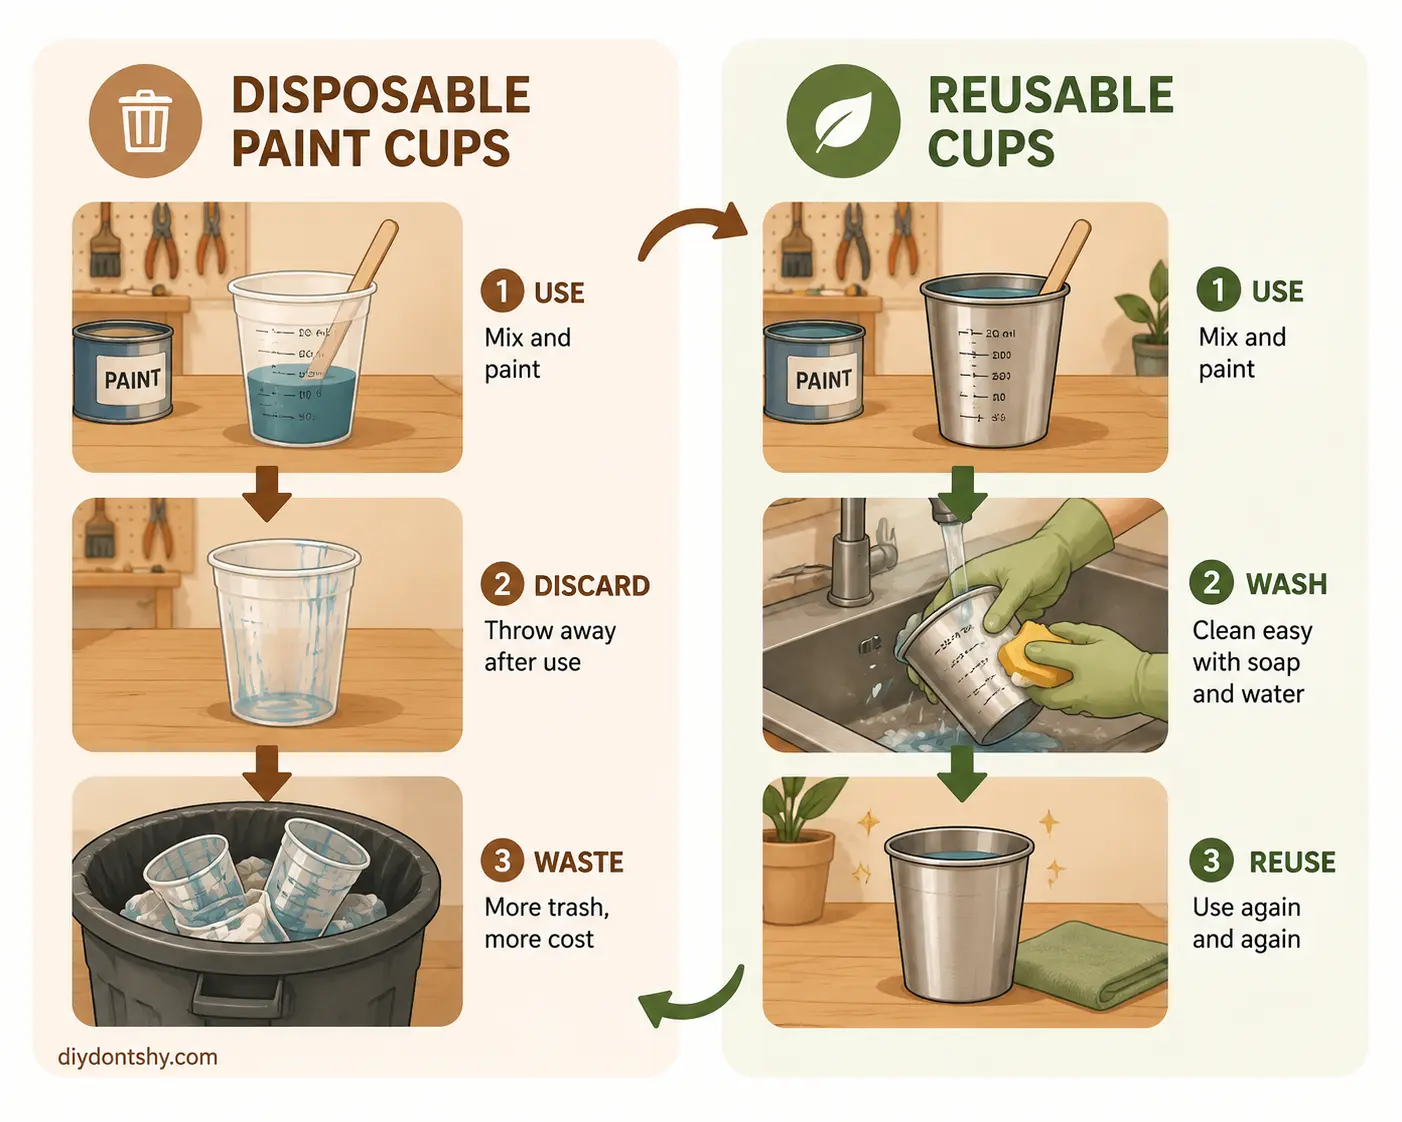
Disposable Versus Reusable Cups and When to Use Each
Paint mixing cups generally come in two categories: disposable and reusable. Both have advantages, and the right choice depends on the type of project, budget, and frequency of use.
Disposable cups dominate professional automotive shops because they save enormous cleanup time. Modern disposable systems often include multiple ratio scales, ounce markings, and milliliter guides directly on the cup. Manufacturers highlight reduced contamination and faster workflow as major advantages.
Reusable cups, on the other hand, make sense for painters working regularly on smaller projects or using water-based materials. They’re sturdier and more environmentally friendly when cleaned properly.
Advantages of Disposable Mixing Cups
Disposable cups are convenient because they eliminate cleanup almost entirely. Once the paint is mixed and used, the cup gets discarded. That reduces cross-contamination risk dramatically, especially when switching colors frequently.
Another advantage is chemical resistance. High-quality disposable cups are designed specifically to withstand solvents and aggressive automotive coatings without warping or dissolving.
When Reusable Cups Make More Sense
Reusable cups work well for hobby painters, woodworkers, or anyone using less aggressive materials. Over time, they can reduce waste and lower long-term costs.
The downside is maintenance. Residual paint left inside reusable containers can contaminate future batches if cleaning isn’t thorough.
Common Mixing Mistakes That Affect Paint Performance
Even experienced painters occasionally make mixing mistakes. The difference is that professionals usually catch problems early before spraying begins. Beginners often discover errors only after the finish dries badly.
One common issue is over-thinning. People assume thinner paint sprays more smoothly, but excessive reducer weakens coverage and increases running. Another frequent problem is under-catalyzing, where insufficient hardener prevents proper curing.
Community discussions among painters frequently mention confusion over ratios and percentages, especially when reading unfamiliar cup markings.
Over-Thinning and Under-Catalyzing
Over-thinned paint may appear glossy initially but often lacks durability. It can shrink excessively while drying and expose sanding scratches underneath.
Under-catalyzed paint creates even bigger headaches. The surface may remain soft, tacky, or vulnerable to chemicals long after application.
Ignoring Temperature and Humidity
Environmental conditions change paint behavior dramatically. Hot temperatures speed evaporation, while humidity affects drying consistency. Technical resources note that painters sometimes adjust reducer levels slightly depending on climate conditions.
Ignoring these factors can cause runs, dry spray, or poor gloss development.
Cleaning Up Safely After the Paint Is Mixed
Cleanup is the part everyone wants to skip, but it’s one of the most important safety steps in the entire process. Paint materials often contain solvents and chemicals that require careful handling.
Start by sealing unused materials immediately. Leaving hardeners or reducers exposed allows contamination and evaporation. Disposable cups should be discarded according to local hazardous waste guidelines, especially if they contain solvent-based residues.
Reusable cups need thorough cleaning with the correct solvent before paint cures inside them. Once hardened, many coatings become extremely difficult to remove.
Safe Disposal and Solvent Handling
Always wear gloves when handling solvents because many chemicals absorb through skin contact. Good ventilation is equally important since fumes can build quickly indoors.
Avoid pouring leftover paint directly into drains. Many coatings contain hazardous compounds that require designated disposal methods.
Tips for Consistent Color and Texture Every Time
Consistency separates amateur paint jobs from professional-looking finishes. The secret isn’t expensive equipment alone. It’s repeatable habits.
Start by always using the same measuring method. If you switch between guessing, cups, and random containers, consistency disappears immediately. Professional painters often keep written notes about ratios, temperatures, and spray settings for future reference.
Another valuable habit is mixing slightly more paint than needed. Running out halfway through a panel forces you to remix another batch, which can create subtle color differences.
Professional Habits That Improve Results
Some of the best painter habits are surprisingly simple:
- Strain paint before spraying
- Use fresh stir sticks
- Label mixed materials
- Keep cups clean and dry
- Follow technical data sheets precisely
Small habits compound into dramatically better finishes over time.
Conclusion
Learning how to use a paint mixing cup properly is one of the most valuable skills any painter can develop. It might seem like a small detail compared to spray guns or paint brands, but accurate mixing controls nearly every aspect of the final finish. From curing strength and gloss retention to texture and durability, the ratio inside that little cup determines whether your project succeeds or fails.
The good news is that mastering paint mixing doesn’t require years of experience. Once you understand how ratio markings work, how environmental conditions affect materials, and why accurate measurements matter, the process becomes much more intuitive. A paint mixing cup stops looking like a confusing chemistry tool and starts feeling like a roadmap toward predictable, professional-quality results.
Whether you’re restoring a car, refinishing furniture, or handling industrial coatings, patience during mixing always pays off. Slow measuring, careful stirring, and attention to detail create smoother finishes, stronger adhesion, and more consistent color every single time.
FAQs
1. What does a 4:1 paint mixing ratio mean?
A 4:1 ratio means four parts paint and one part hardener or activator. The “parts” can represent any measurement unit as long as both ingredients use the same scale.
2. Can I mix paint without a mixing cup?
Yes, but it’s much harder to achieve accurate ratios consistently. Mixing cups simplify measurements and reduce mistakes significantly.
3. Why is my paint bubbling after mixing?
Bubbles usually form from aggressive stirring or trapped air. Stir slowly and allow the mixture to rest briefly before spraying.
4. Are disposable paint cups better than reusable ones?
Disposable cups are faster and reduce contamination risk, while reusable cups save money and reduce waste when cleaned properly.
5. How long can mixed paint sit before use?
It depends on the product. Many catalyzed paints remain usable for 30 minutes to several hours after mixing. Always check the manufacturer’s technical data sheet.

Kareem Sallam is an Egyptian special writer based in Australia, with a strong interest in practical ideas and creative content that focuses on everyday solutions. He writes clear, engaging articles designed to be easy to follow and useful for a wide range of readers.
His work centers on DIY projects, handmade ideas, simple crafts, and home based creativity. Kareem aims to deliver content that is practical, inspiring, and accessible, helping readers turn simple materials into smart and enjoyable projects.


