How to Get Spray Paint to Dry Faster in Any Weather
Spray paint feels almost magical when it works properly. A dull chair becomes glossy and modern. An old bike frame suddenly looks brand-new. A rusty metal shelf transforms into something you actually want to display. But then comes the frustrating part: waiting for the paint to dry. And sometimes it just…doesn’t. Hours later, the surface still feels tacky, fingerprints appear out of nowhere, and dust sticks like glue. If you have ever stood over a freshly painted project wondering why it refuses to cure, you are definitely not alone.
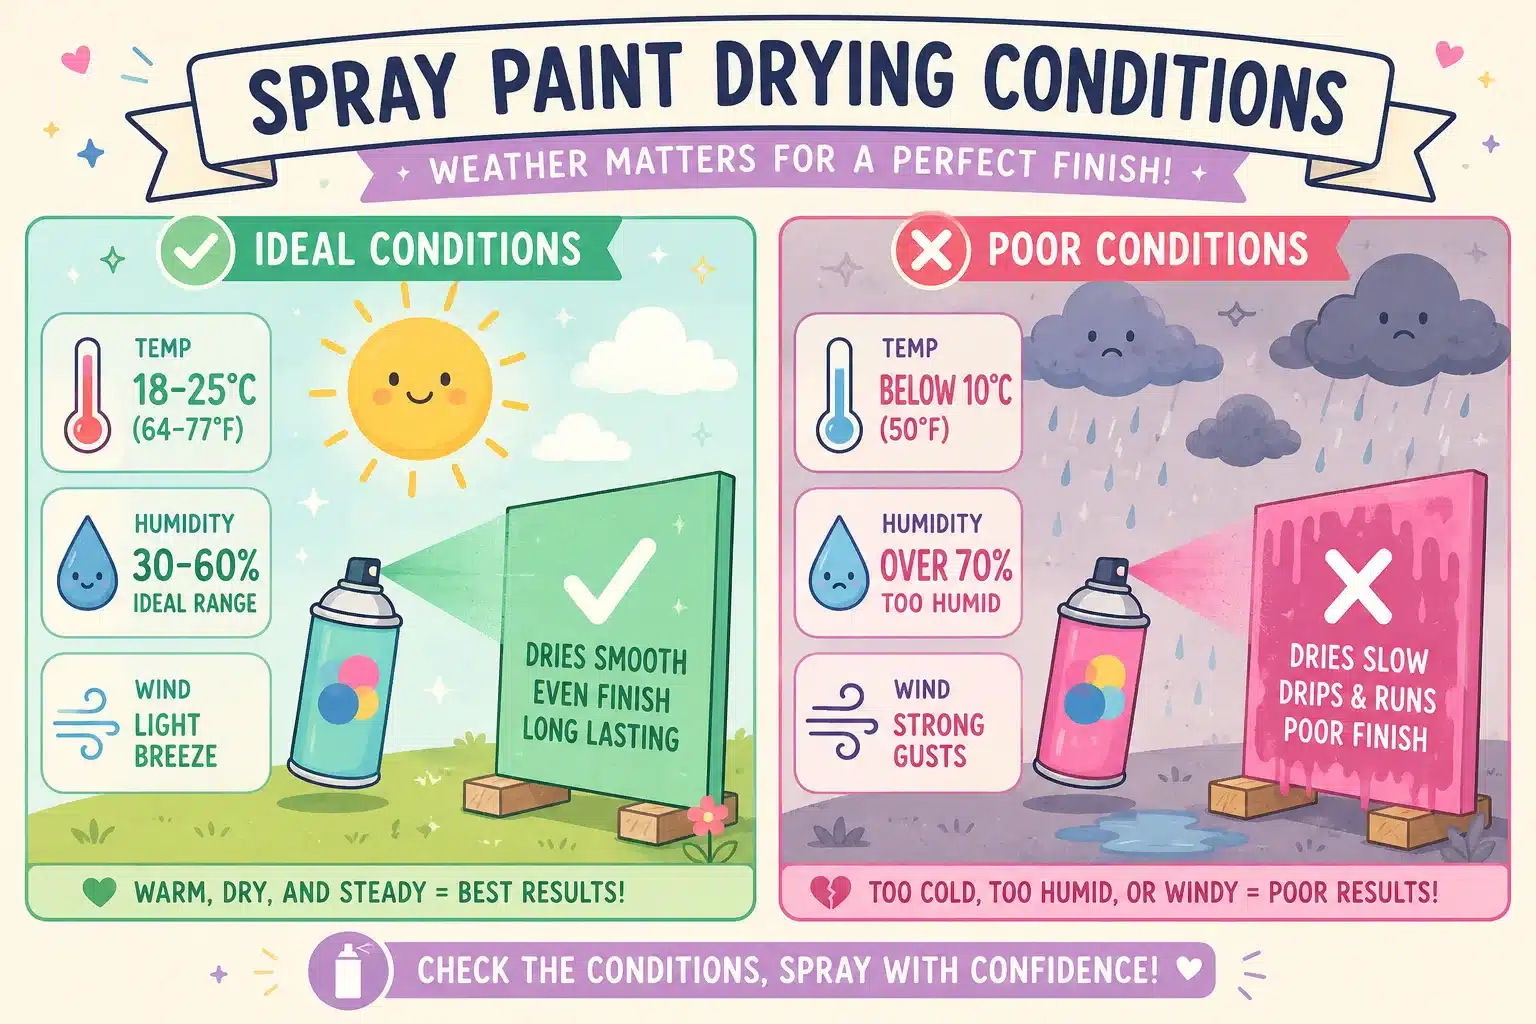
The truth is that spray paint drying time depends heavily on airflow, temperature, humidity, and application technique. Even expensive paint can fail when environmental conditions are wrong. Recent industry guidance suggests that most spray paints perform best between 65°F and 85°F (18°C–29°C) with humidity levels below 65%. When those conditions drift too far in either direction, drying slows dramatically and finishes become vulnerable to bubbling, wrinkling, or staying sticky for days.
A lot of people think heat alone solves everything. That is only partly true. Spray paint dries through solvent evaporation and chemical curing, almost like bread baking from the outside inward. If the surface dries too fast while the lower layers remain wet, you trap solvents underneath. That creates the dreaded sticky finish. Getting paint to dry faster is really about creating balanced conditions where evaporation happens evenly and consistently.
This guide breaks down exactly how to speed up spray paint drying safely without ruining the finish. You will learn how airflow works, why humidity matters more than many people realize, how to apply coats correctly, and how to know when paint is truly cured rather than merely dry to the touch.
Contents
Understanding How Spray Paint Dries
Spray paint drying is more complex than most people assume. At first glance, it seems simple: spray the surface, wait a while, and you are done. But underneath that glossy layer, several chemical processes are happening simultaneously. Solvents evaporate, binders harden, and pigments lock together into a durable film. This process can happen quickly under ideal conditions or drag on endlessly when conditions are poor.
One of the biggest misunderstandings is confusing drying with curing. Paint can feel dry on the surface within minutes while remaining soft underneath for days. According to recent paint industry guidance, spray paint often becomes touch-dry in as little as 15 to 60 minutes, but full curing can take anywhere from 24 hours to several weeks depending on paint type and environmental conditions. That means a project may appear finished long before it is actually durable.
Think of spray paint like ice forming over a pond. The top layer hardens first while the deeper layers remain softer beneath. If you handle the object too soon, stack items on it, or expose it to moisture, the finish can become damaged even though it seemed dry moments earlier. This is why some people end up with fingerprints embedded permanently into their paint jobs.
Another major issue comes from poor evaporation conditions. Paint solvents need somewhere to go. If the surrounding air is humid, stagnant, or cold, those solvents linger instead of escaping efficiently. That slows the entire curing process dramatically. Reddit DIY communities regularly describe projects remaining tacky for a week or longer after painting in humid garages or cold winter weather.
Understanding these fundamentals changes how you approach drying. Instead of randomly adding heat or waiting endlessly, you can control the factors that genuinely matter.
Airflow Changes That Help Paint Cure More Quickly
Airflow is one of the most effective yet overlooked ways to accelerate spray paint drying. Most people focus only on temperature, but moving air often matters even more. Why? Because airflow carries evaporating solvents away from the painted surface. Without ventilation, those vapors hang around the object like fog, slowing evaporation and extending curing times.
Imagine trying to dry laundry in a sealed bathroom. Even with warmth, the moisture has nowhere to escape. Paint behaves similarly. Fresh air continuously removes moisture and solvents so the coating can harden properly. Experts consistently recommend strong but indirect airflow as one of the best ways to speed up drying.
That does not mean blasting paint with a fan at full power from six inches away. Direct airflow creates new problems. It can push dust into wet paint, create uneven drying, and even cause the surface to skin over too quickly while lower layers remain soft. When that happens, trapped solvents create wrinkles, bubbles, or sticky finishes that seem impossible to fix.
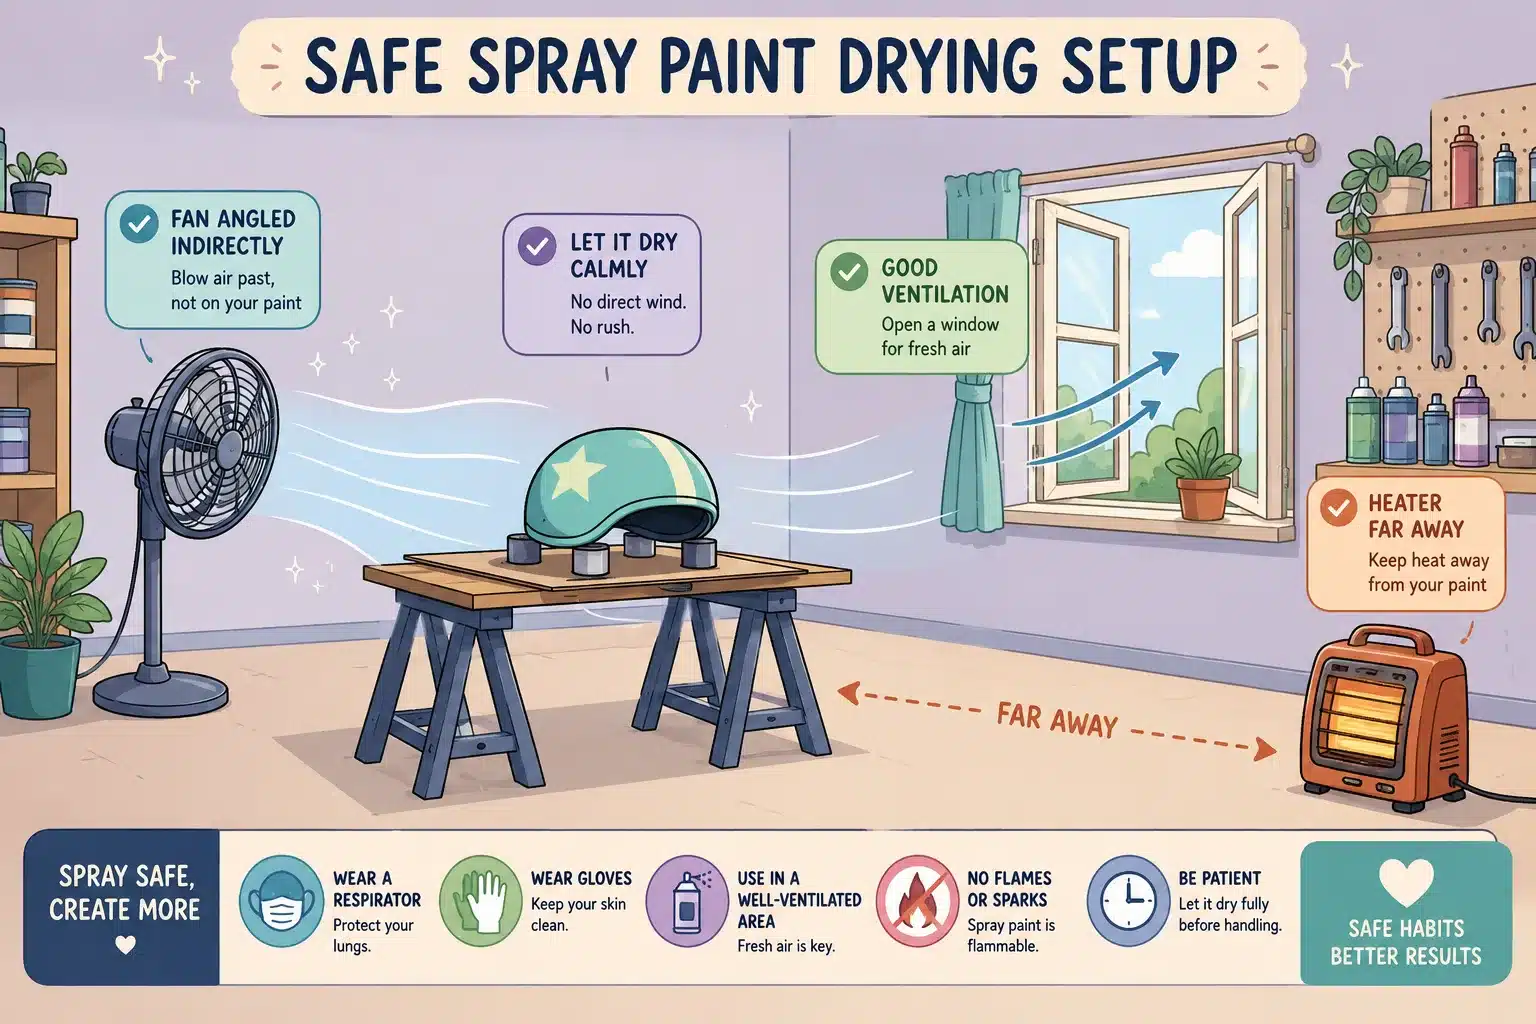
The ideal setup involves gentle, continuous airflow circulating around the object rather than directly at it. Open windows on opposite sides of a room help tremendously because they create cross-ventilation. In garages or workshops, placing a fan several feet away angled slightly beside the project works far better than aiming directly at the paint.
Common Fan Placement Mistakes
Many DIY painters unknowingly sabotage their own projects with poor fan positioning. Here are some of the biggest mistakes:
| Mistake | Why It Causes Problems |
|---|---|
| Pointing a fan directly at wet paint | Causes uneven drying and dust contamination |
| Using fans in dusty spaces | Blows particles into the finish |
| No ventilation exit | Solvents remain trapped in the room |
| Using extremely high speed airflow | Surface skins too quickly |
A Reddit user discussing stubborn enamel paint drying issues summed it up perfectly by saying, “Airflow dries better than heat ever will usually.” That advice lines up closely with professional painting practices.
Good airflow does more than speed up drying. It also improves finish quality. Paint levels more evenly, gloss becomes smoother, and the risk of cloudy moisture buildup decreases significantly.
Temperature and Humidity Conditions That Affect Drying
Temperature and humidity are the hidden forces controlling almost every spray paint result. You can use premium paint, perfect technique, and excellent ventilation, but if the environment is wrong, the finish may still fail. That is why professional painters constantly monitor weather conditions before spraying.
Most current spray paint guidance recommends temperatures between 65°F and 85°F (18°C–29°C) for ideal drying performance. Within that range, solvents evaporate at a controlled pace and coatings cure evenly. Below 50°F, drying slows dramatically and paint can remain tacky for days. Above 90°F, the opposite problem occurs: the surface dries too fast and traps solvents underneath.
Humidity is arguably even more important. High humidity means the surrounding air already contains a lot of moisture, making it harder for solvents and water-based compounds to evaporate. Experts generally recommend keeping humidity below 65%, with many professionals preferring 40–50% for optimal curing.
Painting outdoors on a muggy summer afternoon might feel warm enough, but the moisture content in the air can turn a quick-drying project into an all-day ordeal. Some sources note that humidity above 70% can double or even triple curing times.
Indoor vs Outdoor Drying Conditions
Indoor painting gives you more environmental control, but only if the space is ventilated correctly. Garages, basements, and workshops often trap humidity. Outdoor painting provides better airflow naturally, yet introduces wind, dust, pollen, and unpredictable weather.
Here is a quick comparison:
| Condition | Indoor Painting | Outdoor Painting |
|---|---|---|
| Temperature Control | Easier | Weather-dependent |
| Humidity Control | Possible with dehumidifier | Harder to manage |
| Dust Risk | Lower if cleaned | Higher |
| Airflow | Requires fans/windows | Usually natural |
| Rain Risk | Minimal | High |
A balanced environment matters more than extreme heat. Think of spray paint curing like cooking meat slowly and evenly. Too cold and it stays raw inside. Too hot and the outside burns before the center finishes.
Applying Thin Layers for Faster Results
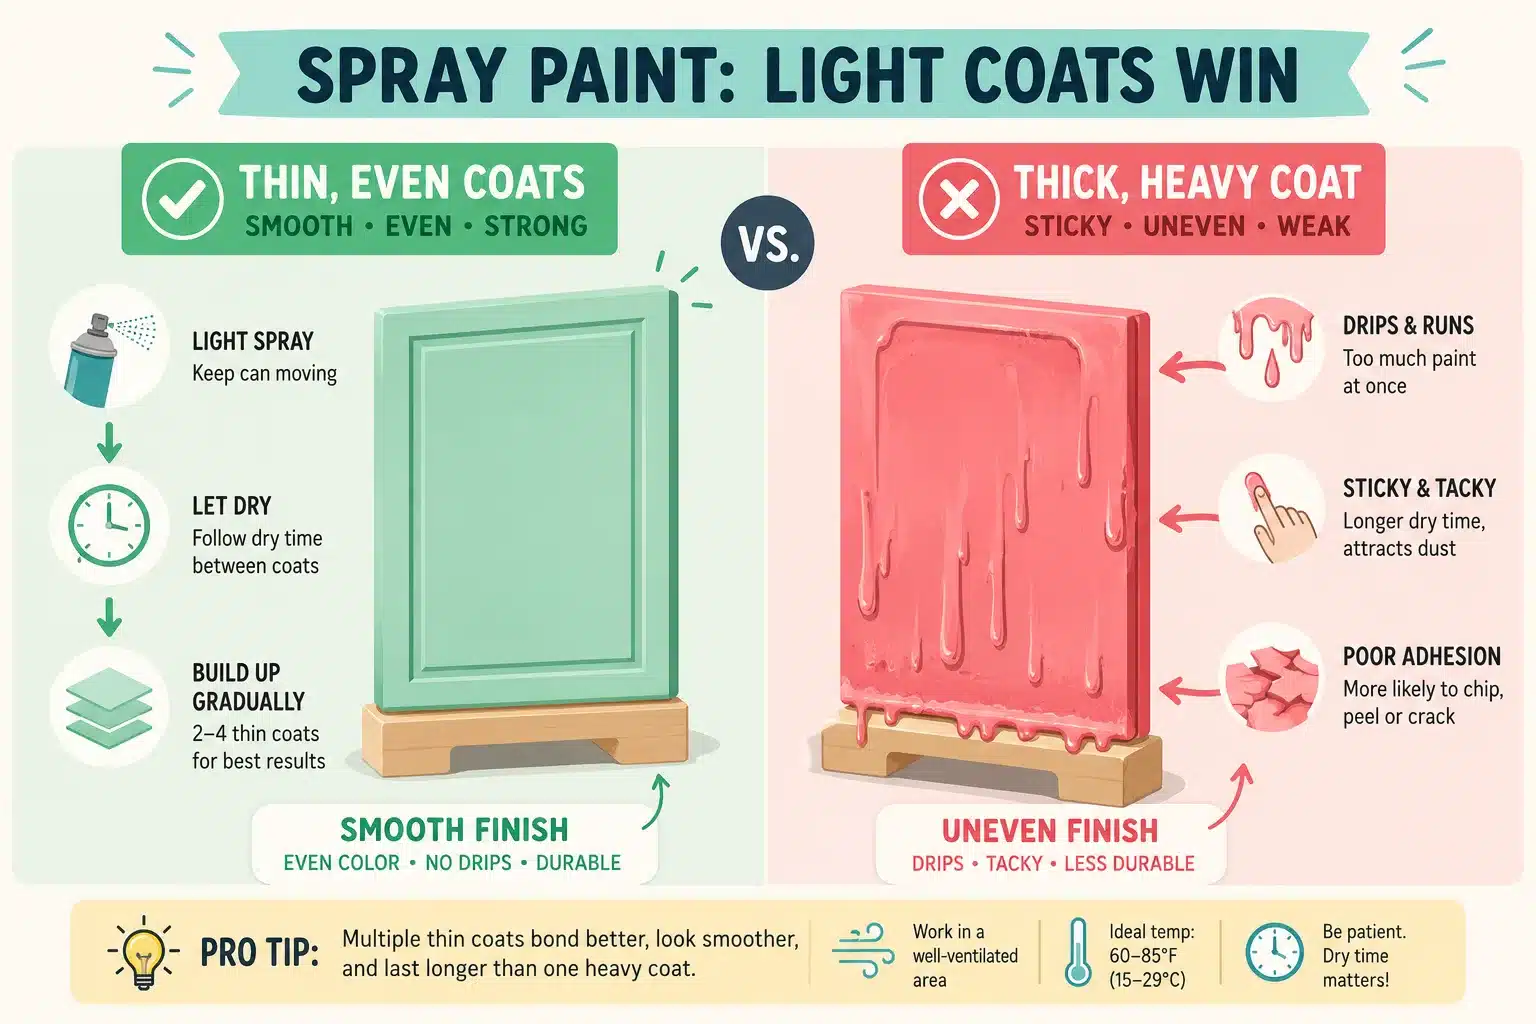
If there is one rule every spray painter should memorize, it is this: thin coats dry faster and look better. Heavy coats may seem faster because they cover more area immediately, but they almost always create longer drying times and more finishing problems.
Spray paint dries from the outside inward. Thin coats allow solvents to evaporate evenly across the entire layer. Heavy coats trap solvents underneath the top skin, slowing curing dramatically. Industry experts consistently warn that thick applications increase the risk of bubbling, sagging, wrinkling, and tackiness.
A good comparison is pouring pancake batter. A thin layer cooks quickly and evenly. A thick lump burns outside while remaining gooey inside. Spray paint behaves the same way. When painters overload a surface, the top hardens first while the deeper paint remains semi-liquid.
The best approach is using multiple light passes instead of one heavy spray. Hold the can roughly 10–12 inches away and move steadily across the surface. Recent guidance from paint specialists recommends smooth sweeping motions with overlapping passes rather than lingering in one area.
Best Spray Distance and Technique
Technique matters almost as much as environmental conditions. Here are the most effective habits for fast drying:
- Shake the can thoroughly before use
- Hold the can 10–12 inches away
- Start spraying slightly before the object
- Keep the can moving continuously
- Wait between thin coats instead of flooding the surface
Many beginners panic when the first coat looks semi-transparent. They immediately apply more paint, which creates the very problems they were trying to avoid. Patience produces smoother finishes and faster curing overall.
Professional painters often describe spray painting as building layers gradually, almost like icing a cake carefully instead of dumping frosting all at once. Thin coats provide control, consistency, and dramatically better durability.
Discover More: Easy Methods for How to Transfer Embroidery Pattern to Fabric
Why Heavy Coats Stay Sticky Longer
Heavy spray paint coats are one of the fastest ways to ruin a project. At first, they seem efficient. The color looks rich instantly, coverage appears complete, and you think you are saving time. But a few hours later the surface still feels rubbery, fingerprints appear easily, and dust sticks permanently. That sticky nightmare usually comes from trapped solvents.
When spray paint is applied too heavily, the outer layer dries first because it is exposed directly to air. Underneath, the deeper paint layers remain wet. Those trapped solvents struggle to evaporate through the hardened outer shell. This issue is sometimes called surface skinning, and it is one of the most common causes of prolonged tackiness.
The frustrating part is that thick paint may appear dry visually while remaining chemically unstable underneath. You touch it lightly and think everything is fine, but pressure leaves marks because the underlying layers are still soft.
Heavy coats also increase the chance of:
- Runs and drips
- Wrinkled textures
- Bubbling
- Orange peel texture
- Cracking during curing
Certain finishes make this even worse. Metallic paints, gloss paints, and enamel formulations tend to cure slower naturally. Some Reddit users reported metallic spray paints remaining fingerprint-sensitive for an entire week after overspraying.
The solution is usually not more heat. In fact, aggressive heating can harden the outer shell even faster, trapping solvents further. Better airflow and patience work much more effectively.
Signs you applied too much paint include glossy puddling, visible sagging, and paint that feels rubbery hours later. If that happens, resist the urge to keep touching the surface. Every fingerprint becomes a permanent texture mark while the paint remains soft.
Safe Ways to Use Fans or Heat Around Fresh Paint
People naturally reach for heaters, hair dryers, or heat guns when paint dries slowly. Sometimes that works. Sometimes it ruins the finish completely. The key is understanding how to use heat safely and moderately.
Gentle warmth can help accelerate evaporation. Recent paint guidance recommends slightly raising room temperatures when drying spray paint indoors. But extreme heat creates uneven curing and increases fire risks because spray paint vapors are highly flammable.
Space heaters can help if used correctly. Keep them several feet away from the project and avoid aiming concentrated heat directly at wet paint. Indirect room warming is safer and more effective than blasting hot air onto the surface itself.
Using Space Heaters Safely
Here are safe heating practices:
| Safe Practice | Why It Matters |
|---|---|
| Use indirect room heating | Prevents surface overheating |
| Keep heaters several feet away | Reduces fire hazards |
| Maintain ventilation | Prevents vapor buildup |
| Avoid open flames | Spray paint fumes are flammable |
Never place spray paint cans near heating elements. Reddit painters frequently warn against warming cans near exposed coils or flames because pressurized cans can become dangerous rapidly.
Can You Use a Hair Dryer or Heat Gun?
Hair dryers work better than heat guns because they produce gentler airflow. Even then, use the lowest heat setting and keep the dryer moving continuously. Holding hot air in one spot can soften paint unevenly and create bubbles.
Heat guns are usually too intense for fresh spray paint unless used by experienced professionals. They can scorch the surface while lower layers remain uncured.
Fans remain the safer and more reliable solution for most projects. Consistent airflow paired with moderate warmth creates balanced evaporation instead of forcing the surface to harden unnaturally fast.
Common Drying Mistakes That Ruin the Finish
Spray paint failures often come from surprisingly simple mistakes. The paint itself is not always the problem. Environmental conditions, impatience, and application habits usually cause more issues than brand quality.
One of the biggest mistakes is painting in cold or humid weather. Many DIY painters assume warm weather alone guarantees success, but humidity matters enormously. Paint experts warn that humidity above 70% can dramatically extend curing times and create cloudy or bubbling finishes.
Cold surfaces create another hidden problem. Even if the air feels warm enough, metal or plastic objects stored in garages can remain cold internally. Paint applied to cold surfaces cures unevenly and often stays tacky.
Touching paint too soon is another classic error. People test dryness repeatedly with fingertips, accidentally embedding oils and fingerprints into soft paint. Every touch interrupts the curing surface.
Other common mistakes include:
- Spraying too close to the object
- Applying second coats too early
- Ignoring manufacturer drying instructions
- Painting in dusty areas
- Using direct sunlight excessively
Direct sunlight deserves special mention. A little warmth helps, but intense sun can dry the surface too rapidly and create bubbling or cracks.
Another overlooked issue is impatience between coats. Thin layers need brief resting periods before recoating. Rushing this process overloads the surface and traps solvents beneath fresh paint.
Think of spray painting like building a brick wall. Each layer needs stability before the next goes on top. Stack everything too quickly and the entire structure weakens.
Knowing When Spray Paint Is Fully Cured
One of the most important skills in spray painting is recognizing the difference between touch dry, hard dry, and fully cured paint. Many ruined projects happen because people assume “dry enough to touch” means completely finished.
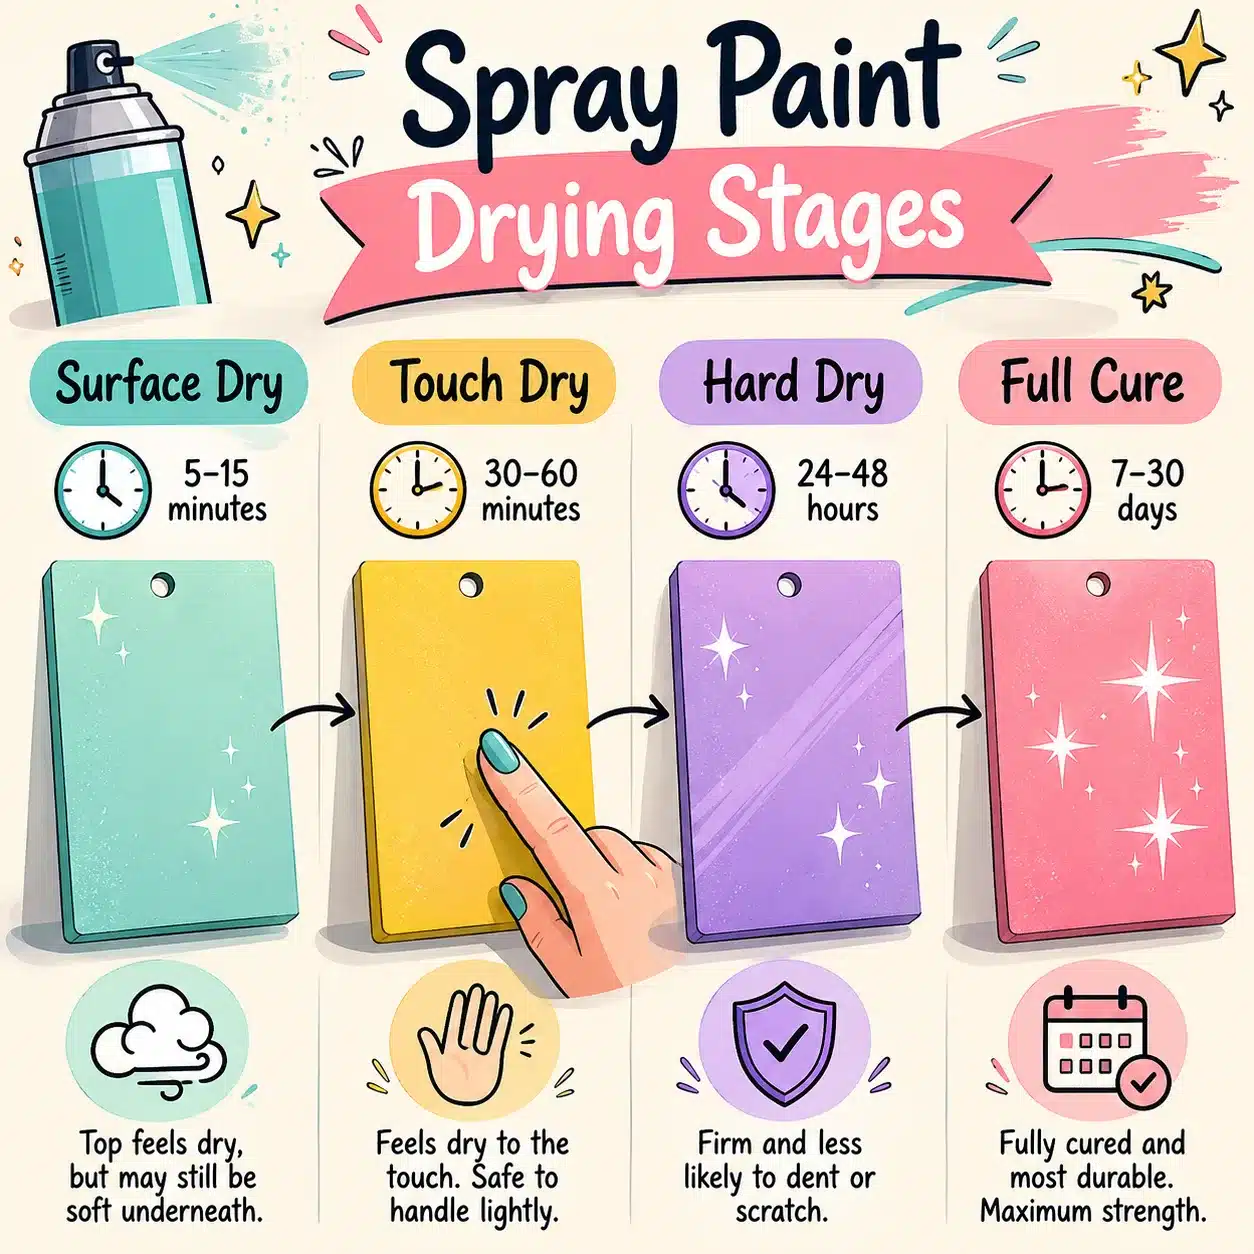
Recent spray paint guidance breaks drying into stages:
| Stage | Typical Time | What It Means |
|---|---|---|
| Surface Dry | 5–15 minutes | Top skin forms |
| Touch Dry | 15–60 minutes | Light touching possible |
| Hard Dry | 1–8 hours | Gentle handling safe |
| Full Cure | 24 hours–30 days | Maximum hardness reached |
Full curing is when the paint reaches maximum durability and chemical stability. Before that point, the surface remains vulnerable to scratches, pressure marks, tape damage, and sticking.
How to Test if Spray Paint Is Ready
There are several safe ways to test curing:
- Smell the surface closely; strong solvent odor usually means curing continues
- Press lightly with a fingernail in an inconspicuous spot
- Check whether the surface feels cool or rubbery
- Follow manufacturer timelines carefully
A fully cured surface should feel firm, smooth, and stable without fingerprints appearing under light pressure.
Temperature and humidity still influence curing long after the surface appears dry. Cold winter conditions can extend curing from days into weeks. Reddit users painting during winter frequently report needing one to two weeks for true hardness.
Patience matters here more than almost anything else. A rushed project often ends up needing sanding and repainting anyway.
Conclusion
Getting spray paint to dry faster is less about forcing the process and more about creating the right conditions for proper curing. Balanced airflow, moderate temperatures, low humidity, and thin coats all work together like ingredients in a recipe. Remove one element and the final result suffers.
The biggest lesson most DIY painters learn eventually is that heavy coats and impatience create nearly every major spray paint problem. Thin applications dry faster, cure more evenly, and produce smoother finishes with fewer defects. Good ventilation matters enormously because paint solvents need continuous airflow to escape properly.
Humidity also deserves far more attention than most beginners realize. Even warm weather can ruin a project if the air is saturated with moisture. A well-ventilated indoor setup with moderate warmth often produces better results than spraying outside on a humid day.
Safe drying practices matter too. Gentle airflow and indirect warmth outperform aggressive heating almost every time. Fans generally help more than excessive heat guns or intense sunlight.
When you understand how spray paint actually cures, the process becomes much less frustrating. Instead of guessing why paint remains sticky, you can control the variables directly and achieve smooth, durable finishes consistently.
Recommended Post: 51+ What to Write in a Sympathy Card Loss of Brother
FAQs
1. What is the fastest way to dry spray paint?
The fastest safe method is improving airflow with fans and ventilation while maintaining temperatures between 65°F and 85°F and keeping humidity low. Thin coats also dry much faster than heavy coats.
2. Can I use a fan to dry spray paint faster?
Yes, but indirect airflow works best. Pointing a fan directly at wet paint can push dust into the surface and create uneven drying.
3. Why is my spray paint still sticky after 24 hours?
Sticky paint usually comes from heavy coats, high humidity, poor ventilation, or cold temperatures. Trapped solvents underneath the surface layer can delay curing dramatically.
4. Does heat make spray paint dry faster?
Moderate warmth helps, but excessive heat can ruin the finish by causing bubbling or trapping solvents under the surface. Gentle room heating is safer than intense direct heat.
5. How long does spray paint take to fully cure?
Depending on paint type and environmental conditions, full curing can take anywhere from 24 hours to several weeks. Enamel and metallic paints often require longer curing periods.

Kareem Sallam is an Egyptian special writer based in Australia, with a strong interest in practical ideas and creative content that focuses on everyday solutions. He writes clear, engaging articles designed to be easy to follow and useful for a wide range of readers.
His work centers on DIY projects, handmade ideas, simple crafts, and home based creativity. Kareem aims to deliver content that is practical, inspiring, and accessible, helping readers turn simple materials into smart and enjoyable projects.